这篇文章主要讲解了“如何用ShardingSphere5.0.0-alpha实现mysql读写分离”,文中的讲解内容简单清晰,易于学习与理解,下面请大家跟着小编的思路慢慢深入,一起来研究和学习“如何用ShardingSphere5.0.0-alpha实现mysql读写分离”吧!
在前文搭建的 mysql 主从复制 (一主两从)基础上, 我们分别在三个 mysql 上创建了 1 个名为 miaosha的数据库, 每个数据库中都有 1 张用户表 user_info.
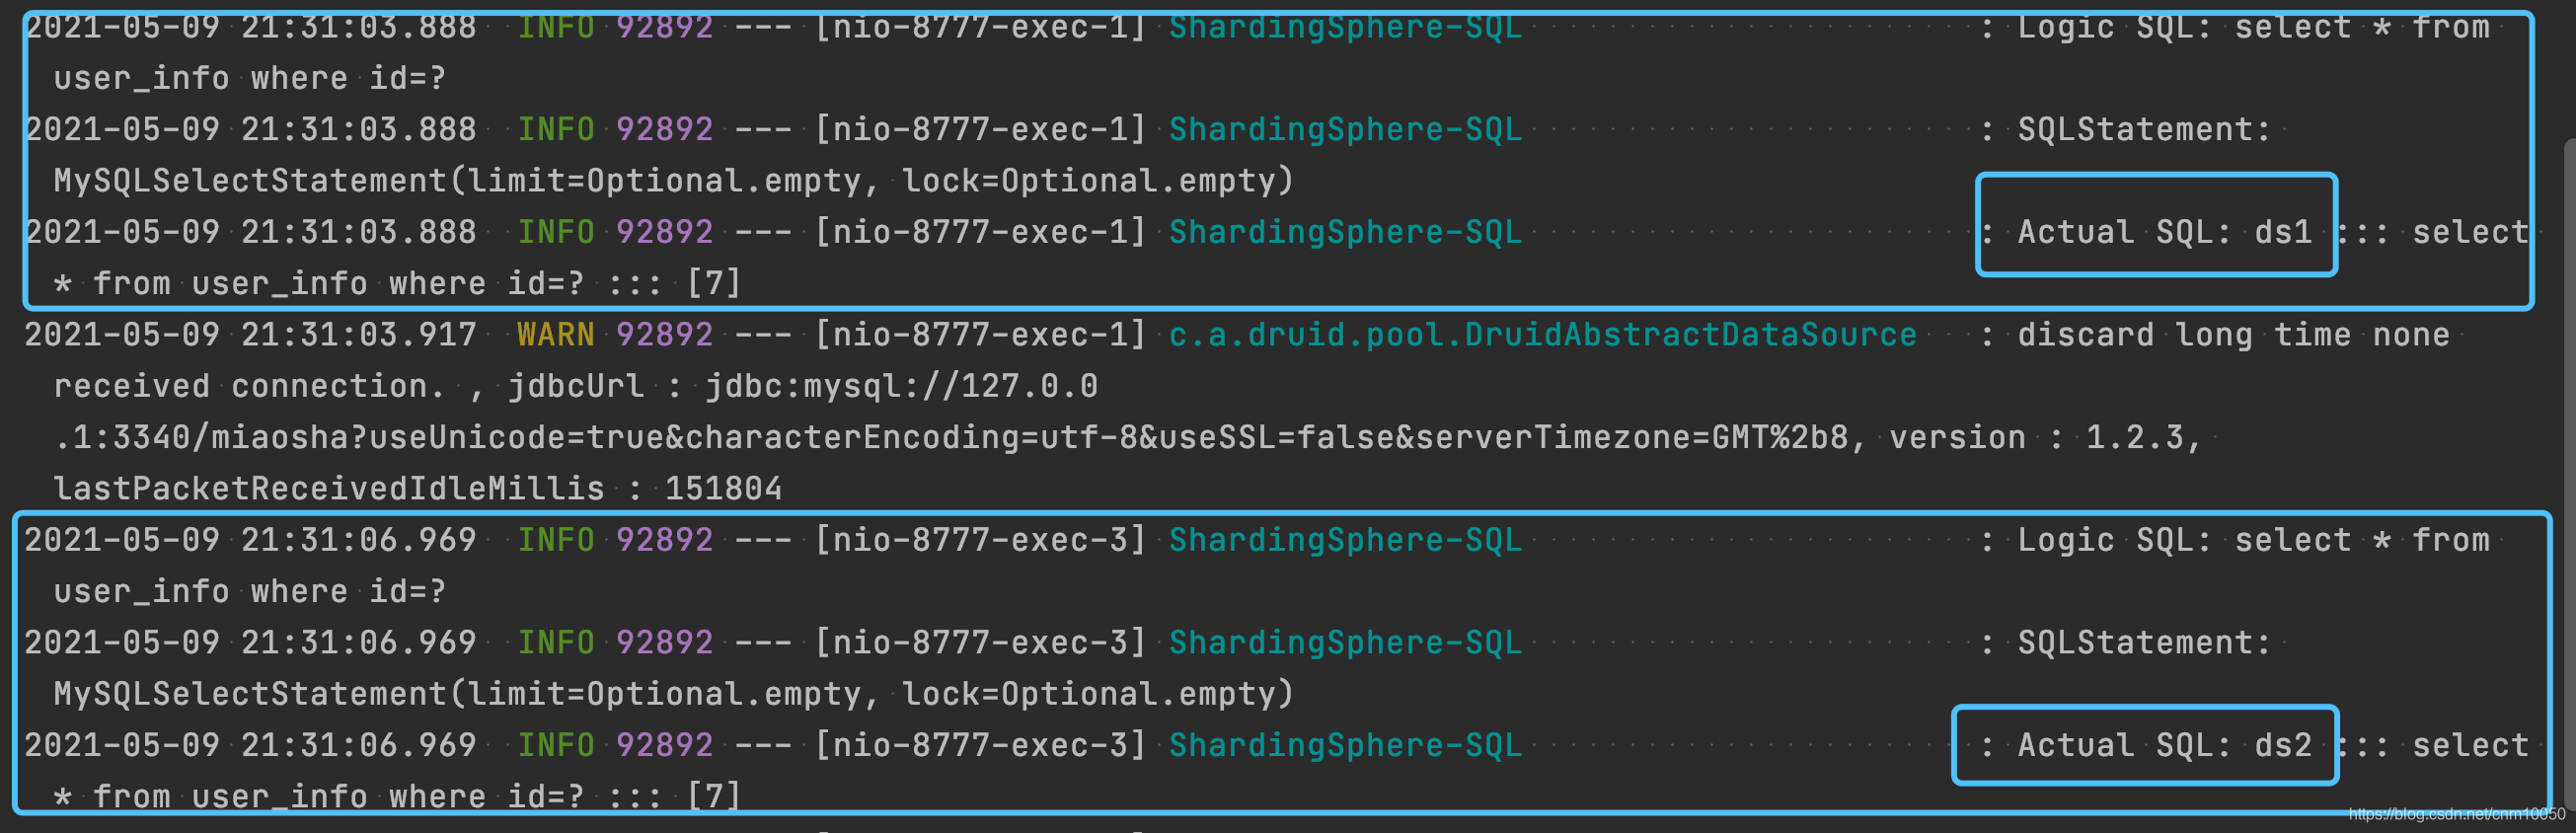
当我们插入数据时, 数据会先插入到主库, 然后会同步到两个从库上, 当我们查询数据时, 只会去两个从库上查询.
create database miaosha;

DROP TABLE IF EXISTS `miaosha`.`user_info`;
CREATE TABLE `miaosha`.`user_info`
(
    `id`         bigint(20)                    NOT NULL AUTO_INCREMENT,
    `user_label` varchar(32) COLLATE utf8_bin           DEFAULT NULL,
    `username`   varchar(64) COLLATE utf8_bin           DEFAULT NULL,
    `email`      varchar(64) COLLATE utf8_bin           DEFAULT NULL,
    `phone`      varchar(64) COLLATE utf8_bin           DEFAULT NULL,
    `password`   varchar(128) COLLATE utf8_bin NOT NULL,
    `active`     tinyint(4)                    NOT NULL DEFAULT '1',
    PRIMARY KEY (`id`)
) ENGINE = InnoDB
  DEFAULT CHARSET = utf8
  COLLATE = utf8_bin;
跟前面数据分库分表的配置一样.
<?xml version="1.0" encoding="UTF-8"?>
<project xmlns="http://maven.apache.org/POM/4.0.0" xmlns:xsi="http://www.w3.org/2001/XMLSchema-instance"
         xsi:schemaLocation="http://maven.apache.org/POM/4.0.0 https://maven.apache.org/xsd/maven-4.0.0.xsd">
    <modelVersion>4.0.0</modelVersion>
    <parent>
        <groupId>org.springframework.boot</groupId>
        <artifactId>spring-boot-starter-parent</artifactId>
        <version>2.3.2.RELEASE</version>
        <relativePath/>
    </parent>
    <groupId>com.nimo</groupId>
    <artifactId>read-write-splitting-demo</artifactId>
    <version>0.0.1-SNAPSHOT</version>
    <name>read-write-splitting-demo</name>

    <properties>
        <java.version>1.8</java.version>
    </properties>

    <dependencies>
        <dependency>
            <groupId>org.springframework.boot</groupId>
            <artifactId>spring-boot-starter-web</artifactId>
        </dependency>
        <dependency>
            <groupId>org.mybatis.spring.boot</groupId>
            <artifactId>mybatis-spring-boot-starter</artifactId>
            <version>2.1.4</version>
        </dependency>

        <dependency>
            <groupId>mysql</groupId>
            <artifactId>mysql-connector-java</artifactId>
            <scope>runtime</scope>
        </dependency>
        <dependency>
            <groupId>org.projectlombok</groupId>
            <artifactId>lombok</artifactId>
            <optional>true</optional>
        </dependency>
        <dependency>
            <groupId>org.springframework.boot</groupId>
            <artifactId>spring-boot-starter-test</artifactId>
            <scope>test</scope>
        </dependency>

        <dependency>
            <groupId>org.apache.shardingsphere</groupId>
            <artifactId>shardingsphere-jdbc-core-spring-boot-starter</artifactId>
            <version>5.0.0-alpha</version>
        </dependency>

        <!-- 阿里数据源 -->
        <dependency>
            <groupId>com.alibaba</groupId>
            <artifactId>druid</artifactId>
            <version>1.2.3</version>
        </dependency>

    </dependencies>

    <build>
        <plugins>
            <plugin>
                <groupId>org.springframework.boot</groupId>
                <artifactId>spring-boot-maven-plugin</artifactId>
                <configuration>
                    <excludes>
                        <exclude>
                            <groupId>org.projectlombok</groupId>
                            <artifactId>lombok</artifactId>
                        </exclude>
                    </excludes>
                </configuration>
            </plugin>
        </plugins>
    </build>

</project>
再次强调下, 本文采用的 shardingsphere 版本是 5.0.0-alpha. 不同版本配置会有差异. 这里先贴出能使用的配置, 后面会对官方提供的配置进行吐槽!!!
server:
  port: 8777

spring:
  shardingsphere:
    props:
      sql-show: true

    # 配置 3 个数据源
    datasource:
      names: ds0,ds1,ds2
      common:
        type: com.alibaba.druid.pool.DruidDataSource
      ds0:
        url: jdbc:mysql://127.0.0.1:3306/miaosha?useUnicode=true&characterEncoding=utf-8&useSSL=false&serverTimezone=GMT%2b8
        username: root
        password: '123456'
        driver-class-name: com.mysql.cj.jdbc.Driver
      ds1:
        url: jdbc:mysql://127.0.0.1:3340/miaosha?useUnicode=true&characterEncoding=utf-8&useSSL=false&serverTimezone=GMT%2b8
        username: root
        password: '123456'
        driver-class-name: com.mysql.cj.jdbc.Driver
      ds2:
        url: jdbc:mysql://127.0.0.1:3341/miaosha?useUnicode=true&characterEncoding=utf-8&useSSL=false&serverTimezone=GMT%2b8
        username: root
        password: '123456'
        driver-class-name: com.mysql.cj.jdbc.Driver

    rules:
      replica-query:
        load-balancers:
        	# 负载均衡算法
          round-robin:
            type: ROUND_ROBIN
            # 这里是最神经病的地方, 不配置就报错! 配置吧又不知道配置什么
            props:
              # 你也可以配置 xxx: 123, yyy: 4342 但是必须得有一个属性, 随便编
              default: 0
        data-sources:
          # 这个名字就随便起
          prds:
          	# 主库
            primary-data-source-name: ds0
            # 从库
            replica-data-source-names: ds1,ds2
            load-balancer-name: round_robin
    # enabled: true

mybatis:
  typeAliasesPackage: com.nimo.readwritesplitting.entity
  mapperLocations: classpath:mapper/*.xml
// sql
<insert id="addUser" parameterType="com.nimo.shardingdemo.entity.UserInfo">
   insert into user_info(id, username, password) values (#{id}, #{username}, #{password})
</insert>

 // 新增一个用户信息
@PostMapping("userinfo")
public Object addUserInfo(@RequestBody UserInfo userInfo) {
   return userInfoMapper.addUser(userInfo);
}# 插入用户
curl -X POST --location "http://localhost:8777/userinfo" \
-H "Content-Type: application/json" \
-d "{
\"username\": \"wangbadan\",
\"password\": \"123456\"
}"# 查询 id 为 7 的用户 curl -X GET http://localhost:8777/userinfo/7
下面是发起查询两次请求后, 打印出来的日志(有删减).
官方5.x 版本对 读写分离 的名称进行了修改.
原先叫 read-write-splitting, 后来改为了 replica-query, 所以读写分离的配置也发生了变化
# 官方文档 5.x
spring.shardingsphere.rules.readwrite-splitting.xxxxxxxxxx

# 官网 demo 5.0.0-alpha
spring.shardingsphere.rules.replica-query.xxxxxxxxxx=
但是 官网文档关于读写分离的那一章节, 并没有做修改, 还是用的 read-write-splitting, 它只是另起了一个章节, 对名称变更做了说明.
详细介绍请参考
github
官方文档的变更历史
可以看到 读写分离配置章节 涉及到读写分离的配置还是用的 readwrite-splitting
比如 spring.shardingsphere.rules.readwrite-splitting.xxxxxxxxxx
spring.shardingsphere.datasource.names=

spring.shardingsphere.rules.readwrite-splitting.data-sources.<readwrite-splitting-data-source-name>.primary-data-source-name=

spring.shardingsphere.rules.readwrite-splitting.data-sources.<readwrite-splitting-data-source-name>.replica-data-source-names=

spring.shardingsphere.rules.readwrite-splitting.data-sources.<readwrite-splitting-data-source-name>.load-balancer-name=

# Load balance algorithm configuration
spring.shardingsphere.rules.readwrite-splitting.load-balancers.<load-balance-algorithm-name>.type=

spring.shardingsphere.rules.readwrite-splitting.load-balancers.<load-balance-algorithm-name>.props.xxx=
这里还有一个需要注意的地方, 在看官网 demo 时, 需要选择下对应的分支/标签. 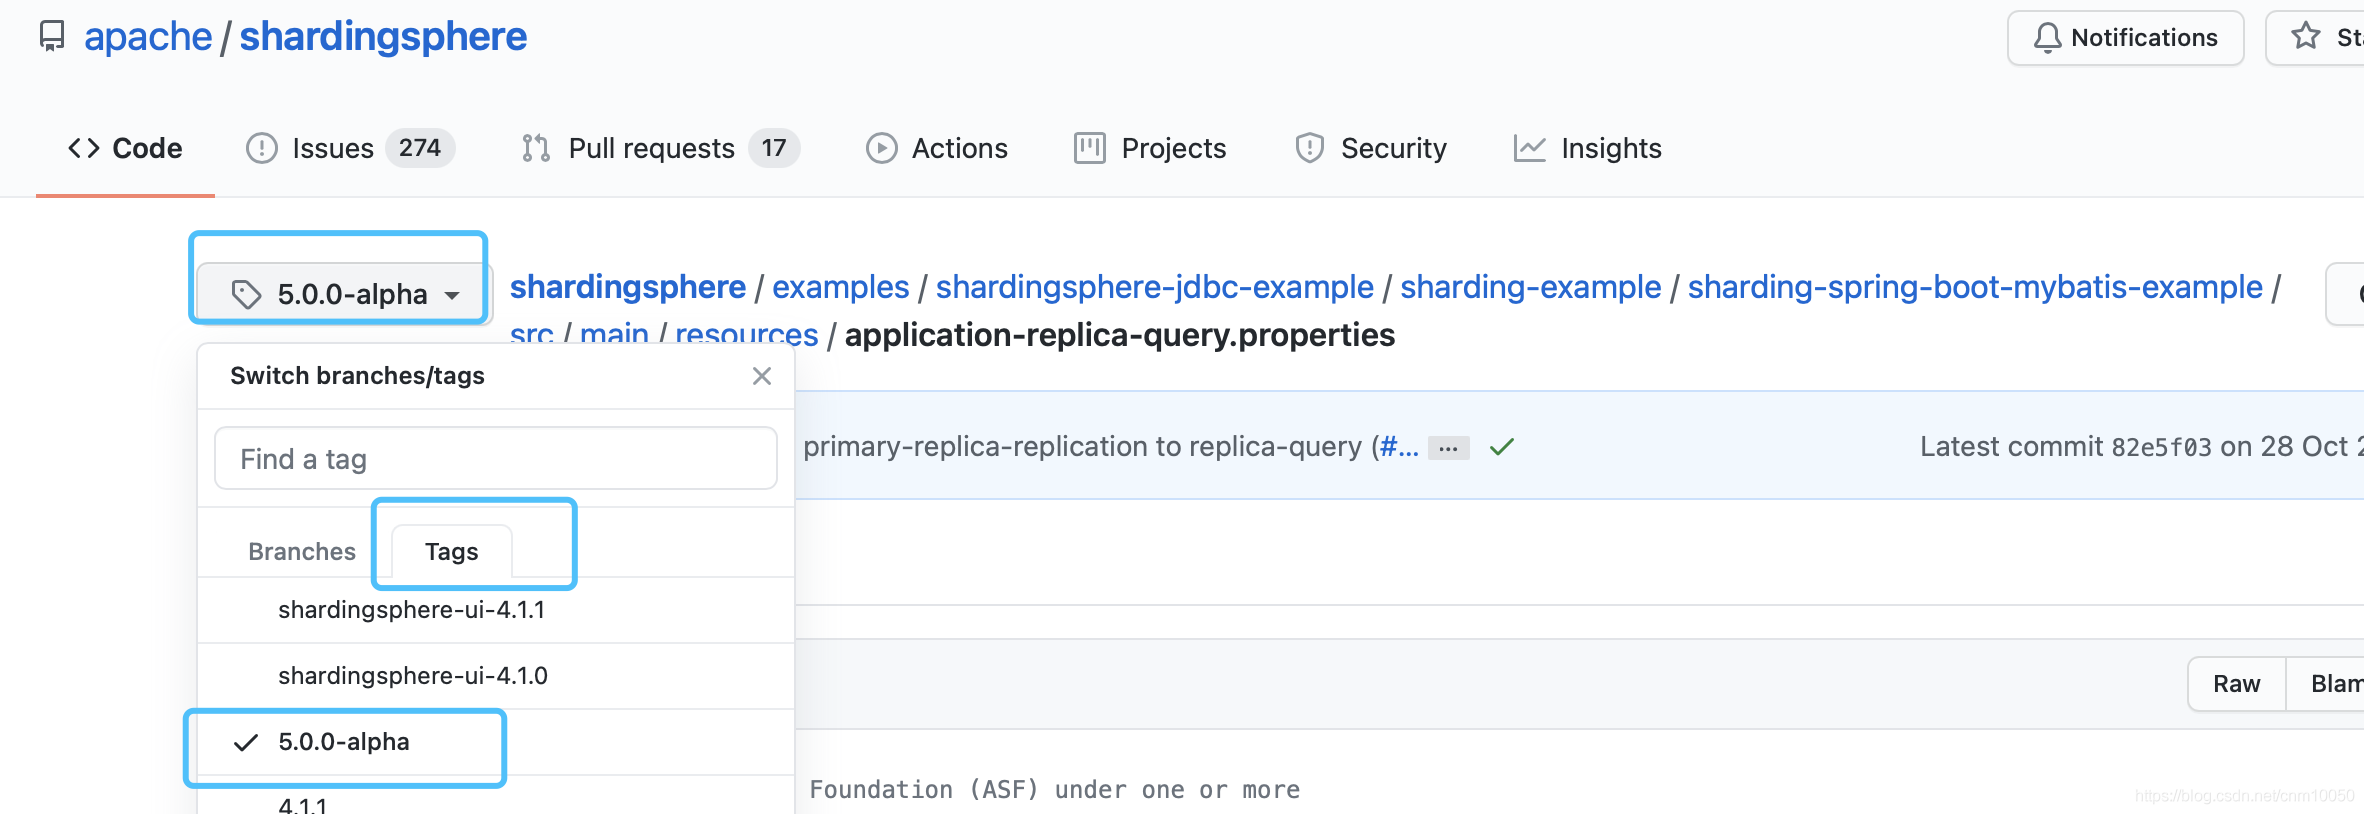
官网 demo 提供的 读写分离配置 用的是 replica-query 字段, 比如: spring.shardingsphere.rules.replica-query.xxxxxxxxxx=
官网 demo 提供的配置
spring.shardingsphere.datasource.names=primary_ds,replica_ds_0,replica_ds_1

spring.shardingsphere.datasource.common.type=com.zaxxer.hikari.HikariDataSource
spring.shardingsphere.datasource.common.driver-class-name=com.mysql.jdbc.Driver
spring.shardingsphere.datasource.common.username=root
spring.shardingsphere.datasource.common.password=

# 主数据源 primary_ds
spring.shardingsphere.datasource.primary_ds.jdbc-url=jdbc:mysql://localhost:3306/demo_primary_ds?serverTimezone=UTC&useSSL=false&useUnicode=true&characterEncoding=UTF-8

# 从数据源 replica_ds_0
spring.shardingsphere.datasource.replica_ds_0.jdbc-url=jdbc:mysql://localhost:3306/demo_replica_ds_0?serverTimezone=UTC&useSSL=false&useUnicode=true&characterEncoding=UTF-8

# 从数据源 replica_ds_1
spring.shardingsphere.datasource.replica_ds_1.jdbc-url=jdbc:mysql://localhost:3306/demo_replica_ds_1?serverTimezone=UTC&useSSL=false&useUnicode=true&characterEncoding=UTF-8

# 负载均衡算法
spring.shardingsphere.rules.replica-query.load-balancers.round_robin.type=ROUND_ROBIN

# 主库
spring.shardingsphere.rules.replica-query.data-sources.pr_ds.primary-data-source-name=primary_ds

# 从库
spring.shardingsphere.rules.replica-query.data-sources.pr_ds.replica-data-source-names=replica_ds_0,replica_ds_1

spring.shardingsphere.rules.replica-query.data-sources.pr_ds.load-balancer-name=round_robin
最可怕的是不管是使用官网提供的 demo, 还是按照官网文档提供的配置去配置, 项目都运行不起来.
本文基于ShardingSphere5.0.0-alpha 实现了 mysql 读写分离, 在此之前, 还需要搭建一套 mysql 的主从复制架构.
另外, 官方 5.x 版本对 读写分离 的配置进行了调整, 由 readwrite-splitting 改为了 replica-query.
最后就是以下的配置不可少. props 下的配置可以随意配置. 比如 xxx=yyy, abc=123;
当然原因还没有搞清楚, 后面有时间会研究一下.
spring.shardingsphere.rules.readwrite-splitting.load-balancers.<load-balance-algorithm-name>.props.xxx= # 负载均衡算法属性配置
感谢各位的阅读,以上就是“如何用ShardingSphere5.0.0-alpha实现mysql读写分离”的内容了,经过本文的学习后,相信大家对如何用ShardingSphere5.0.0-alpha实现mysql读写分离这一问题有了更深刻的体会,具体使用情况还需要大家实践验证。这里是亿速云,小编将为大家推送更多相关知识点的文章,欢迎关注!
免责声明:本站发布的内容(图片、视频和文字)以原创、转载和分享为主,文章观点不代表本网站立场,如果涉及侵权请联系站长邮箱:is@yisu.com进行举报,并提供相关证据,一经查实,将立刻删除涉嫌侵权内容。


