这篇文章主要介绍“springboot集成flyway自动创表的配置教程”,在日常操作中,相信很多人在springboot集成flyway自动创表的配置教程问题上存在疑惑,小编查阅了各式资料,整理出简单好用的操作方法,希望对大家解答”springboot集成flyway自动创表的配置教程”的疑惑有所帮助!接下来,请跟着小编一起来学习吧!
Flayway是一款数据库版本控制管理工具,,支持数据库版本自动升级,Migrations可以写成sql脚本,也可以写在java代码里;不仅支持Command Line和java api ,也支持Build构建工具和Spring boot,也可以在分布式环境下能够安全可靠安全地升级数据库,同时也支持失败恢复。
Flyway最核心的就是用于记录所有版本演化和状态的MetaData表,Flyway首次启动会创建默认名为SCHEMA_VERSION的元素局表。 表中保存了版本,描述,要执行的sql脚本等;
在ruoyi-admin这个module里面添加flyway依赖
<dependency>
      <groupId>org.flywaydb</groupId>
      <artifactId>flyway-core</artifactId>
  </dependency>
<!--   不是必须的 -->
    <build>
        <plugins>
            <plugin>
                <groupId>org.flywaydb</groupId>
                <artifactId>flyway-maven-plugin</artifactId>
                <version>5.2.1</version>
            </plugin>
        </plugins>
    </build>
yml 配置flyway
spring:
    # 配置flyway数据版本管理
    flyway:
        enabled: true
        baseline-on-migrate: true
        clean-on-validation-error: false
        sql-migration-prefix: V
        sql-migration-suffixes: .sql
        locations: classpath:db/migration/mysql
配置sql脚本
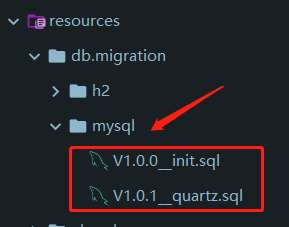
在若依项目中的sql目录下有两个初始化sql脚本,在ruoyi-admin模块下的"resources/db/migration/mysql",命名为:Vx.x.x__ xxx.sql数据库文件。
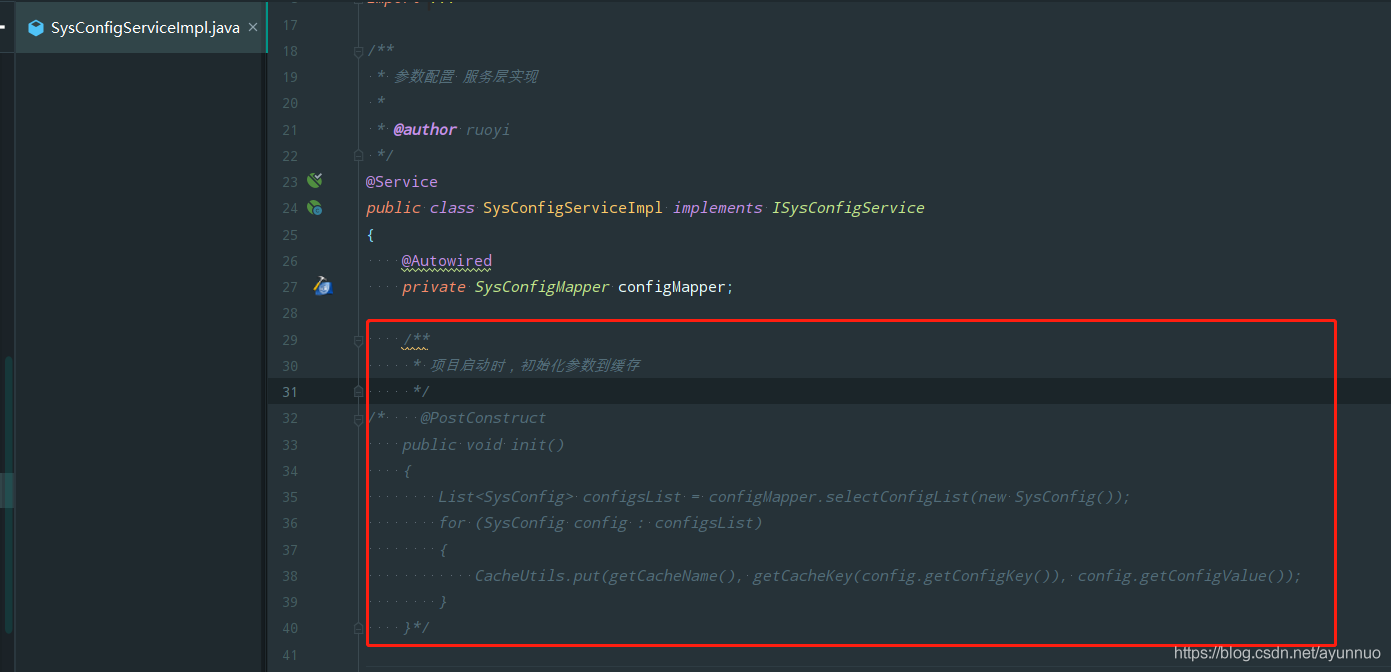
一般的springboot项目进行到这里,flyway配置就完成了,不过ruoyi项目到这里启动的话,还是会报错,主要是有三个地方用到了@PostConstruct注解,系统需要从数据库中加载配置信息,并且是构造bean后就执行,此时flaway的数据库配置加载还没执行,如果是第一次执行项目的话,数据库都还没有表结构信息,所以会报错。
直接改若依项目项目启动是加载到缓存的配置的这三个地方的加载时机就行了。
首先,注释掉三个地方的配置加载。ruoyi-system中com.ruoyi.system.service.impl.SysConfigServiceImpl的参数缓存配置
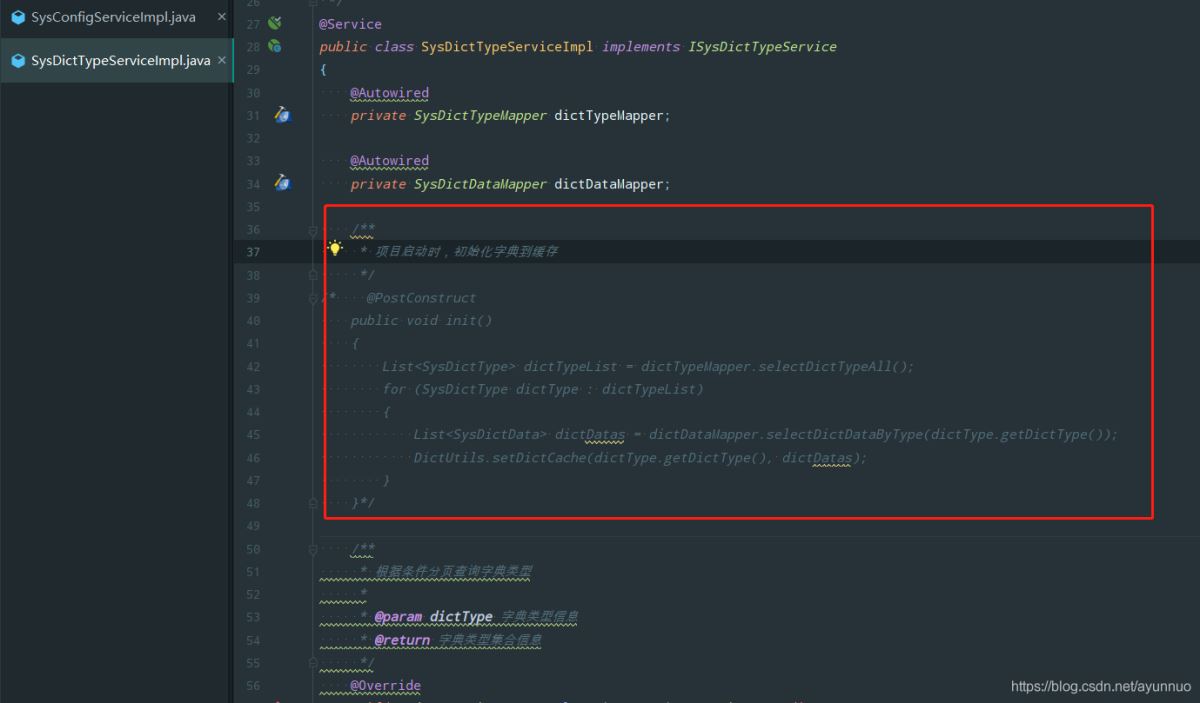
ruoyi-system中com.ruoyi.system.service.impl.SysDictTypeServiceImpl的字典信息缓存配置
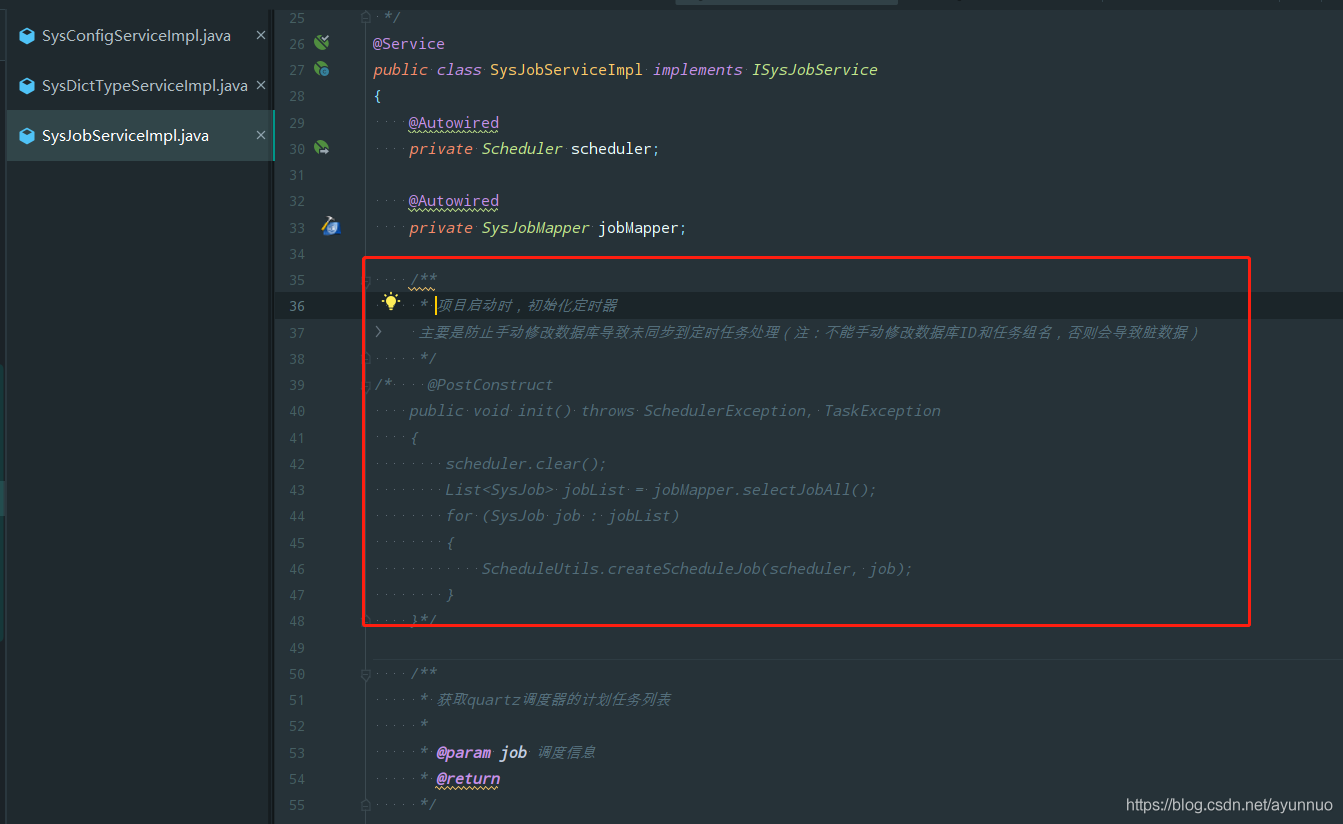
ruoyi-quartz中com.ruoyi.quartz.service.impl.SysJobServiceImpl的定时任务配置
在ruoyi-system中新增一个配置类com.ruoyi.system.config.RuntimeConfig,内容如下,在项目加载完成后flyaway加载完成后再执行这些参数的缓存配置。
import org.quartz.Scheduler;
import org.quartz.SchedulerException;
import org.slf4j.Logger;
import org.slf4j.LoggerFactory;
import org.springframework.beans.factory.annotation.Autowired;
import org.springframework.context.ApplicationListener;
import org.springframework.context.event.ContextRefreshedEvent;
import org.springframework.stereotype.Component;

import java.util.List;

/**
 *
  * @author: 云诺
  * @date: 2021/6/25
  * @description: 将项目启动后flyway创建好表加载到缓存
 */
@Component
public class RuntimeConfig implements ApplicationListener<ContextRefreshedEvent> {

    private final static Logger LOGGER = LoggerFactory.getLogger(RuntimeConfig.class);

    @Autowired
    private SysConfigMapper configMapper;


    @Autowired
    private SysDictTypeMapper dictTypeMapper;

    @Autowired
    private SysDictDataMapper dictDataMapper;

    @Autowired
    private Scheduler scheduler;

    @Autowired
    private SysJobMapper jobMapper;

    /**
     * 项目启动时,初始化参数
     */
    @Override
    public void onApplicationEvent(ContextRefreshedEvent contextRefreshedEvent) {
        LOGGER.info("init Param ...");
        this.initParam();
        LOGGER.info("init dict ...");
        this.initDict();
        try {
            LOGGER.info("init job ...");
            this.initJob();
        } catch (SchedulerException e) {
            e.printStackTrace();
        } catch (TaskException e) {
            e.printStackTrace();
        }
    }

    /**
     * 初始化定时任务信息到缓存
     *
     * @throws SchedulerException
     * @throws TaskException
     */
    public void initJob() throws SchedulerException, TaskException {
        scheduler.clear();
        List<SysJob> jobList = jobMapper.selectJobAll();
        for (SysJob job : jobList) {
            ScheduleUtils.createScheduleJob(scheduler, job);
        }
    }


    /**
     * 初始化参数到缓存
     */
    public void initParam() {
        List<SysConfig> configsList = configMapper.selectConfigList(new SysConfig());
        for (SysConfig config : configsList)
        {
            CacheUtils.put(getCacheName(), getCacheKey(config.getConfigKey()), config.getConfigValue());
        }
    }

    /**
     * 初始化字典到缓存
     */
    public void initDict() {
        List<SysDictType> dictTypeList = dictTypeMapper.selectDictTypeAll();
        for (SysDictType dictType : dictTypeList)
        {
            List<SysDictData> dictDatas = dictDataMapper.selectDictDataByType(dictType.getDictType());
            DictUtils.setDictCache(dictType.getDictType(), dictDatas);
        }
    }

    /**
     * 设置cache key
     *
     * @param configKey 参数键
     * @return 缓存键key
     */
    private String getCacheKey(String configKey)
    {
        return Constants.SYS_CONFIG_KEY + configKey;
    }

    /**
     * 获取cache name
     *
     * @return 缓存名
     */
    private String getCacheName()
    {
        return Constants.SYS_CONFIG_CACHE;
    }
}
到这里就可以正常启动项目了
到此,关于“springboot集成flyway自动创表的配置教程”的学习就结束了,希望能够解决大家的疑惑。理论与实践的搭配能更好的帮助大家学习,快去试试吧!若想继续学习更多相关知识,请继续关注亿速云网站,小编会继续努力为大家带来更多实用的文章!
免责声明:本站发布的内容(图片、视频和文字)以原创、转载和分享为主,文章观点不代表本网站立场,如果涉及侵权请联系站长邮箱:is@yisu.com进行举报,并提供相关证据,一经查实,将立刻删除涉嫌侵权内容。


