本篇内容主要讲解“怎么用vue实现登录验证码”,感兴趣的朋友不妨来看看。本文介绍的方法操作简单快捷,实用性强。下面就让小编来带大家学习“怎么用vue实现登录验证码”吧!
本文实例为大家分享了vue实现登录验证码的具体代码,供大家参考,具体内容如下
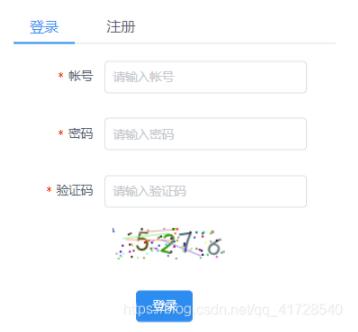
先来demo效果图
canvas验证码组件(可直接复制,无需改动)
<template>
<div class="s-canvas">
<canvas id="s-canvas" :width="contentWidth" :height="contentHeight"></canvas>
</div>
</template>
<script>
export default {
name: "SIdentify",
props: {
identifyCode: {
type: String,
default: '1234'
},
fontSizeMin: {
type: Number,
default: 25
},
fontSizeMax: {
type: Number,
default: 30
},
backgroundColorMin: {
type: Number,
default: 255
},
backgroundColorMax: {
type: Number,
default: 255
},
colorMin: {
type: Number,
default: 0
},
colorMax: {
type: Number,
default: 160
},
lineColorMin: {
type: Number,
default: 100
},lineColorMax: {
type: Number,
default: 255
},
dotColorMin: {
type: Number,
default: 0
},
dotColorMax: {
type: Number,
default: 255
},
contentWidth: {
type: Number,
default: 112
},
contentHeight: {
type: Number,
default: 31
}
},
methods: {
// 生成一个随机数
randomNum(min, max) {
return Math.floor(Math.random() * (max - min) + min)
},
// 生成一个随机的颜色
randomColor(min, max) {
let r = this.randomNum(min, max)
let g = this.randomNum(min, max)
let b = this.randomNum(min, max)
return 'rgb(' + r + ',' + g + ',' + b + ')'
},
drawPic() {
let canvas = document.getElementById('s-canvas')
let ctx = canvas.getContext('2d')
ctx.textBaseline = 'bottom'
// 绘制背景
ctx.fillStyle = this.randomColor(this.backgroundColorMin, this.backgroundColorMax)
ctx.fillRect(0, 0, this.contentWidth, this.contentHeight)
// 绘制文字
for (let i = 0; i < this.identifyCode.length; i++) {
this.drawText(ctx, this.identifyCode[i], i)
}
this.drawLine(ctx)
this.drawDot(ctx)
},
drawText(ctx, txt, i) {
ctx.fillStyle = this.randomColor(this.colorMin, this.colorMax)
ctx.font = this.randomNum(this.fontSizeMin, this.fontSizeMax) + 'px SimHei'
let x = (i + 1) * (this.contentWidth / (this.identifyCode.length + 1))
let y = this.randomNum(this.fontSizeMax, this.contentHeight - 5)
var deg = this.randomNum(-45, 45)
// 修改坐标原点和旋转角度
ctx.translate(x, y)
ctx.rotate(deg * Math.PI / 180)
ctx.fillText(txt, 0, 0)
// 恢复坐标原点和旋转角度
ctx.rotate(-deg * Math.PI / 180)
ctx.translate(-x, -y)
},
drawLine(ctx) {
// 绘制干扰线
for (let i = 0; i < 5; i++) {
ctx.strokeStyle = this.randomColor(this.lineColorMin, this.lineColorMax)
ctx.beginPath()
ctx.moveTo(this.randomNum(0, this.contentWidth), this.randomNum(0, this.contentHeight))
ctx.lineTo(this.randomNum(0, this.contentWidth), this.randomNum(0, this.contentHeight))
ctx.stroke()
}
},
drawDot(ctx) {
// 绘制干扰点
for (let i = 0; i < 80; i++) {
ctx.fillStyle = this.randomColor(0, 255)
ctx.beginPath()
ctx.arc(this.randomNum(0, this.contentWidth), this.randomNum(0, this.contentHeight), 1, 0, 2 * Math.PI)
ctx.fill()
}
}
},
watch: {
identifyCode() {
this.drawPic()
}
},
mounted() {
this.drawPic()
}
}
</script>
<style scoped>
.s-canvas {
height: 38px;
}
.s-canvas canvas{
margin-top: 1px;
margin-left: 8px;
}
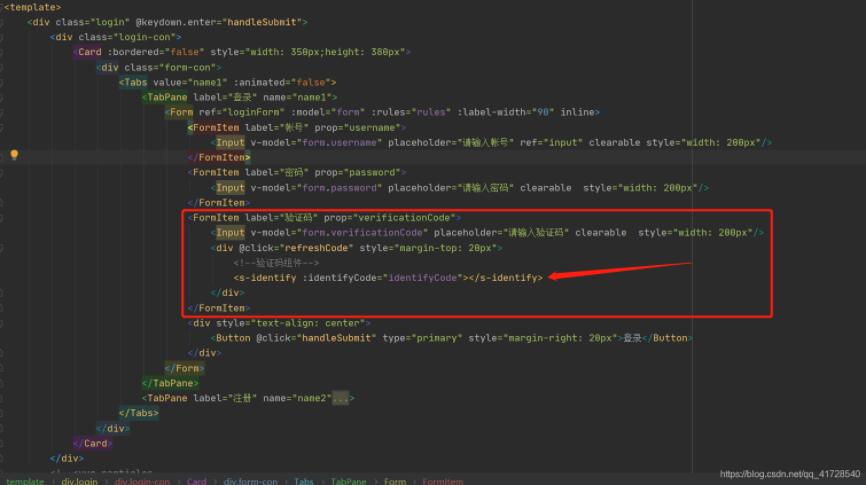
</style>login页面的html部分,按需改动
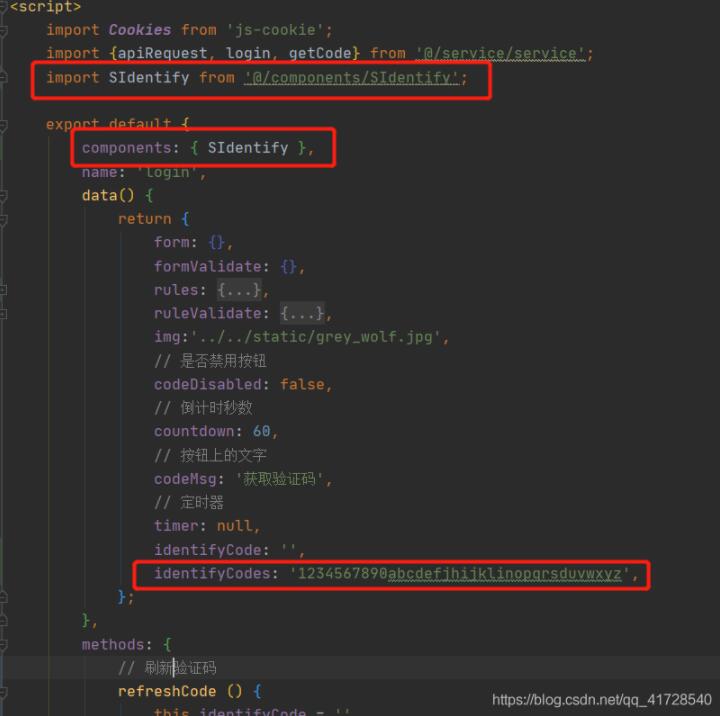
引入验证码组件
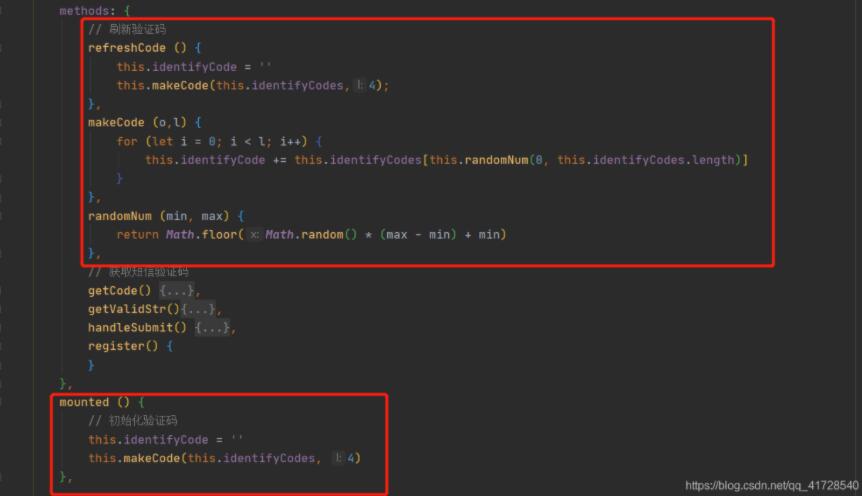
methods方法
login页面完整代码
<style lang="less">
    @import './login.less';
</style>

<template>
    <div class="login" @keydown.enter="handleSubmit">
        <div class="login-con">
            <Card :bordered="false" >
                <div class="form-con">
                    <Tabs value="name1" :animated="false">
                        <TabPane label="登录" name="name1">
                            <Form ref="loginForm" :model="form" :rules="rules" :label-width="90" inline>
                                <FormItem label="帐号" prop="username">
                                    <Input v-model="form.username" placeholder="请输入帐号" ref="input" clearable />
                                </FormItem>
                                <FormItem label="密码" prop="password">
                                    <Input v-model="form.password" placeholder="请输入密码" clearable  />
                                </FormItem>
                                <FormItem label="验证码" prop="verificationCode">
                                    <Input v-model="form.verificationCode" placeholder="请输入验证码" clearable  />
                                    <div @click="refreshCode" >
                                        <!--验证码组件-->
                                        <s-identify :identifyCode="identifyCode"></s-identify>
                                    </div>
                                </FormItem>
                                <div >
                                    <Button @click="handleSubmit" type="primary" >登录</Button>
                                </div>
                            </Form>
                        </TabPane>
                        <TabPane label="注册" name="name2">
                            <Form ref="formValidate" :model="formValidate" :rules="ruleValidate" :label-width="90" inline>
                                <FormItem label="帐号" prop="username">
                                    <Input v-model="formValidate.username" placeholder="请输入帐号" ref="input" clearable />
                                </FormItem>
                                <FormItem label="密码" prop="password">
                                    <Input v-model="formValidate.password" placeholder="请输入密码" clearable  />
                                </FormItem>
                                <FormItem label="手机号" prop="mobile">
                                    <Input v-model="formValidate.mobile" placeholder="请输入手机号" clearable  />
                                </FormItem>
                                <FormItem label="短信验证码" prop="header">
                                    <Input v-model="formValidate.header" placeholder="短信验证码" />
                                    <Button type="primary" size="small" @click="getCode" :disabled="codeDisabled">{{codeMsg}}</Button>
                                </FormItem>
                                <div >
                                    <Button type="primary" @click="register('formValidate')">注册</Button>
                                </div>
                            </Form>
                        </TabPane>
                    </Tabs>
                </div>
            </Card>
        </div>
        <!--<vue-particles
                color="#FF4500"
                :particleOpacity="0.7"
                :particlesNumber="300"
                shapeType="circle"
                :particleSize="7"
                linesColor="#00FF00"
                :linesWidth="2"
                :lineLinked="true"
                :lineOpacity="0.4"
                :linesDistance="150"
                :moveSpeed="4"
                :hoverEffect="true"
                hoverMode="grab"
                :clickEffect="true"
                clickMode="repulse"
        >
        </vue-particles>-->
    </div>
</template>

<script>
    import Cookies from 'js-cookie';
    import {apiRequest, login, getCode} from '@/service/service';
    import SIdentify from '@/components/SIdentify';

    export default {
        components: { SIdentify },
        name: 'login',
        data() {
            return {
                form: {},
                formValidate: {},
                rules: {
                    username: [
                        {required: true, message: '登录用户名不能为空', trigger: 'blur'}
                    ],
                    password: [
                        {required: true, message: '登录密码不能为空', trigger: 'blur'}
                    ],
                    verificationCode: [
                        {required: true, message: '验证码不能为空', trigger: 'blur'}
                    ]
                },
                ruleValidate: {
                    username: [
                        {required: true, message: '登录用户名不能为空', trigger: 'blur'}
                    ],
                    password: [
                        {required: true, message: '登录密码不能为空', trigger: 'blur'}
                    ],
                    mobile: [
                        {required: true, message: '手机号不能为空', trigger: 'blur'}
                    ],
                    header: [
                        {required: true, message: '短信验证码不能为空', trigger: 'blur'}
                    ]
                },
                img:'../../static/grey_wolf.jpg',
                // 是否禁用按钮
                codeDisabled: false,
                // 倒计时秒数
                countdown: 60,
                // 按钮上的文字
                codeMsg: '获取验证码',
                // 定时器
                timer: null,
                identifyCode: '',
                identifyCodes: '1234567890abcdefjhijklinopqrsduvwxyz',
            };
        },
        methods: {
            // 刷新验证码
            refreshCode () {
                this.identifyCode = ''
                this.makeCode(this.identifyCodes,4);
            },
            makeCode (o,l) {
                for (let i = 0; i < l; i++) {
                    this.identifyCode += this.identifyCodes[this.randomNum(0, this.identifyCodes.length)]
                }
            },
            randomNum (min, max) {
                return Math.floor(Math.random() * (max - min) + min)
            },
            // 获取短信验证码
            getCode() {
                // 验证码60秒倒计时
                if (!this.timer) {
                    this.getValidStr();
                    this.timer = setInterval(this.getValidStr, 1000);
                }
                apiRequest(this, getCode(this.form.mobile), response => {
                });
            },
            getValidStr(){
                if (this.countdown > 0 && this.countdown <= 60) {
                    this.countdown--;
                    if (this.countdown !== 0) {
                        this.codeMsg = "重新发送(" + this.countdown + ")";
                        this.codeDisabled = true;
                    } else {
                        clearInterval(this.timer);
                        this.codeMsg = "获取验证码";
                        this.countdown = 60;
                        this.timer = null;
                        this.codeDisabled = false;
                    }
                }
            },
            handleSubmit() {
                this.$refs.loginForm.validate((valid) => {
                    if (valid) {
                        //登录密码做MD5加密
                        let password = this.$copyto.md5(this.form.password);
                        //登录接口请求
                        apiRequest(this, login(this.form.username, password), response => {
                            this.$store.commit('setUserInfo', response.data);
                            Cookies.set('user', this.form.username);
                            Cookies.set('userId', response.data.id);
                            localStorage.sessionId = response.sessionId
                            this.$store.commit('setAvator', '');
                            if (this.form.userName === 'admin') {
                                Cookies.set('access', 0);
                            } else {
                                Cookies.set('access', 1);
                            }
                            this.$router.push({name: 'home_index'});
                        });
                    }
                });
            },
            register() {
            }
        },
        mounted () {
            // 初始化验证码
            this.identifyCode = ''
            this.makeCode(this.identifyCodes, 4)
        },

    };
</script>

<style>

</style>
到此,相信大家对“怎么用vue实现登录验证码”有了更深的了解,不妨来实际操作一番吧!这里是亿速云网站,更多相关内容可以进入相关频道进行查询,关注我们,继续学习!
免责声明:本站发布的内容(图片、视频和文字)以原创、转载和分享为主,文章观点不代表本网站立场,如果涉及侵权请联系站长邮箱:is@yisu.com进行举报,并提供相关证据,一经查实,将立刻删除涉嫌侵权内容。


