这篇文章主要介绍了SpringBoot如何实现文件上传功能,具有一定借鉴价值,感兴趣的朋友可以参考下,希望大家阅读完这篇文章之后大有收获,下面让小编带着大家一起了解一下。
经典的文件上传
服务器处理上传文件一般都是先在请求中读取文件信息,然后改变名称保存在服务器的临时路径下,最后保存到服务器磁盘中。本次以thymeleaf搭建demo,因此需要引入thymeleaf依赖库。
<dependency>
    <groupId>org.springframework.boot</groupId>
    <artifactId>spring-boot-starter-thymeleaf</artifactId>
    <version>2.5.5</version>
</dependency>
如果使用的是gradle构建的项目,需要修改build.gradle文件:
compile 'org.springframework.boot:spring-boot-starter-thymeleaf:2.5.5'
新建一个Action类负责处理上传的文件:
@RestController
@RequestMapping("/upload/*")
public class UploadAction {

    @PostMapping("/file")
    public Object uploadHandler(HttpServletRequest request, String title, MultipartFile file) {
        Map<String, Object> resultMap = new LinkedHashMap<>();
        resultMap.put("title", title);
        resultMap.put("fileName", file.getName()); // 文件名
        resultMap.put("originalFilename", file.getOriginalFilename()); // 原始名称
        resultMap.put("content-type", file.getContentType()); // 文件类型
        resultMap.put("fileSize", file.getSize() / 1024 + "K"); // 文件大小
        try {
            // 保存文件
            String uploadedFilePath = saveFile(request, file.getInputStream(), file.getOriginalFilename()
                    .substring(file.getOriginalFilename().lastIndexOf(".") + 1));
            resultMap.put("uploadedFilePath", uploadedFilePath); // 文件大小
        } catch (IOException e) {
            System.err.println("error-path: /upload/file, message: " + e.getMessage());
        }
        return resultMap;
    }

    /**
     * 保存上传的文件到本地服务器
     *
     * @param request HttpServletRequest
     * @param input   输入流
     * @param ext     文件扩展名
     * @return 文件路径
     * @throws IOException
     */
    public String saveFile(HttpServletRequest request, InputStream input, String ext) throws IOException {
        String realPath = request.getServletContext().getRealPath("/upload/file/"); // 取得服务器真实路径
        File file = new File(realPath);
        if (!file.getParentFile().exists()) { // 目录不存在
            file.mkdirs(); // 创建多级目录
        }
        String filePath = realPath + UUID.randomUUID() + "." + ext;
        // 取的文件输出流
        OutputStream out = new FileOutputStream(filePath);
        byte[] data = new byte[2048]; // 缓冲数组2KB
        int len = 0; // 读取字节长度
        while ((len = input.read(data)) != -1) {
            out.write(data, 0, len); // 文件写入磁盘
        }
        if (input != null) {
            input.close();
        }
        out.close();
        return filePath;
    }
}
在resources目录下新建templates文件夹,在里面创建index.html文件作为项目首页展示。
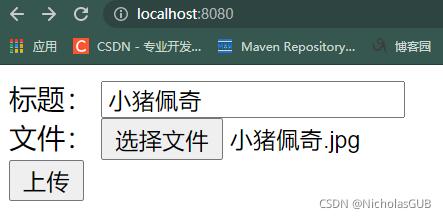
<!doctype HTML>
<html xmlns:th="http://www.thymeleaf.org">
    <head>
        <title>文件上传测试</title>
        <meta charset="UTF-8" />
    </head>
    <body>
        <form action="/upload/file" method="post" enctype="multipart/form-data">
            <span>标题:</span>
            <input type="text" name="title" /><br>
            <span>文件:</span>
            <input type="file" name="file" /><br>
            <input type="submit" value="上传"  />
        </form>
    </body>
</html>
启动项目,直接访问:http://localhost:8080/将进入index.html页面。

点击上传按钮,文件将被保存到服务器磁盘中:

SpringBoot对上传文件处理的简化
SpringBoot对FileUpload组件进行了整合,在文件保存的时候可以避免直接操作IO流,通过配置文件的方式指定文件上传的限制参数。修改application.yml文件:
server:
  port: 8080
spring:
  servlet:
    multipart:
      enabled: true  # 启用文件上传
      max-file-size: 1MB # 单文件上传最大限制
      max-request-size: 10MB # 文件上传最大值
      file-size-threshold: 10KB # 上传文件达到多大时写入磁盘
      location: / # 临时文件存储位置
修改UploadAction,使用MultipartFile类的transferTo方法保存上传文件。
@RestController
@RequestMapping("/upload/*")
public class UploadAction {
    @PostMapping("/file")
    public Object uploadHandler(HttpServletRequest request, String title, MultipartFile file) {
        Map<String, Object> resultMap = new LinkedHashMap<>();
        resultMap.put("title", title);
        resultMap.put("fileName", file.getName()); // 文件名
        resultMap.put("originalFilename", file.getOriginalFilename()); // 原始名称
        resultMap.put("content-type", file.getContentType()); // 文件类型
        resultMap.put("fileSize", file.getSize() / 1024 + "K"); // 文件大小
        try {
            // 保存文件
            String etc = file.getOriginalFilename().substring(file.getOriginalFilename().lastIndexOf(".") + 1);
            String serverPath = request.getScheme() + "://" + request.getServerName()
                    + ":" + request.getServerPort() + request.getContextPath() + "/file/upload/";
            String fileName = UUID.randomUUID() + "." + etc;
            resultMap.put("filePath", serverPath + fileName); // 文件地址(服务器访问地址)
            // 文件保存再真实路径下
            File saveFile = new File(request.getServletContext().getRealPath("/file/upload/") + fileName);
            if (!saveFile.getParentFile().exists()) { // 目录不存在,创建目录
                saveFile.mkdirs();
            }
            file.transferTo(saveFile); // 保存上传文件
        } catch (IOException e) {
            System.err.println("error-path: /upload/file, message: " + e.getMessage());
        }
        return resultMap;
    }
}访问:http://localhost:8080/
点击上传按钮:
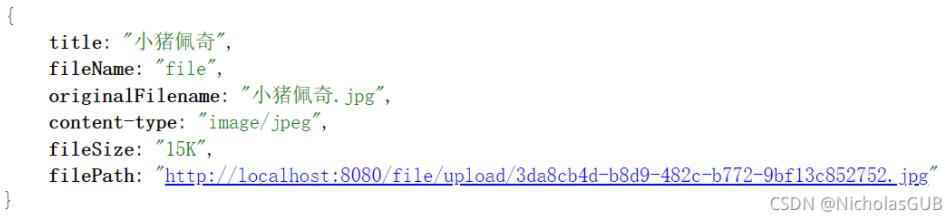
在浏览器上访问filePath,可以预览上传的文件:

感谢你能够认真阅读完这篇文章,希望小编分享的“SpringBoot如何实现文件上传功能”这篇文章对大家有帮助,同时也希望大家多多支持亿速云,关注亿速云行业资讯频道,更多相关知识等着你来学习!
免责声明:本站发布的内容(图片、视频和文字)以原创、转载和分享为主,文章观点不代表本网站立场,如果涉及侵权请联系站长邮箱:is@yisu.com进行举报,并提供相关证据,一经查实,将立刻删除涉嫌侵权内容。


