这篇文章将为大家详细讲解有关springboot如何使用ThreadLocal,小编觉得挺实用的,因此分享给大家做个参考,希望大家阅读完这篇文章后可以有所收获。
在spring boot中使用ThreadLocal实现线程封闭的实例。
首先创建一个包含ThreadLocal成员变量的实例:
public class RequestHolder {
    private final static ThreadLocal<Long> requestHolder = new ThreadLocal<>();
    public static void add(Long id) {
        requestHolder.set(id);
    }

    public static Long getId() {
        return requestHolder.get();
    }

    public static void remove() {
        requestHolder.remove();
    }
}
编写一个Controller类,请求该类的test()方法获取ThreadLocal中存储的id:
import org.springframework.stereotype.Controller;
import org.springframework.web.bind.annotation.RequestMapping;
import org.springframework.web.bind.annotation.ResponseBody;

@Controller
@RequestMapping("/threadLocal")
public class ThreadLocalController {

    @RequestMapping("/test")
    @ResponseBody
    public Long test() {
        return RequestHolder.getId();
    }
}
编写过滤器,在请求到达Servlet之前(请求->tomcat容器->filter->servlet->inteceptor->controller),将当前线程的id添加到ThreadLocal中:
import com.mmall.concurrency.example.threadLocal.RequestHolder;
import lombok.extern.slf4j.Slf4j;
import javax.servlet.Filter;
import javax.servlet.FilterChain;
import javax.servlet.FilterConfig;
import javax.servlet.ServletException;
import javax.servlet.ServletRequest;
import javax.servlet.ServletResponse;
import javax.servlet.http.HttpServletRequest;
import java.io.IOException;

@Slf4j
public class HttpFilter implements Filter {

    @Override
    public void init(FilterConfig filterConfig) throws ServletException {
    }

    @Override
    public void doFilter(ServletRequest servletRequest, ServletResponse servletResponse, FilterChain filterChain) throws IOException, ServletException {
        HttpServletRequest request = (HttpServletRequest) servletRequest;
        log.info("do filter, {}, {}", Thread.currentThread().getId(), request.getServletPath());
        //在ThreadLocal中添加当前线程的id
        RequestHolder.add(Thread.currentThread().getId());
        filterChain.doFilter(servletRequest, servletResponse);
    }
    @Override
    public void destroy() {
    }
}
编写拦截器,当请求处理完成后(从Controller返回后),清除ThreadLocal中的id,避免内存泄漏。
import com.mmall.concurrency.example.threadLocal.RequestHolder;
import lombok.extern.slf4j.Slf4j;
import org.springframework.web.servlet.handler.HandlerInterceptorAdapter;
import javax.servlet.http.HttpServletRequest;
import javax.servlet.http.HttpServletResponse;

@Slf4j
public class HttpInterceptor extends HandlerInterceptorAdapter {

    @Override
    public boolean preHandle(HttpServletRequest request, HttpServletResponse response, Object handler) throws Exception {
        log.info("preHandle");
        return true;
    }

    @Override
    public void afterCompletion(HttpServletRequest request, HttpServletResponse response, Object handler, Exception ex) throws Exception {
        log.info("ThreadId:"+RequestHolder.getId());
        RequestHolder.remove();
        log.info("afterCompletion");
        return;
    }
}
最后,我们需要在spring boot启动类上注册我们定义的Filer及Inteceptor,并设置拦截路径。
import org.springframework.boot.SpringApplication;
import org.springframework.boot.autoconfigure.SpringBootApplication;
import org.springframework.boot.web.servlet.FilterRegistrationBean;
import org.springframework.context.annotation.Bean;
import org.springframework.web.servlet.config.annotation.InterceptorRegistry;
import org.springframework.web.servlet.config.annotation.WebMvcConfigurerAdapter;

@SpringBootApplication
public class ConcurrencyApplication extends WebMvcConfigurerAdapter{
 public static void main(String[] args) {
  SpringApplication.run(ConcurrencyApplication.class, args);
 }

 @Bean
 public FilterRegistrationBean httpFilter() {
  FilterRegistrationBean registrationBean = new FilterRegistrationBean();
  registrationBean.setFilter(new HttpFilter());
  registrationBean.addUrlPatterns("/threadLocal/*");
  return registrationBean;
 }

 @Override
 public void addInterceptors(InterceptorRegistry registry) {
  registry.addInterceptor(new HttpInterceptor()).addPathPatterns("/**");
 }
}
在浏览器或者postman中输入http://localhost:8080/threadLocal/test
观察输出结果:
2018-11-09 11:16:51.287 INFO 34076 --- [ main] s.b.c.e.t.TomcatEmbeddedServletContainer : Tomcat started on port(s): 8080 (http)
2018-11-09 11:16:51.290 INFO 34076 --- [ main] c.m.concurrency.ConcurrencyApplication : Started ConcurrencyApplication in 1.718 seconds (JVM running for 2.132)
2018-11-09 11:17:03.060 INFO 34076 --- [nio-8080-exec-2] o.a.c.c.C.[Tomcat].[localhost].[/] : Initializing Spring FrameworkServlet 'dispatcherServlet'
2018-11-09 11:17:03.060 INFO 34076 --- [nio-8080-exec-2] o.s.web.servlet.DispatcherServlet : FrameworkServlet 'dispatcherServlet': initialization started
2018-11-09 11:17:03.072 INFO 34076 --- [nio-8080-exec-2] o.s.web.servlet.DispatcherServlet : FrameworkServlet 'dispatcherServlet': initialization completed in 12 ms
2018-11-09 11:17:03.078 INFO 34076 --- [nio-8080-exec-2] com.mmall.concurrency.HttpFilter : do filter, 29, /threadLocal/test
2018-11-09 11:17:03.090 INFO 34076 --- [nio-8080-exec-2] com.mmall.concurrency.HttpInterceptor : preHandle
2018-11-09 11:17:03.124 INFO 34076 --- [nio-8080-exec-2] com.mmall.concurrency.HttpInterceptor : ThreadId:29
2018-11-09 11:17:03.124 INFO 34076 --- [nio-8080-exec-2] com.mmall.concurrency.HttpInterceptor : afterCompletion
从打印的日志结果中,我们看到在Filter中我们将当前线程的id 29添加到了ThreadLocal中,随后在Inteceptor中打印并删除了id。
ThreadLocal 适用于变量在线程间隔离,而在方法或类间共享的场景。现在在Springboot中我做如下场景的使用:
使用 Spring Boot 创建一个 Web 应用程序,使用 ThreadLocal 存放一个 Integer 的值,来暂且代表需要在线程中保存的用户信息,这个值初始是 null。在业务逻辑中,我先从 ThreadLocal 获取一次值,然后把外部传入的参数设置到 ThreadLocal 中,来模拟从当前上下文获取到用户信息的逻辑,随后再获取一次值,最后输出两次获得的值和线程名称。
@RestController
public class threadLocal {
    private ThreadLocal<Integer> currentUser = ThreadLocal.withInitial(() -> null);
    @RequestMapping("wrong")
    public Map wrong(@RequestParam("userId") Integer userId) {
        //设置用户信息之前先查询一次ThreadLocal中的用户信息
        String before = Thread.currentThread().getName() + ":" + currentUser.get();
        //设置用户信息到ThreadLocal
        currentUser.set(userId);

            //设置用户信息之后再查询一次ThreadLocal中的用户信息
            String after = Thread.currentThread().getName() + ":" + currentUser.get();
            //汇总输出两次查询结果
            Map result = new HashMap();
            result.put("before", before);
            result.put("after", after);
            return result;
    }
}
为了让问题快速的重现,我在配置文件中设置一下 Tomcat 的参数,把工作线程池最大线程数设置为 1,这样始终是同一个线程在处理请求:
server.tomcat.max-threads=1
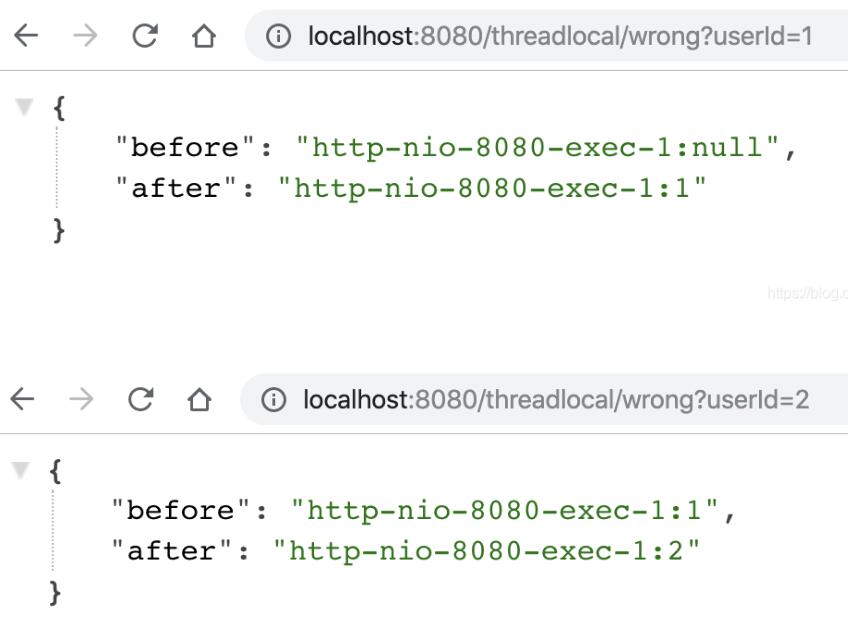
运行程序后先让用户 1 来请求接口,可以看到第一和第二次获取到用户 ID 分别是 null 和 1,符合预期:随后用户 2 来请求接口,这次就出现了 Bug,第一和第二次获取到用户 ID 分别是 1 和 2,显然第一次获取到了用户 1 的信息,原因就是 Tomcat 的线程池重用了线程。
在 Tomcat 这种 Web 服务器下跑的业务代码,本来就运行在一个多线程环境中,并不能认为没有显式开启多线程就不会有线程安全问题,所以使用类似 ThreadLocal 工具来存放一些数据时,需要特别注意在代码运行完后,显式地去清空设置的数据。如果在代码中使用了自定义的线程池,也同样会遇到这个问题。修改后代码如下:
@RestController
public class threadLocal {
    private ThreadLocal<Integer> currentUser = ThreadLocal.withInitial(() -> null);
    @RequestMapping("wrong")
    public Map wrong(@RequestParam("userId") Integer userId) {
        //设置用户信息之前先查询一次ThreadLocal中的用户信息
        String before = Thread.currentThread().getName() + ":" + currentUser.get();
        //设置用户信息到ThreadLocal
        currentUser.set(userId);
        try {
            //设置用户信息之后再查询一次ThreadLocal中的用户信息
            String after = Thread.currentThread().getName() + ":" + currentUser.get();
            //汇总输出两次查询结果
            Map result = new HashMap();
            result.put("before", before);
            result.put("after", after);
            return result;
        } finally {
         //增加移除处理
            currentUser.remove();
        }
    }
}
关于“springboot如何使用ThreadLocal”这篇文章就分享到这里了,希望以上内容可以对大家有一定的帮助,使各位可以学到更多知识,如果觉得文章不错,请把它分享出去让更多的人看到。
免责声明:本站发布的内容(图片、视频和文字)以原创、转载和分享为主,文章观点不代表本网站立场,如果涉及侵权请联系站长邮箱:is@yisu.com进行举报,并提供相关证据,一经查实,将立刻删除涉嫌侵权内容。


