这篇文章主要讲解了“Vue3和TypeScript怎么搭建完整的项目结构”,文中的讲解内容简单清晰,易于学习与理解,下面请大家跟着小编的思路慢慢深入,一起来研究和学习“Vue3和TypeScript怎么搭建完整的项目结构”吧!
在官方仓库的 Quickstart 中推荐用两种方式方式来构建我们的 SPA 项目:
vite
npm init vite-app sail-vue3 # OR yarn create vite-app sail-vue3
vue-cli
npm install -g @vue/cli # OR yarn global add @vue/cli
vue create sail-vue3
# select vue 3 preset
vite 是一个由原生ESM驱动的Web开发构建工具,打开 vite 依赖的 package.json 可以发现在 devDependencies 开发依赖里面已经引入了TypeScript ,甚至还有 vuex , vue-router , less , sass 这些本地开发经常需要用到的工具。vite 轻量,开箱即用的特点,满足了大部分开发场景的需求,作为快速启动本地 Vue 项目来说,这是一个非常完美的工具。
后面的演示代码也是用vite搭的
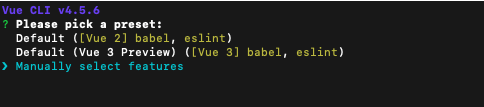
从 vue2.x 走过来的掘友肯定知道 vue-cli 这个官方脚手架, vue3 的更新怎么能少得了 vue-cli 呢, vue-cli 更强调的是用 cli 的方式进行交互式的配置,选择起来更加灵活可控。丰富的官方插件适配,GUI的创建管理界面,标准化开发流程,这些都是 vue-cli 的特点。
vue-cli ✖ TypeScript STEP1
vue-cli ✖ TypeScript STEP2
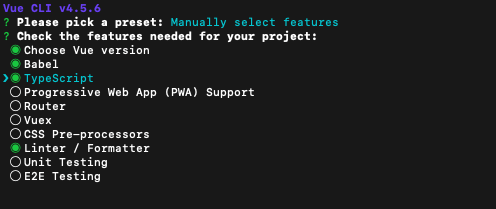
想要预装TypeScript,就需要选择手动配置,并check好TypeScript
忘记使用选择 TypeScript 也没事,加一行cli命令就行了
vue add typescript
最后,别忘了在 .vue 代码中,给 script 标签加上 lang="ts"
<script lang="ts">
在 Vue2.x 使用过 TypeScript 的掘友肯定知道引入 TypeScript 不是一件简单的事情:
要用 vue-class-component 强化 vue 组件,让 Script 支持 TypeScript 装饰器
用 vue-property-decorator 来增加更多结合 Vue 特性的装饰器
引入 ts-loader 让 webpack 识别 .ts .tsx 文件
.....
然后出来的代码风格是这样的:
@Component({
    components:{ componentA, componentB},
})
export default class Parent extends Vue{
  @Prop(Number) readonly propA!: number | undefined
  @Prop({ default: 'default value' }) readonly propB!: string
  @Prop([String, Boolean]) readonly propC!: string | boolean | undefined

  // data信息
  message = 'Vue2 code style'
  // 计算属性
  private get reversedMessage (): string[] {
      return this.message.split(' ').reverse().join('')
  }
  // method
  public changeMessage (): void {
    this.message = 'Good bye'
}
class 风格的组件,各种装饰器穿插在代码中,有点感觉自己不是在写 vue ,些许凌乱????,所以这种曲线救国的方案在 vue3 里面肯定是行不通的。
在 vue3 中可以直接这么写:
import { defineComponent, PropType } from 'vue'
interface Student {
  name: string
  class: string
  age: number
}
const Component = defineComponent({
  props: {
    success: { type: String },
    callback: {
      type: Function as PropType<() => void>
    },
    student: {
      type: Object as PropType<Student>,
      required: true
    }
  },
  data() {
     return {
        message: 'Vue3 code style'
    }
  },
  computed: {
    reversedMessage(): string {
      return this.message.split(' ').reverse().join('')
    }
  }
})
vue 对 props 进行复杂类型验证的时候,就直接用 PropType 进行强制转换, data 中返回的数据也能在不显式定义类型的时候推断出大多类型, computed 也只用返回类型的计算属性即可,代码清晰,逻辑简单,同时也保证了 vue 结构的完整性。
在 vue3 的 Composition API 代码风格中,比较有代表性的api就是 ref 和 reactive ,我们看看这两个是如何做类型声明的:
import { defineComponent, ref } from 'vue'
const Component = defineComponent({
setup() {
  const year = ref(2020)
  const month = ref<string | number>('9')
  month.value = 9 // OK
  const result = year.value.split('') // => Property 'split' does not exist on type 'number'
 }
})
分析上面的代码,可以发现如果我们不给定 ref 定义的类型的话, vue3 也能根据初始值来进行类型推导,然后需要指定复杂类型的时候简单传递一个泛型即可。
Tips:
如果只有setup方法的话,可以直接在defineComponent中传入setup函数
const Component = defineComponent(() => {
    const year = ref(2020)
    const month = ref<string | number>('9')
    month.value = 9 // OK
    const result = year.value.split('') // => Property 'split' does not exist on type 'number'
})import { defineComponent, reactive } from 'vue'
interface Student {
name: string
class?: string
age: number
}
export default defineComponent({
name: 'HelloWorld',
setup() {
const student = reactive<Student>({ name: '阿勇', age: 16 })
// or
const student: Student = reactive({ name: '阿勇', age: 16 })
// or
const student = reactive({ name: '阿勇', age: 16, class: 'cs' }) as Student
}
})声明 reactive 的时候就很推荐使用接口了,然后怎么使用类型断言就有很多种选择了,这是 TypeScript 的语法糖,本质上都是一样的。
vue3 借鉴 react hooks 开发出了 Composition API ,那么也就意味着 Composition API 也能进行自定义封装 hooks ,接下来我们就用 TypeScript 风格封装一个计数器逻辑的 hooks ( useCount ):
首先来看看这个 hooks 怎么使用:
import { ref } from '/@modules/vue'
import  useCount from './useCount'

export default {
  name: 'CountDemo',
  props: {
    msg: String
  },
  setup() {
    const { current: count, inc, dec, set, reset } = useCount(2, {
      min: 1,
      max: 15
    })
    const msg = ref('Demo useCount')
    return {
      count,
      inc,
      dec,
      set,
      reset,
      msg
    }
  }
}
出来的效果就是:
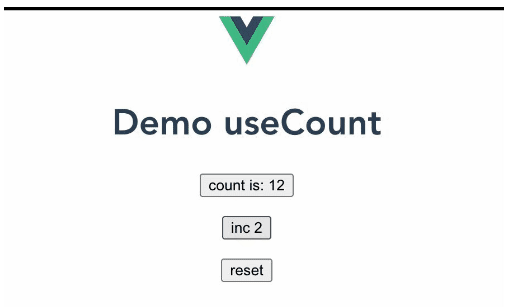
贴上 useCount 的源码:
import { ref, Ref, watch } from 'vue'
interface Range {
min?: number,
max?: number
}
interface Result {
current: Ref<number>,
inc: (delta?: number) => void,
dec: (delta?: number) => void,
set: (value: number) => void,
reset: () => void
}
export default function useCount(initialVal: number, range?: Range): Result {
const current = ref(initialVal)
const inc = (delta?: number): void => {
if (typeof delta === 'number') {
current.value += delta
} else {
current.value += 1
}
}
const dec = (delta?: number): void => {
if (typeof delta === 'number') {
current.value -= delta
} else {
current.value -= 1
}
}
const set = (value: number): void => {
current.value = value
}
const reset = () => {
current.value = initialVal
}
watch(current, (newVal: number, oldVal: number) => {
if (newVal === oldVal) return
if (range && range.min && newVal < range.min) {
current.value = range.min
} else if (range && range.max && newVal > range.max) {
current.value = range.max
}
})
return {
current,
inc,
dec,
set,
reset
}
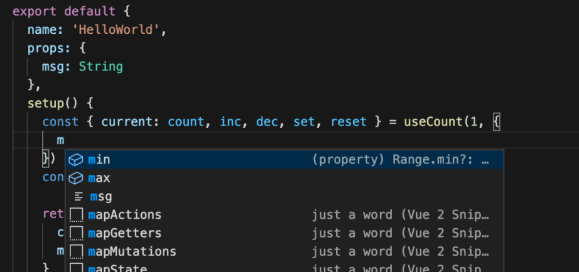
}分析源码
这里首先是对 hooks 函数的入参类型和返回类型进行了定义,入参的 Range 和返回的 Result 分别用一个接口来指定,这样做了以后,最大的好处就是在使用 useCount 函数的时候,ide就会自动提示哪些参数是必填项,各个参数的类型是什么,防止业务逻辑出错。
接下来,在增加 inc 和减少 dec 的两个函数中增加了 typeo 类型守卫检查,因为传入的 delta 类型值在某些特定场景下不是很确定,比如在 template 中调用方法的话,类型检查可能会失效,传入的类型就是一个原生的 Event 。
关于 ref 类型值,这里并没有特别声明类型,因为 vue3 会进行自动类型推导,但如果是复杂类型的话可以采用类型断言的方式:ref(initObj) as Ref<ObjType>
AnyScript
在初期使用 TypeScript 的时候,很多掘友都很喜欢使用 any 类型,硬生生把TypeScript 写成了 AnyScript ,虽然使用起来很方便,但是这就失去了 TypeScript 的类型检查意义了,当然写类型的习惯是需要慢慢去养成的,不用急于一时。
Vetur
vetur 代码检查工具在写vue代码的时候会非常有用,就像构建 vue 项目少不了 vue-cli 一样,vetur 提供了 vscode 的插件支持,赶着升级 vue3 这一波工作,顺带也把 vetur 也带上吧。
├─public
│      favicon.ico
│      index.html
└─src
    │  App.vue
    │  main.ts
    │  shims-vue.d.ts
    ├─assets
    │  │  logo.png
    │  └─css
    │          base.css
    │          main.styl
    ├─components
    │  │  HelloWorld.vue
    │  └─base
    │          Button.vue
    │          index.ts
    │          Select.vue
    ├─directive
    │      focus.ts
    │      index.ts
    │      pin.ts
    ├─router
    │      index.ts
    ├─store
    │      index.ts
    ├─utils
    │  │  cookie.ts
    │  │  deep-clone.ts
    │  │  index.ts
    │  │  storage.ts
    │  └─validate
    │          date.ts
    │          email.ts
    │          mobile.ts
    │          number.ts
    │          system.ts
    └─views
        │  About.vue
        │  Home.vue
        │  LuckDraw.vue
        │  TodoList.vue
        └─address
                AddressEdit.tsx
                AddressList.tsx
.vue写法
<template>
  ...
</template>

<script lang="ts">
import dayjs from "dayjs";
import { ref, reactive, onMounted } from "vue";
import { Button, Step, Steps, NoticeBar } from "vant";

export default {
  components: {
    Button,
    Step,
    Steps,
    NoticeBar,
  },
  setup() {
    const nameinput = ref();
    const selectionStart = ref(0);
    const twoNow = dayjs().subtract(2, "day").format("YYYY-MM-DD HH:mm:ss");
    const now = dayjs().format("YYYY-MM-DD HH:mm:ss");
    const now2 = dayjs().add(2, "day").format("YYYY-MM-DD HH:mm:ss");
    const formData = reactive({
      name: "",
      phone: "",
      code: "",
    });

    onMounted(() => {
      (nameinput.value as HTMLInputElement).focus();
    });

    const insertName = () => {
      const index = (nameinput.value as HTMLInputElement).selectionStart;
      if (typeof index !== "number") return;
      formData.name =
        formData.name.slice(0, index) + "哈哈" + formData.name.slice(index);
    };

    return {
      nameinput,
      formData,
      insertName,
      selectionStart,
      twoNow,
      now,
      now2,
    };
  },
};
</script>
<template>
...
</template>
<script lang="ts">
import dayjs from "dayjs";
import { defineComponent } from "vue";
import HelloWorld from "@/components/HelloWorld.vue"; // @ is an alias to /src
import { Button, Dialog, Toast } from "vant";
export default defineComponent({
name: "Home",
components: {
HelloWorld,
Button,
},
data() {
return {
direction: "top",
pinPadding: 0,
time: "",
timer: 0,
color: "red",
};
},
methods: {
showToast() {
Toast("字体颜色已改蓝色");
this.color = "blue";
},
handleClick() {
Dialog({
title: "标题",
message: "这是一个全局按钮组件",
});
},
initTime() {
this.time = dayjs().format("YYYY-MM-DD HH:mm:ss");
this.timer = setInterval(() => {
this.time = dayjs().format("YYYY-MM-DD HH:mm:ss");
}, 1000);
},
},
created() {
this.initTime();
},
beforeUnmount() {
clearInterval(this.timer);
},
});
</script>
<style vars="{ color }">
.text-color {
color: var(--color);
}
</style>tsx写法
import { ref, reactive } from "vue";
import { AddressList, NavBar, Toast, Popup } from "vant";
import AddressEdit from './AddressEdit'
import router from '@/router'
export default {
  setup() {
    const chosenAddressId = ref('1')
    const showEdit = ref(false)
    const list = reactive([
      {
        id: '1',
        name: '张三',
        tel: '13000000000',
        address: '浙江省杭州市西湖区文三路 138 号东方通信大厦 7 楼 501 室',
        isDefault: true,
      },
      {
        id: '2',
        name: '李四',
        tel: '1310000000',
        address: '浙江省杭州市拱墅区莫干山路 50 号',
      },
    ])
    const disabledList = reactive([
      {
        id: '3',
        name: '王五',
        tel: '1320000000',
        address: '浙江省杭州市滨江区江南大道 15 号',
      },
    ])
    const onAdd = () => {
      showEdit.value = true
    }
    const onEdit = (item: any, index: string) => {
      Toast('编辑地址:' + index);
    }
    const onClickLeft = () => {
      router.back()
    }
    const onClickRight = () => {
      router.push('/todoList')
    }
    return () => {
      return (
        <div >
          <NavBar
            title="地址管理"
            left-text="返回"
            right-text="Todo"
            left-arrow
            onClick-left={onClickLeft}
            onClick-right={onClickRight}
          />
          <AddressList
            vModel={chosenAddressId.value}
            list={list}
            disabledList={disabledList}
            disabledText="以下地址超出配送范围"
            defaultTagText="默认"
            onAdd={onAdd}
            onEdit={onEdit}
          />
          <Popup vModel={[showEdit.value, 'show']} position="bottom" round  >
            <AddressEdit />
          </Popup>
        </div >
      );
    };
  }
};
感谢各位的阅读,以上就是“Vue3和TypeScript怎么搭建完整的项目结构”的内容了,经过本文的学习后,相信大家对Vue3和TypeScript怎么搭建完整的项目结构这一问题有了更深刻的体会,具体使用情况还需要大家实践验证。这里是亿速云,小编将为大家推送更多相关知识点的文章,欢迎关注!
免责声明:本站发布的内容(图片、视频和文字)以原创、转载和分享为主,文章观点不代表本网站立场,如果涉及侵权请联系站长邮箱:is@yisu.com进行举报,并提供相关证据,一经查实,将立刻删除涉嫌侵权内容。


