本文小编为大家详细介绍“Pinia、Vuex与两个Vue状态管理模式怎么应用”,内容详细,步骤清晰,细节处理妥当,希望这篇“Pinia、Vuex与两个Vue状态管理模式怎么应用”文章能帮助大家解决疑惑,下面跟着小编的思路慢慢深入,一起来学习新知识吧。
Pinia和Vuex一样都是是vue的全局状态管理器。其实Pinia就是Vuex5,只不过为了尊重原作者的贡献就沿用了这个看起来很甜的名字Pinia。
Vuex
npm i vuex -S
Pinia
npm i pinia -S
在src目录下新建vuexStore,实际项目中你只需要建一个store目录即可,由于我们需要两种状态管理器,所以需要将其分开并创建两个store目录
新建vuexStore/index.js
import { createStore } from 'vuex'

export default createStore({
    //全局state,类似于vue种的data
    state() {
      return {
        vuexmsg: "hello vuex",
        name: "xiaoyue",
      };
    },


    //修改state函数
    mutations: {
    },

    //提交的mutation可以包含任意异步操作
    actions: {
    },

    //类似于vue中的计算属性
    getters: {
    },

    //将store分割成模块(module),应用较大时使用
    modules: {
    }
})
main.js引入
import { createApp } from 'vue'
import App from './App.vue'
import store from '@/vuexStore'
createApp(App).use(store).mount('#app')
App.vue测试
<template>
  <div></div>
</template>
<script setup>
import { useStore } from 'vuex'
let vuexStore = useStore()
console.log(vuexStore.state.vuexmsg); //hello vuex
</script>
页面正常打印hello vuex说明我们的Vuex已经挂载成功了
main.js引入
import { createApp } from "vue";
import App from "./App.vue";
import {createPinia} from 'pinia'
const pinia = createPinia()
createApp(App).use(pinia).mount("#app");
创建Store
src下新建piniaStore/storeA.js
import { defineStore } from "pinia";

export const storeA = defineStore("storeA", {
  state: () => {
    return {
      piniaMsg: "hello pinia",
    };
  },
  getters: {},
  actions: {},
});
App.vue使用
<template>
  <div></div>
</template>
<script setup>
import { storeA } from '@/piniaStore/storeA'
let piniaStoreA = storeA()
console.log(piniaStoreA.piniaMsg); //hello pinia
</script>
从这里我们可以看出pinia中没有了mutations和modules,pinia不必以嵌套(通过modules引入)的方式引入模块,因为它的每个store便是一个模块,如storeA,storeB... 。 在我们使用Vuex的时候每次修改state的值都需要调用mutations里的修改函数(下面会说到),因为Vuex需要追踪数据的变化,这使我们写起来比较繁琐。而pinia则不再需要mutations,同步异步都可在actions进行操作,至于它没有了mutations具体是如何最终到state变化的,这里我们不过多深究,大概好像应该是通过hooks回调的形式解决。
获取state的值从上面我们已经可以一目了然的看到了,下面让我们看看他俩修改state的方法吧
vuex在组件中直接修改state,如App.vue
<template>
  <div>{{vuexStore.state.vuexmsg}}</div>
</template>
<script setup>
import { useStore } from 'vuex'
let vuexStore = useStore()
vuexStore.state.vuexmsg = 'hello juejin'
console.log(vuexStore.state.vuexmsg)

</script>
可以看出我们是可以直接在组件中修改state的而且还是响应式的,但是如果这样做了,vuex不能够记录每一次state的变化记录,影响我们的调试。当vuex开启严格模式的时候,直接修改state会抛出错误,所以官方建议我们开启严格模式,所有的state变更都在vuex内部进行,在mutations进行修改。例如vuexStore/index.js:
import { createStore } from "vuex";

export default createStore({
  strict: true,
  //全局state,类似于vue种的data
  state: {
    vuexmsg: "hello vuex",
  },

  //修改state函数
  mutations: {
    setVuexMsg(state, data) {
      state.vuexmsg = data;
    },
  },

  //提交的mutation可以包含任意异步操作
  actions: {},

  //类似于vue中的计算属性
  getters: {},

  //将store分割成模块(module),应用较大时使用
  modules: {},
});
当我们需要修改vuexmsg的时候需要提交setVuexMsg方法,如App.vue
<template>
  <div>{{ vuexStore.state.vuexmsg }}</div>
</template>
<script setup>
import { useStore } from 'vuex'
let vuexStore = useStore()
vuexStore.commit('setVuexMsg', 'hello juejin')
console.log(vuexStore.state.vuexmsg) //hello juejin

</script>
或者我们可以在actions中进行提交mutations修改state:
import { createStore } from "vuex";
export default createStore({
  strict: true,
  //全局state,类似于vue种的data
  state() {
    return {
      vuexmsg: "hello vuex",
    }
  },

  //修改state函数
  mutations: {
    setVuexMsg(state, data) {
      state.vuexmsg = data;
    },
  },

  //提交的mutation可以包含任意异步操作
  actions: {
    async getState({ commit }) {
      //const result = await xxxx 假设这里进行了请求并拿到了返回值
      commit("setVuexMsg", "hello juejin");
    },
  }
});
组件中使用dispatch进行分发actions
<template>
<div>{{ vuexStore.state.vuexmsg }}</div>
</template>
<script setup>
import { useStore } from 'vuex'
let vuexStore = useStore()
vuexStore.dispatch('getState')
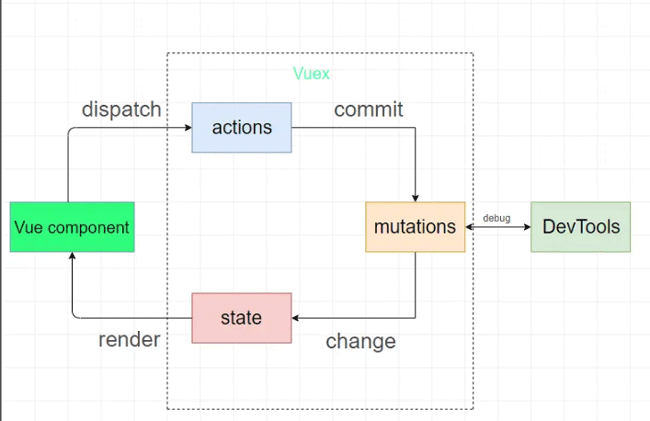
</script>一般来说,vuex中的流程是首先actions一般放异步函数,拿请求后端接口为例,当后端接口返回值的时候,actions中会提交一个mutations中的函数,然后这个函数对vuex中的状态(state)进行一个修改,组件中再渲染这个状态,从而实现整个数据流程都在vuex内部进行便于检测。直接看图,一目了然
直接修改
相比于Vuex,Pinia是可以直接修改状态的,并且调试工具能够记录到每一次state的变化,如App.vue
<template>
  <div>{{ piniaStoreA.piniaMsg }}</div>
</template>
<script setup>
import { storeA } from '@/piniaStore/storeA'
let piniaStoreA = storeA()
console.log(piniaStoreA.piniaMsg); //hello pinia

piniaStoreA.piniaMsg = 'hello juejin'
console.log(piniaStoreA.piniaMsg); //hello juejin

</script>
$patch
使用$patch方法可以修改多个state中的值,比如我们在piniaStore/storeA.js中的state增加一个name
import { defineStore } from "pinia";

export const storeA = defineStore("storeA", {
  state: () => {
    return {
      piniaMsg: "hello pinia",
      name: "xiaoyue",
    };
  },
  getters: {},
  actions: {},
});
然后我们在App.vue中进行修改这两个state
import { storeA } from '@/piniaStore/storeA'
let piniaStoreA = storeA()
console.log(piniaStoreA.name); //xiaoyue
piniaStoreA.$patch({
  piniaMsg: 'hello juejin',
  name: 'daming'
})
console.log(piniaStoreA.name);//daming
当然也是支持修改单个状态的如
piniaStoreA.$patch({
  name: 'daming'
})
$patch还可以使用函数的方式进行修改状态
import { storeA } from '@/piniaStore/storeA'
let piniaStoreA = storeA()
cartStore.$patch((state) => {
  state.name = 'daming'
  state.piniaMsg = 'hello juejin'
})
在actions中进行修改
不同于Vuex的是,Pinia去掉了mutations,所以在actions中修改state就行Vuex在mutations修改state一样。其实这也是我比较推荐的一种修改状态的方式,就像上面说的,这样可以实现整个数据流程都在状态管理器内部,便于管理。
在piniaStore/storeA.js的actions添加一个修改name的函数
import { defineStore } from "pinia";
export const storeA = defineStore("storeA", {
  state: () => {
    return {
      piniaMsg: "hello pinia",
      name: "xiao yue",
    };
  },
  actions: {
    setName(data) {
      this.name = data;
    },
  },
});
组件App.vue中调用不需要再使用dispatch函数,直接调用store的方法即可
import { storeA } from '@/piniaStore/storeA'
let piniaStoreA = storeA()
piniaStoreA.setName('daming')
重置state
Pinia可以使用$reset将状态重置为初始值
import { storeA } from '@/piniaStore/storeA'
let piniaStoreA = storeA()
piniaStoreA.$reset()当我们组件中需要用到state中多个参数时,使用解构的方式取值往往是很方便的,但是传统的ES6解构会使state失去响应式,比如组件App.vue,我们先解构取得name值,然后再去改变name值,然后看页面是否变化
<template>
  <div>{{ name }}</div>
</template>
<script setup>
import { storeA } from '@/piniaStore/storeA'
let piniaStoreA = storeA()
let { piniaMsg, name } = piniaStoreA
piniaStoreA.$patch({
  name: 'daming'
})

</script>
浏览器展示如下

我们可以发现浏览器并没有更新页面为daming
为了解决这个问题,Pinia提供了一个结构方法storeToRefs,我们将组件App.vue使用storeToRefs解构
<template>
  <div>{{ name }}</div>
</template>
<script setup>
import { storeA } from '@/piniaStore/storeA'
import { storeToRefs } from 'pinia'
let piniaStoreA = storeA()
let { piniaMsg, name } = storeToRefs(piniaStoreA)
piniaStoreA.$patch({
  name: 'daming'
})

</script>
再看下页面变化
我们发现页面已经被更新成daming了
其实Vuex中的getters和Pinia中的getters用法是一致的,用于自动监听对应state的变化,从而动态计算返回值(和vue中的计算属性差不多),并且getters的值也具有缓存特性
我们先将piniaStore/storeA.js改为
import { defineStore } from "pinia";

export const storeA = defineStore("storeA", {
  state: () => {
    return {
      count1: 1,
      count2: 2,
    };
  },
  getters: {
    sum() {
      console.log('我被调用了!')
      return this.count1 + this.count2;
    },
  },
});
然后在组件App.vue中获取sum
<template>
  <div>{{ piniaStoreA.sum }}</div>
</template>
<script setup>
import { storeA } from '@/piniaStore/storeA'
let piniaStoreA = storeA()
console.log(piniaStoreA.sum) //3

</script>
让我们来看下什么是缓存特性。首先我们在组件多次访问sum再看下控制台打印
import { storeA } from '@/piniaStore/storeA'
let piniaStoreA = storeA()
console.log(piniaStoreA.sum)
console.log(piniaStoreA.sum)
console.log(piniaStoreA.sum)
piniaStoreA.count1 = 2
console.log(piniaStoreA.sum)
从打印结果我们可以看出只有在首次使用用或者当我们改变sum所依赖的值的时候,getters中的sum才会被调用
Vuex中的getters使用和Pinia的使用方式类似,就不再进行过多说明,写法如下vuexStore/index.js
import { createStore } from "vuex";

export default createStore({
  strict: true,
  //全局state,类似于vue种的data
  state: {
    count1: 1,
    count2: 2,
  },

  //类似于vue中的计算属性
  getters: {
    sum(state){
      return state.count1 + state.count2
    }
  }


});如果项目比较大,使用单一状态库,项目的状态库就会集中到一个大对象上,显得十分臃肿难以维护。所以Vuex就允许我们将其分割成模块(modules),每个模块都拥有自己state,mutations,actions...。而Pinia每个状态库本身就是一个模块。
Pinia没有modules,如果想使用多个store,直接定义多个store传入不同的id即可,如:
import { defineStore } from "pinia";

export const storeA = defineStore("storeA", {...});
export const storeB = defineStore("storeB", {...});
export const storeC = defineStore("storeB", {...});一般来说每个module都会新建一个文件,然后再引入这个总的入口index.js中,这里为了方便就写在了一起
import { createStore } from "vuex";
const moduleA = {
  state: () => ({
    count:1
   }),
  mutations: {
    setCount(state, data) {
      state.count = data;
    },
  },
  actions: {
    getuser() {
      //do something
    },
  },
  getters: { ... }
}

const moduleB = {
  state: () => ({ ... }),
  mutations: { ... },
  actions: { ... }
}

export default createStore({
  strict: true,
  //全局state,类似于vue种的data
  state() {
    return {
      vuexmsg: "hello vuex",
      name: "xiaoyue",
    };
  },
  modules: {
    moduleA,
    moduleB
  },
});
使用moduleA
import { useStore } from 'vuex'
let vuexStore = useStore()
console.log(vuexStore.state.moduleA.count) //1
vuexStore.commit('setCount', 2)
console.log(vuexStore.state.moduleA.count) //2
vuexStore.dispatch('getuser')
一般我们为了防止提交一些mutation或者actions中的方法重名,modules一般会采用命名空间的方式 namespaced: true 如moduleA:
const moduleA = {
  namespaced: true,
  state: () => ({
    count: 1,
  }),
  mutations: {
    setCount(state, data) {
      state.count = data;
    },
  },
  actions: {
    getuser() {
      //do something
    },
  },
}
此时如果我们再调用setCount或者getuser
vuexStore.commit('moduleA/setCount', 2)
vuexStore.dispatch('moduleA/getuser')
读到这里,这篇“Pinia、Vuex与两个Vue状态管理模式怎么应用”文章已经介绍完毕,想要掌握这篇文章的知识点还需要大家自己动手实践使用过才能领会,如果想了解更多相关内容的文章,欢迎关注亿速云行业资讯频道。
免责声明:本站发布的内容(图片、视频和文字)以原创、转载和分享为主,文章观点不代表本网站立场,如果涉及侵权请联系站长邮箱:is@yisu.com进行举报,并提供相关证据,一经查实,将立刻删除涉嫌侵权内容。


