目录
一、必须安装在ansible的Linux管控主机上安装控制Windows的组件
  1.安装pywinrm,kerberos
二、配置Windows主机
  1.安装安装Framework 4.5(最低3.0)
  2.修改注册列表:设置powershell本地脚本运行权限为remotesigned
  2.升级到powershell-3.0
  3.配置winrm
三、功能测试
下面开始...
一、配置ansible管控机器
使用Python的pip安装pywinrm及kerberos
$ sudo pip install http://github.com/diyan/pywinrm/archive/master.zip#egg=pywinrm
$ sudo pip install kerberos
在安装kerberos之前需要安装
$ sudo apt-get install libkrb5-dev
否则报错为
$ sudo pip install kerberos
running build_ext
building 'kerberos' extension
creating build
creating build/temp.linux-x86_64-2.7
creating build/temp.linux-x86_64-2.7/src
gcc -pthread -fno-strict-aliasing -DNDEBUG -g -fwrapv -O2 -Wall -Wstrict-prototypes -fPIC -I/usr/include/python2.7 -c src/base64.c -o build/temp.linux-x86_64-2.7/src/base64.o sh: 1: krb5-config: not found
gcc: error: sh:: No such file or directory
gcc: error: 1:: No such file or directory
gcc: error: krb5-config:: No such file or directory
gcc: error: not: No such file or directory
gcc: error: found: No such file or directory
error: command 'gcc' failed with exit status 1
----------------------------------------
Command /usr/bin/python -c "import setuptools;__file__='/etc/ansible/scripts/build/kerberos/setup.py';exec(compile(open(__file__).read().replace('\r\n', '\n'), __file__, 'exec'))" install --single-version-externally-managed --record /tmp/pip-Q3eBF1-record/install-record.txt failed with error code 1
Storing complete log in /home/ansible/.pip/pip.log
二、配置windows主机
查看系统中.Net版本及powershell版本
.Net版本为CLRVersion;powershell使用$host中Version
PS C:\Users\ABC> $psversiontable
Name                           Value
----                           -----
CLRVersion                       2.0.50727.5485
BuildVersion                      6.1.7601.17514
PSVersion                        2.0
WSManStackVersion                    2.0
PSCompatibleVersions                  1.0, 2.0}
SerializationVersion                  1.1.0.1
PSRemotingProtocolVersion                2.1

PS C:\Users\ABC> $host


Name               : ConsoleHost
Version              : 2.0
InstanceId            : 586e26ae-8630-4add-aa4c-d864726f5384
UI                : System.Management.Automation.Internal.Host.InternalHostUserInterface
CurrentCulture          : zh-CN
CurrentUICulture         : zh-CN
PrivateData            : Microsoft.PowerShell.ConsoleHost+ConsoleColorProxy
IsRunspacePushed         : False
Runspace             : System.Management.Automation.Runspaces.LocalRunspace
1.安装安装Framework 4.5(最低3.0)
http://download.microsoft.com/download/B/A/4/BA4A7E71-2906-4B2D-A0E1-80CF16844F5F/dotNetFx45_Full_x86_x64.exe
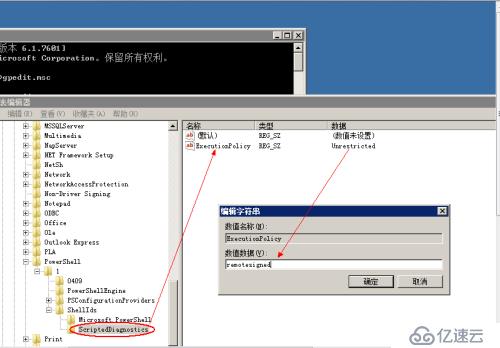
2.修改注册列表:设置powershell本地脚本运行权限为remotesigned
HKEY_LOCAL_MACHINE\SOFTWARE\Microsoft\PowerShell\1\ShellIds\Microsoft\PowerShell
2.升级到powershell-3.0及winrm
官网上说下载并执行下述脚本,但是一直不成功,原因是一直下载不下来安装包(可能的情况是网络不可达,大家懂得)
https://github.com/cchurch/ansible/blob/devel/examples/scripts/upgrade_to_ps3.ps1
于是手动找通过微软官网找到下载地址win7_x64升级包如下
https://www.microsoft.com/en-us/download/confirmation.aspx?id=34595
下载powershell-3.0的更新补丁,此补丁同时集成WMF3.0,winrm等
地址:
https://download.microsoft.com/download/E/7/6/E76850B8-DA6E-4FF5-8CCE-A24FC513FD16/Windows6.1-KB2506143-x64.msu
(注意:这个更新包依赖于.net3.0以上版本,如果未安装.net,会有提示“此更新不适应于您的计算机”)
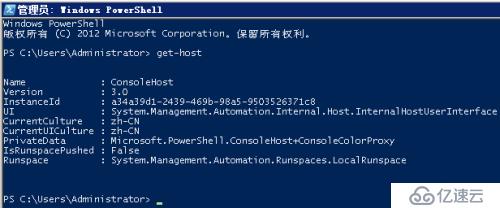
安装完成之后需要重启,重启后检验powershell版本
> get-host
3.配置winrm
3.1 下载下面脚本,使用powershell运行,自动配置好winrm
https://github.com/ansible/ansible/blob/devel/examples/scripts/ConfigureRemotingForAnsible.ps1
(注意:官网教程直到上面结束,但是一般执行完之后检验winrm是否已经运行,因为ansible管控机需要通过端口进行访问winrm)
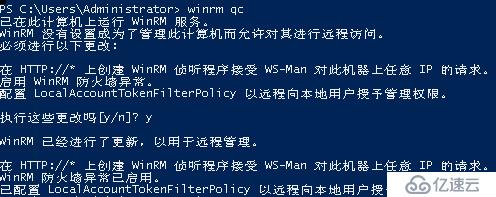
3.2 在计算机上运行winrm服务
powershell 3.0中执行
> winrm qc

这个提示,请将网络设置将工作网络 改成 家庭网络 就可以了,特殊情况可能需要重启,
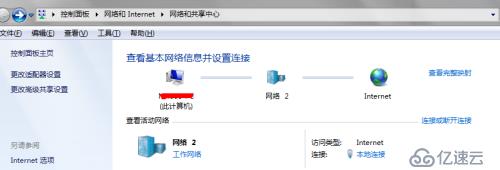
配置好网络类型重新启动服务,结果如下:
开启后,需要查看配置是否已经开启
3.3 主要是下图Auth中Basic设置为true,service中AllowUnencrypted设置为true。
> winrm set winrm/config/service '@{AllowUnencrypted="true"}'
> winrm set winrm/config/service/auth '@{Basic="true"}'
三、功能测试
配置ansible控制机
配置方法有两种:
第一种:
在/etc/ansible/hosts中
[windows]
192.168.1.11
[windows:vars]
ansible_ssh_user="Administrator"
ansible_ssh_pass="123456"
ansible_ssh_port=5986
ansible_connection="winrm"
$ ansible windows -m win_ping
192.168.1.11 | SUCCESS => {
    "changed": false,
    "ping": "pong"
}
第二种
在/etc/ansible/hosts中
[windows]
192.168.1.11 ansible_ssh_user="Administrator" ansible_ssh_pass="123456" ansible_ssh_port=5986 ansible_connection="winrm"
要注意的是 端口方面ssl即https方式的使用5986,http使用5985。
区别于控制Linux主机,win主机的命令,需要加上win_,具体支持情况请见官网
http://docs.ansible.com/ansible/list_of_windows_modules.html
我这里做部分常用测试
传文件
删文件
创建用户(创建用户,更改密码,创建可以进行远程桌面登录的用户)
执行cmd命令(重启电脑)
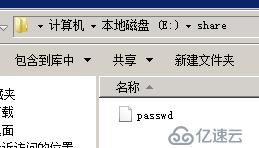
1. 传文件到windows系统
$ ansible windows -m win_copy -a "src=/etc/passwd dest=e:\share"
192.168.1.11 | SUCCESS => {
    "changed": true,
    "checksum": "a82c2bd7de3d9a5c5adddd5e4fc7cbf1703720b7",
    "operation": "file_copy",
    "original_basename": "passwd",
    "size": 1755
}
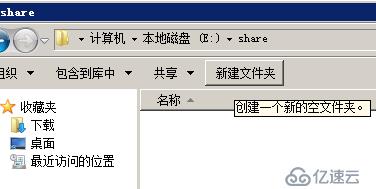
2. 删除文件
$ ansible windows -m win_file -a "dest=e:\share\passwd state=absent"
192.168.1.11 | SUCCESS => {
    "changed": true
}
3.创建用户
$ ansible windows -m win_user -a "name=aa passwd=123456"
192.168.1.11 | SUCCESS => {
    "account_disabled": false,
    "account_locked": false,
    "changed": true,
    "description": "",
    "fullname": "aa",
    "groups": [],
    "name": "aa",
    "password_expired": true,
    "password_never_expires": false,
    "path": "WinNT://WORKGROUP/ABC-PC/aa",
    "sid": "S-1-5-21-37586581-19248684-93829760-1006",
    "state": "present",
    "user_cannot_change_password": false
}
场景需求:
创建一个名叫user1的管理员用户,要求能够远程访问
$ ansible windows -m win_user -a "name=user1 password=123 groups='Administrators,Remote Desktop Users'"
192.168.1.11 | SUCCESS => {
    "account_disabled": false,
    "account_locked": false,
    "changed": true,
    "description": "",
    "fullname": "user1",
    "groups": [
        {
            "name": "Administrators",
            "path": "WinNT://WORKGROUP/ABC-PC/Administrators"
        },
        {
            "name": "Remote Desktop Users",
            "path": "WinNT://WORKGROUP/ABC-PC/Remote Desktop Users"
        }
    ],
    "name": "user1",
    "password_expired": false,
    "password_never_expires": false,
    "path": "WinNT://WORKGROUP/ABC-PC/user1",
    "sid": "S-1-5-21-375864581-19248684-93852960-1009",
    "state": "present",
    "user_cannot_change_password": false
}
4. 执行cmd命令
重启的第一种方式
$ ansible windows -m win_shell -a "shutdown -r -t 1"
第二种方式,不加参数等同于第一种方式
$ ansible windows -m win_reboot
未完待续,持续更新......
免责声明:本站发布的内容(图片、视频和文字)以原创、转载和分享为主,文章观点不代表本网站立场,如果涉及侵权请联系站长邮箱:is@yisu.com进行举报,并提供相关证据,一经查实,将立刻删除涉嫌侵权内容。


