Ceph块设备,以前称为 RADOS 块设备,为客户机提供可靠的、分布式的和高性能的块存储磁盘。
RADOS 块设备利用 librbd 库并以顺序的形式在 Ceph 集群中的多个 osd 上存储数据块。RBD是由 Ceph 的 RADOS 层支持的,因此每个块设备都分布在多个 Ceph 节点上,提供了高性能和优异的可靠性。RBD 有 linux 内核的本地支持。
任何普通的 linux 主机都可以充当 Ceph 的客户机。客户端通过网络与 Ceph 存储集群交互以存储或检索用户数据。Ceph RBD 支持已经添加到 Linux主线内核中,从 2.6.34和以后的版本开始。
192.168.3.158为客户端做如下操作
[root@localhost ~]# cat /etc/hosts
……
192.168.3.165 ceph265
192.168.3.166 ceph266
192.168.3.167 ceph267
192.168.3.158 ceph258

[root@localhost ~]# hostnamectl set-hostname ceph258
# wget -O /etc/yum.repos.d/ceph.repo https://raw.githubusercontent.com/aishangwei/ceph-demo/master/ceph-deploy/ceph.repo
# mkdir -p /etc/ceph
# yum -y install epel-release
# yum -y install ceph
# cat /etc/ceph/ceph.client.rbd.keyring
# 创建 ceph 块客户端用户名和认证密钥
[ceph@ceph265 my-cluster]$ ceph auth get-or-create client.rbd mon 'allow r' osd 'allow class-read object_prefix rbd_children, allow rwx pool=rbd' | tee ./ceph.client.rbd.keyring
[client.rbd]
   key = AQBLBwRepKVJABAALyRx67z6efeI4xogPqHkyw==
  注: client.rbd 为客户端名
     mon 之后的全为授权配置
拷贝配置文件及密钥到客户机
[ceph@ceph265 my-cluster]$ scp ceph.client.rbd.keyring root@192.168.3.158:/etc/ceph
[ceph@ceph265 my-cluster]$ scp ceph.conf root@192.168.3.158:/etc/ceph
# 检查是否符合块设备环境要求
uname -r
modprobe rbd
#安装 ceph 客户端
# wget -O /etc/yum.repos.d/ceph.repo https://raw.githubusercontent.com/aishangwei/ceph-demo/master/ceph-deploy/ceph.repo
查看密钥文件
[root@ceph258 ~]# cat /etc/ceph/ceph.client.rbd.keyring
[client.rdb]
   key = AQBLBwRepKVJABAALyRx67z6efeI4xogPqHkyw==
[root@ceph258 ~]# ceph -s --name client.rbd

在服务器192.168.3.165执行如下命令
(1) 创建块设备
默认创建块设备,会直接创建在 rbd 池中,但使用 deploy 安装后,该 rbd 池并没有创建。
# 创建池和块
$ ceph osd lspools    # 查看集群存储池
$ ceph osd pool create rbd 50
   pool 'rbd' created   # 50 为 place group 数量,由于我们后续测试,也需要更多的 pg,所以这里设置为50
确定pg_num取值是强制性的,因为不能自动计算。下面是几个常用的值:
少于5个OSD时可把pg_num设置为128
OSD数量在5到10个时,可把pg_num设置为512
OSD数量在10到50个时,可把pg_num设置为4096
OSD数量大于50时,你得理解权衡方法、以及如何自己计算pg_num取值

(2)客户端创建 块设备
创建一个容量为 5105M 的 rbd 块设备
[root@ceph258 ~]# rbd create rbd2 --size 5105 --name client.rbd

192.168.3.158 客户端查看 rbd2 块设备
[root@ceph258 ~]# rbd ls --name client.rbd
 rbd2
[root@ceph258 ~]# rbd ls -p rbd --name client.rbd
 rbd2
[root@ceph258 ~]# rbd list --name client.rbd
 rbd2

查看 rbd2块设备信息
[root@ceph258 ~]# rbd --image rbd2 info --name client.rbd

# 映射到客户端,应该会报错
[root@ceph258 ~]# rbd map --image rbd2 --name client.rbd

layering:分层支持
- exclusive-lock:排它锁定支持对
- object-map:对象映射支持(需要排它锁定(exclusive-lock))
- deep-flatten:快照平支持(snapshot flatten support)
- fast-diff:在client-node1上使用krbd(内核rbd)客户机进行快速diff计算(需要对象映射),我们将无法在CentOS内核3.10上映射块设备映像,因为该内核不支持对象映射(object-map)、深平(deep-flatten)和快速dif(fast-dif)(在内核4.9中引入了支持)。为了解决这个问题,我们将禁用不支持的特性,有几个选项可以做到这一点:
1)动态禁用
rbd feature disable rbdl exclusive-lock object-map deep-flatten fast-diff--name client.rbd
2)创建RBD镜像时,只启用分层特性。
rbd create rbd2 --size 10240 --image-feature layering--name client.rbd
3)ceph配置文件中禁用
rbd_default_features=1
# 我们这里动态禁用
[root@ceph258 ~]# rbd feature disable rbd2 exclusive-lock object-map fast-diff deep-flatten --name client.rbd

对 rbd2 进行映射
[root@ceph258 ~]# rbd map --image rbd2 --name client.rbd

查看本机已经映射的 rbd 镜像
[root@ceph258 ~]# rbd showmapped --name client.rbd

查看磁盘 rbd0 大小

格式化 rbd0

创建挂载目录并进行挂载
[root@ceph258 ~]# mkdir /mnt/ceph-disk1
[root@ceph258 ~]# mount /dev/rbd0 /mnt/ceph-disk1/

# 写入数据测试
[root@ceph258 ~]# dd if=/dev/zero of=/mnt/ceph-disk1/file1 count=100 bs=1M


# 做成服务,开机自动挂载
[root@ceph203-]# wget -O /usr/local/bin/rbd-mount https://raw.githubusercontent.com/aishangwei/ceph-demo/master/client/rbd-mount
# vim /usr/local/bin/rbd-mount

[root@ceph258 ~]# chmod +x /usr/local/bin/rbd-mount
[root@ceph258~ ]# wget -O /etc/systemd/system/rbd-mount.service https://raw.githubusercontent.com/aishangwei/ceph-demo/master/client/rbd-mount.service
[root@ceph258 ~]# systemctl daemon-reload
[root@ceph258 ~]# systemctl enable rbd-mount.service
Created symlink from /etc/systemd/system/multi-user.target.wants/rbd-mount.service to /etc/systemd/system/rbd-mount.service.

卸载手动挂载的目录,进行服务自动挂载测试
[root@ceph258 ~]# umount /mnt/ceph-disk1/
[root@ceph258 ~]# systemctl status rbd-mount

Ceph: RBD 在线扩容容量
Ceph管理端的操作
查询 pool 总容量及已经分配容量
[root@ceph265 ~]# ceph df

查看已经存在的 pool
[root@ceph265 ~]# ceph osd lspools

查看已经有的 rbd

开始对 rbd2 进行动态扩容
[root@ceph265 ~]# rbd resize rbd/rbd2 --size 7168

Ceph客户端的操作
[root@ceph258 ~]# rbd showmapped

[root@ceph258 ~]# df -h

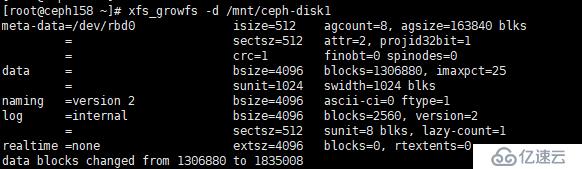
[root@ceph258 ~]# xfs_growfs -d /mnt/ceph-disk1

输入ceph-deploy mon create-initial命令获取密钥key,会在当前目录(如我的是~/etc/ceph/)下生成几个key,但报错如下。意思是:就是配置失败的两个结点的配置文件的内容于当前节点不一致,提示使用--overwrite-conf参数去覆盖不一致的配置文件。
# ceph-deploy mon create-initial
...
[ceph3][DEBUG ] remote hostname: ceph3
[ceph3][DEBUG ] write cluster configuration to /etc/ceph/{cluster}.conf
[ceph_deploy.mon][ERROR ] RuntimeError: config file /etc/ceph/ceph.conf exists with different content; use --overwrite-conf to overwrite
[ceph_deploy][ERROR ] GenericError: Failed to create 2 monitors
...
输入命令如下(此处我共配置了三个结点ceph2~3):
# ceph-deploy --overwrite-conf mon create ceph{3,1,2}
...
[ceph3][DEBUG ] remote hostname: ceph3
[ceph3][DEBUG ] write cluster configuration to /etc/ceph/{cluster}.conf
[ceph3][DEBUG ] create the mon path if it does not exist
[ceph3][DEBUG ] checking for done path: /var/lib/ceph/mon/ceph-ceph3/done
...
之后配置成功,可继续进行初始化磁盘操作。
[root@ceph2 ceph]# ceph -s
cluster:
id: 8e2248e4-3bb0-4b62-ba93-f597b1a3bd40
health: HEALTH_WARN
too few PGs per OSD (21 < min 30)
services:
mon: 3 daemons, quorum ceph3,ceph2,ceph4
……
从上面集群状态信息可查,每个osd上的pg数量=21<最小的数目30个。pgs为32,因为我之前设置的是2副本的配置,所以当有3个osd的时候,每个osd上均分了32÷3*2=21个pgs,也就是出现了如上的错误 小于最小配置30个。
集群这种状态如果进行数据的存储和操作,会发现集群卡死,无法响应io,同时会导致大面积的osd down。
解决办法:
增加pg数
因为我的一个pool有8个pgs,所以我需要增加两个pool才能满足osd上的pg数量=48÷3*2=32>最小的数目30。
[root@ceph2 ceph]# ceph osd pool create mytest 8
pool 'mytest' created
[root@ceph2 ceph]# ceph osd pool create mytest1 8
pool 'mytest1' created
[root@ceph2 ceph]# ceph -s
cluster:
id: 8e2248e4-3bb0-4b62-ba93-f597b1a3bd40
health: HEALTH_OK
services:
mon: 3 daemons, quorum ceph3,ceph2,ceph4
mgr: ceph3(active), standbys: ceph2, ceph4
osd: 3 osds: 3 up, 3 in
rgw: 1 daemon active
data:
pools: 6 pools, 48 pgs
objects: 219 objects, 1.1 KiB
usage: 3.0 GiB used, 245 GiB / 248 GiB avail
pgs: 48 active+clean
集群健康状态显示正常。
如果此时,查看集群状态是HEALTH_WARN application not enabled on 1 pool(s):
[root@ceph2 ceph]# ceph -s
cluster:
id: 13430f9a-ce0d-4d17-a215-272890f47f28
health: HEALTH_WARN
application not enabled on 1 pool(s)
[root@ceph2 ceph]# ceph health detail
HEALTH_WARN application not enabled on 1 pool(s)
POOL_APP_NOT_ENABLED application not enabled on 1 pool(s)
application not enabled on pool 'mytest'
use 'ceph osd pool application enable <pool-name> <app-name>', where <app-name> is 'cephfs', 'rbd', 'rgw', or freeform for custom applications.
运行ceph health detail命令发现是新加入的存储池mytest没有被应用程序标记,因为之前添加的是RGW实例,所以此处依提示将mytest被rgw标记即可:
[root@ceph2 ceph]# ceph osd pool application enable mytest rgw
enabled application 'rgw' on pool 'mytest'
再次查看集群状态发现恢复正常
[root@ceph2 ceph]# ceph health
HEALTH_OK
以下以删除mytest存储池为例,运行ceph osd pool rm mytest命令报错,显示需要在原命令的pool名字后再写一遍该pool名字并最后加上--yes-i-really-really-mean-it参数
[root@ceph2 ceph]# ceph osd pool rm mytest
Error EPERM: WARNING: this will *PERMANENTLY DESTROY* all data stored in pool mytest. If you are *ABSOLUTELY CERTAIN* that is what you want, pass the pool name *twice*, followed by --yes-i-really-really-mean-it.
按照提示要求复写pool名字后加上提示参数如下,继续报错:
[root@ceph2 ceph]# ceph osd pool rm mytest mytest --yes-i-really-really-mean-it
Error EPERM: pool deletion is disabled; you must first set the
mon_allow_pool_delete config option to true before you can destroy a pool
错误信息显示,删除存储池操作被禁止,应该在删除前现在ceph.conf配置文件中增加mon_allow_pool_delete选项并设置为true。所以分别登录到每一个节点并修改每一个节点的配置文件。操作如下:
[root@ceph2 ceph]# vi ceph.conf
[root@ceph2 ceph]# systemctl restart ceph-mon.target
在ceph.conf配置文件底部加入如下参数并设置为true,保存退出后使用systemctl restart ceph-mon.target命令重启服务。
[mon]
mon allow pool delete = true
其余节点操作同理。
[root@ceph3 ceph]# vi ceph.conf
[root@ceph3 ceph]# systemctl restart ceph-mon.target
[root@ceph4 ceph]# vi ceph.conf
[root@ceph4 ceph]# systemctl restart ceph-mon.target
再次删除,即成功删除mytest存储池。
[root@ceph2 ceph]# ceph osd pool rm mytest mytest --yes-i-really-really-mean-it
pool 'mytest' removed
笔者将ceph集群中的三个节点分别关机并重启后,查看ceph集群状态如下:
[root@ceph2 ~]# ceph -s
cluster:
id: 13430f9a-ce0d-4d17-a215-272890f47f28
health: HEALTH_WARN
1 MDSs report slow metadata IOs
324/702 objects misplaced (46.154%)
Reduced data availability: 126 pgs inactive
Degraded data redundancy: 144/702 objects degraded (20.513%), 3 pgs degraded, 126 pgs undersized
services:
mon: 3 daemons, quorum ceph3,ceph2,ceph4
mgr: ceph2(active), standbys: ceph3, ceph4
mds: cephfs-1/1/1 up {0=ceph2=up:creating}
osd: 3 osds: 3 up, 3 in; 162 remapped pgs
data:
pools: 8 pools, 288 pgs
objects: 234 objects, 2.8 KiB
usage: 3.0 GiB used, 245 GiB / 248 GiB avail
pgs: 43.750% pgs not active
144/702 objects degraded (20.513%)
324/702 objects misplaced (46.154%)
162 active+clean+remapped
123 undersized+peered
3 undersized+degraded+peered
查看
[root@ceph2 ~]# ceph health detail
HEALTH_WARN 1 MDSs report slow metadata IOs; 324/702 objects misplaced (46.154%); Reduced data availability: 126 pgs inactive; Degraded data redundancy: 144/702 objects degraded (20.513%), 3 pgs degraded, 126 pgs undersized
MDS_SLOW_METADATA_IO 1 MDSs report slow metadata IOs
mdsceph2(mds.0): 9 slow metadata IOs are blocked > 30 secs, oldest blocked for 42075 secs
OBJECT_MISPLACED 324/702 objects misplaced (46.154%)
PG_AVAILABILITY Reduced data availability: 126 pgs inactive
pg 8.28 is stuck inactive for 42240.369934, current state undersized+peered, last acting [0]
pg 8.2a is stuck inactive for 45566.934835, current state undersized+peered, last acting [0]
pg 8.2d is stuck inactive for 42240.371314, current state undersized+peered, last acting [0]
pg 8.2f is stuck inactive for 45566.913284, current state undersized+peered, last acting [0]
pg 8.32 is stuck inactive for 42240.354304, current state undersized+peered, last acting [0]
....
pg 8.28 is stuck undersized for 42065.616897, current state undersized+peered, last acting [0]
pg 8.2a is stuck undersized for 42065.613246, current state undersized+peered, last acting [0]
pg 8.2d is stuck undersized for 42065.951760, current state undersized+peered, last acting [0]
pg 8.2f is stuck undersized for 42065.610464, current state undersized+peered, last acting [0]
pg 8.32 is stuck undersized for 42065.959081, current state undersized+peered, last acting [0]
....
可见在数据修复中, 出现了inactive和undersized的值, 则是不正常的现象
解决方法:
①处理inactive的pg:
重启一下osd服务即可
[root@ceph2 ~]# systemctl restart ceph-osd.target
继续查看集群状态发现,inactive值的pg已经恢复正常,此时还剩undersized的pg。
[root@ceph2 ~]# ceph -s
cluster:
id: 13430f9a-ce0d-4d17-a215-272890f47f28
health: HEALTH_WARN
1 filesystem is degraded
241/723 objects misplaced (33.333%)
Degraded data redundancy: 59 pgs undersized
services:
mon: 3 daemons, quorum ceph3,ceph2,ceph4
mgr: ceph2(active), standbys: ceph3, ceph4
mds: cephfs-1/1/1 up {0=ceph2=up:rejoin}
osd: 3 osds: 3 up, 3 in; 229 remapped pgs
rgw: 1 daemon active
data:
pools: 8 pools, 288 pgs
objects: 241 objects, 3.4 KiB
usage: 3.0 GiB used, 245 GiB / 248 GiB avail
pgs: 241/723 objects misplaced (33.333%)
224 active+clean+remapped
59 active+undersized
5 active+clean
io:
client: 1.2 KiB/s rd, 1 op/s rd, 0 op/s wr
②处理undersized的pg:
学会出问题先查看健康状态细节,仔细分析发现虽然设定的备份数量是3,但是PG 12.x却只有两个拷贝,分别存放在OSD 0~2的某两个上。
[root@ceph2 ~]# ceph health detail
HEALTH_WARN 241/723 objects misplaced (33.333%); Degraded data redundancy: 59 pgs undersized
OBJECT_MISPLACED 241/723 objects misplaced (33.333%)
PG_DEGRADED Degraded data redundancy: 59 pgs undersized
pg 12.8 is stuck undersized for 1910.001993, current state active+undersized, last acting [2,0]
pg 12.9 is stuck undersized for 1909.989334, current state active+undersized, last acting [2,0]
pg 12.a is stuck undersized for 1909.995807, current state active+undersized, last acting [0,2]
pg 12.b is stuck undersized for 1910.009596, current state active+undersized, last acting [1,0]
pg 12.c is stuck undersized for 1910.010185, current state active+undersized, last acting [0,2]
pg 12.d is stuck undersized for 1910.001526, current state active+undersized, last acting [1,0]
pg 12.e is stuck undersized for 1909.984982, current state active+undersized, last acting [2,0]
pg 12.f is stuck undersized for 1910.010640, current state active+undersized, last acting [2,0]
进一步查看集群osd状态树,发现ceph3和cepn3宕机再恢复后,osd.1 和osd.2进程已不在ceph3和cepn3上。
[root@ceph2 ~]# ceph osd tree
ID CLASS WEIGHT TYPE NAME STATUS REWEIGHT PRI-AFF
-1 0.24239 root default
-9 0.16159 host centos7evcloud
1 hdd 0.08080 osd.1 up 1.00000 1.00000
2 hdd 0.08080 osd.2 up 1.00000 1.00000
-3 0.08080 host ceph2
0 hdd 0.08080 osd.0 up 1.00000 1.00000
-5 0 host ceph3
-7 0 host ceph4
分别查看osd.1 和osd.2服务状态。
解决方法:
分别进入到ceph3和ceph4节点中重启osd.1 和osd.2服务,将这两个服务重新映射到ceph3和ceph4节点中。
[root@ceph2 ~]# ssh ceph3
[root@ceph3 ~]# systemctl restart ceph-osd@1.service
[root@ceph3 ~]# ssh ceph4
[root@ceph4 ~]# systemctl restart ceph-osd@2.service
最后查看集群osd状态树发现这两个服务重新映射到ceph3和ceph4节点中。
[root@ceph4 ~]# ceph osd tree
ID CLASS WEIGHT TYPE NAME STATUS REWEIGHT PRI-AFF
-1 0.24239 root default
-9 0 host centos7evcloud
-3 0.08080 host ceph2
0 hdd 0.08080 osd.0 up 1.00000 1.00000
-5 0.08080 host ceph3
1 hdd 0.08080 osd.1 up 1.00000 1.00000
-7 0.08080 host ceph4
2 hdd 0.08080 osd.2 up 1.00000 1.00000
集群状态也显示了久违的HEALTH_OK。
[root@ceph4 ~]# ceph -s
cluster:
id: 13430f9a-ce0d-4d17-a215-272890f47f28
health: HEALTH_OK
services:
mon: 3 daemons, quorum ceph3,ceph2,ceph4
mgr: ceph2(active), standbys: ceph3, ceph4
mds: cephfs-1/1/1 up {0=ceph2=up:active}
osd: 3 osds: 3 up, 3 in
rgw: 1 daemon active
data:
pools: 8 pools, 288 pgs
objects: 241 objects, 3.6 KiB
usage: 3.1 GiB used, 245 GiB / 248 GiB avail
pgs: 288 active+clean挂载命令如下:
mount -t ceph 10.0.86.246:6789,10.0.86.221:6789,10.0.86.253:6789:/ /mnt/mycephfs/ -o name=admin,secret=AQBAI/JbROMoMRAAbgRshBRLLq953AVowLgJPw==
卸载CephFS后再挂载时报错:mount error(2): No such file or directory
说明:首先检查/mnt/mycephfs/目录是否存在并可访问,我的是存在的但依然报错No such file or directory。但是我重启了一下osd服务意外好了,可以正常挂载CephFS。
[root@ceph2 ~]# systemctl restart ceph-osd.target
[root@ceph2 ~]# mount -t ceph 10.0.86.246:6789,10.0.86.221:6789,10.0.86.253:6789:/ /mnt/mycephfs/ -o name=admin,secret=AQBAI/JbROMoMRAAbgRshBRLLq953AVowLgJPw==
可见挂载成功~!
[root@ceph2 ~]# df -h
Filesystem Size Used Avail Use% Mounted on
/dev/vda2 48G 7.5G 41G 16% /
devtmpfs 1.9G 0 1.9G 0% /dev
tmpfs 2.0G 8.0K 2.0G 1% /dev/shm
tmpfs 2.0G 17M 2.0G 1% /run
tmpfs 2.0G 0 2.0G 0% /sys/fs/cgroup
tmpfs 2.0G 24K 2.0G 1% /var/lib/ceph/osd/ceph-0
tmpfs 396M 0 396M 0% /run/user/0
10.0.86.246:6789,10.0.86.221:6789,10.0.86.253:6789:/ 249G 3.1G 246G 2% /mnt/mycephfs
参考链接
https://blog.csdn.net/SL_World/article/details/84584366
免责声明:本站发布的内容(图片、视频和文字)以原创、转载和分享为主,文章观点不代表本网站立场,如果涉及侵权请联系站长邮箱:is@yisu.com进行举报,并提供相关证据,一经查实,将立刻删除涉嫌侵权内容。


