上篇文章介绍了UITableView的数据源驱动、重用机制、刷新数据等基本用法
本篇文章介绍如何实现一些复杂的单元格
UITableViewCell单元格对象有四种基本样式,开发中这个基本样式往往不能满足我们的需求,也就是说需要自定义UITableViewCell的样式,介绍主要的两种做法:
1)使用纯代码自定义
2)使用storyboard中的prototype cell
先来介绍一下UITableViewCell
UITableViewCell表格单元格
UITableView中的单元格使用UITableViewCell视图对象
创建方法:
- (instancetype)initWithStyle:(UITableViewCellStyle)style reuseIdentifier:(NSString *)reuseIdentifier
style参数:cell的预设样式
typedef enum : NSInteger {
     UITableViewCellStyleDefault,
     UITableViewCellStyleValue1,
     UITableViewCellStyleValue2,
     UITableViewCellStyleSubtitle
} UITableViewCellStyle;
reuseIdentifier参数:cell的重用ID
单元格的内部视图:
@property(nonatomic, readonly, retain) UIView *contentView
内部视图中又包含以下三个子视图,这三个子视图在不同样式中显示的个数及样式不同
@property(nonatomic, readonly, retain) UILabel *textLabel
@property(nonatomic, readonly, retain) UILabel *detailTextLabel
@property(nonatomic, readonly, retain) UIImageView *p_w_picpathView
单元格的其他组件:
@property(nonatomic) UITableViewCellAccessoryType accessoryType //右侧指示视图样式
@property(nonatomic, retain) UIView *accessoryView //自定义右侧指示视图
单元格的选择状态:
@property(nonatomic, getter=isSelected) BOOL selected
@property(nonatomic) UITableViewCellSelectionStyle selectionStyle
复杂单元格实现(一): 纯代码自定义
实现如下效果:
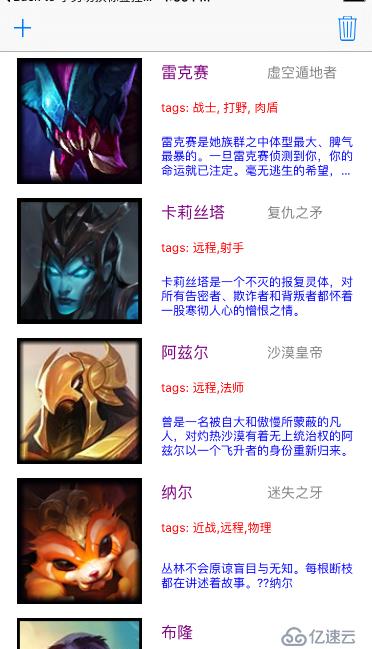 实现一个游戏人物信息的展示
分析:
UITableView使用典型的MVC设计模式进行开发
a. 模型:游戏英雄信息数据
b. 视图:单元格视图UITableViewCell的子类
c. 控制器:管理模型数组,以及实现tableView的数据源、代理等
1)模型定义
@interface AMHeroModel : NSObject

@property (nonatomic, copy) NSString * name;    //英雄名

@property (nonatomic, copy) NSString * title;    //英雄称号

@property (nonatomic, copy) NSString * icon;    //英雄图标

@property (nonatomic, copy) NSString * desc;    //英雄描述

@property (nonatomic, copy) NSString * tags;    //英雄标签

+ (AMHeroModel*) modelWithDict:(NSDictionary*)dict;//构造方法:字典转模型

@end
2)控制器管理模型数组并使用懒加载
@interface ViewController ()
@property (nonatomic, strong) NSMutableArray * heroArray;//模型数组
@property (weak, nonatomic) IBOutlet UITableView *tableView;//tableView
@end
#pragma mark - heroArray懒加载
- (NSMutableArray *)heroArray
{
    if ( _heroArray == nil ) {
        NSString * plistPath = [[NSBundle mainBundle] pathForResource:@"hero.plist" ofType:nil];
        NSArray * plistArray = [NSArray arrayWithContentsOfFile:plistPath];
        _heroArray = [NSMutableArray array];
        for ( NSDictionary * dict in plistArray ) {
            AMHeroModel * model = [AMHeroModel modelWithDict:dict];
            [_heroArray addObject:model];
        }
    }
    return _heroArray;
}
3)自定义UITableViewCell子类
需要展示的模型数据包括:4个字符串、一张图片,故UITableViewCell内部应自定义4个UILabel以及一个UIImageView子视图。
实现需要三步:
@interface AMHeroCell : UITableViewCell
//1.添加一个类方法,获取cell
+ (AMHeroCell *) cellWithTableView:(UITableView * ) tableView;
//2.添加模型属性并重写setter方法
@property (nonatomic, strong) AMHeroModel * heroModel;
//3.提供一个类方法,返回cell的高度
+ (CGFloat) cellHeight;
@end
4)UITableViewCell子类:添加一个类方法获取cell
这一步是自定义UITableViewCell最关键且最复杂的步骤,需要完成:
将cell创建/获取的代码封装、创建所有的子视图、设置所有的子视图的frame
//1.1 实现类方法,获取cell
+ (AMHeroCell *)cellWithTableView:(UITableView *)tableView
{
    AMHeroCell * cell = [tableView dequeueReusableCellWithIdentifier:@"cell"];
    if ( cell == nil ) {
        cell = [[AMHeroCell alloc] initWithStyle:UITableViewCellStyleDefault reuseIdentifier:@"cell"];
    }
    return cell;
}
创建所有的子视图操作应当放在initWithStyle方法中,故重写
//1.2 重写initWithStyle:方法,添加自定义子视图的代码
- (instancetype)initWithStyle:(UITableViewCellStyle)style reuseIdentifier:(NSString *)reuseIdentifier
{
    if ( self = [super initWithStyle:style reuseIdentifier:reuseIdentifier] ) {
        //1.2.1 将没有用的子视图删除
        [self.p_w_picpathView removeFromSuperview];
        [self.textLabel removeFromSuperview];
        [self.detailTextLabel removeFromSuperview];
        //1.2.2 创建自定义的子视图并进行一次性的属性设置
        UIImageView * iconImageView = [[UIImageView alloc] init];
        self.iconImageView  =iconImageView;
        [self.contentView addSubview:self.iconImageView];
        UILabel * nameLabel = [[UILabel alloc] init];
        self.nameLabel = nameLabel;
        [self.contentView addSubview:self.nameLabel];
        self.nameLabel.textColor = [UIColor purpleColor];
        self.nameLabel.font = [UIFont systemFontOfSize:16];
        UILabel * titleLabel = [[UILabel alloc] init];
        self.titleLabel = titleLabel;
        [self.contentView addSubview:self.titleLabel];
        self.titleLabel.textColor = [UIColor grayColor];
        self.titleLabel.font = [UIFont systemFontOfSize:14];
        UILabel * tagsLabel = [[UILabel alloc] init];
        self.tagsLabel = tagsLabel;
        [self.contentView addSubview:tagsLabel];
        self.tagsLabel.textColor = [UIColor redColor];
        self.tagsLabel.font = [UIFont systemFontOfSize:12];
        UILabel * descLabel = [[UILabel alloc] init];
        self.descLabel = descLabel;
        [self.contentView  addSubview:descLabel];
        self.descLabel.textColor = [UIColor blueColor];
        self.descLabel.font = [UIFont systemFontOfSize:12];
        self.descLabel.numberOfLines = 0;
    }
    return self;
}
考虑到屏幕适配,使用设定frame的方式且当前为view子类,所以重写layoutSubviews方法
//1.3 设置所有子视图的frame或者使用autolayout
//如果使用autolayout,代码放在重写的initWithStyle方法中
//如果使用frame,放在layoutSubviews方法中
- (void)layoutSubviews
{
    [super layoutSubviews];
    CGFloat Xspace = self.contentView.frame.size.width*0.05;
    CGFloat Yspace = self.contentView.frame.size.height*0.05;

    CGFloat iX, iY, iW, iH;
    iX = Xspace;
    iY = Yspace;
    iH = self.contentView.frame.size.height*0.9;
    iW = iH;
    self.iconImageView.frame = CGRectMake(iX, iY, iW, iH);

    CGFloat nX, nY, nW, nH;
    nX = 2*Xspace+iW;
    nY = iY;
    nW = (self.contentView.frame.size.width-3*Xspace-iW-Xspace)/2;
    nH = self.contentView.frame.size.height*0.2;
    self.nameLabel.frame = CGRectMake(nX, nY, nW, nH);

    CGFloat tX, tY, tW, tH;
    tX = CGRectGetMaxX(self.nameLabel.frame)+Xspace;
    tY = nY;
    tW = nW;
    tH = nH;
    self.titleLabel.frame = CGRectMake(tX, tY, tW, tH);

    CGFloat taX, taY, taW, taH;
    taX = nX;
    taY = self.contentView.frame.size.height*0.3;
    taW = self.contentView.frame.size.width- 3*Xspace -iW;
    taH = nH;
    self.tagsLabel.frame = CGRectMake(taX, taY, taW, taH);

    CGFloat dX, dY, dW, dH;
    dX = nX;
    dY = self.contentView.frame.size.height*0.55;
    dW = taW;
    dH = self.contentView.frame.size.height*0.4;
    self.descLabel.frame = CGRectMake(dX, dY, dW, dH);

}
5)UITableViewCell子类:添加模型属性并重写setter方法
在3)中的代码示例中已经看到添加了模型属性
重写setter方法的目的是:对外隐藏子视图,数据显示到子视图的操作封装在setter方法内部
- (void)setHeroModel:(AMHeroModel *)heroModel
{
    _heroModel = heroModel;
    //图片对象的创建:两种方式:
    //1)p_w_picpathNamed 有缓存的图片对象创建方式  以空间换时间
    //self.iconImageView.p_w_picpath = [UIImage p_w_picpathNamed:_heroModel.icon];
    //2)withContentOfFile方式创建的 不使用缓存  以时间换空间
    NSString * path = [[NSBundle mainBundle] pathForResource:_heroModel.icon ofType:nil];
    self.iconImageView.p_w_picpath = [[UIImage alloc] initWithContentsOfFile:path];
    self.nameLabel.text = _heroModel.name;
    self.titleLabel.text = _heroModel.title;
    self.tagsLabel.text = _heroModel.tags;
    self.descLabel.text = _heroModel.desc;
}
6)UITableViewCell子类:类方法返回cell的高度
UITableView中单元格的高度,默认是44,添加一个类方法返回指定的高度,这样做的好处是:当需求有变时,只需要修改UITableViewCell的子类,即高内聚低耦合的编程思想。
+ (CGFloat)cellHeight
{
    return 140.f;
}
7)控制器实现tableView的数据源、代理方法
#pragma mark - tableView的数据源和代理
- (NSInteger)numberOfSectionsInTableView:(UITableView *)tableView
{
    return 1;
}
- (NSInteger)tableView:(UITableView *)tableView numberOfRowsInSection:(NSInteger)section
{
    return self.heroArray.count;
}
- (UITableViewCell *)tableView:(UITableView *)tableView cellForRowAtIndexPath:(NSIndexPath *)indexPath
{
    return [AMHeroCell cellWithTableView:tableView];
}
- (void)tableView:(UITableView *)tableView willDisplayCell:(UITableViewCell *)cell forRowAtIndexPath:(NSIndexPath *)indexPath
{
    AMHeroCell * heroCell = cell;

    heroCell.heroModel = self.heroArray[indexPath.row];
}
- (CGFloat)tableView:(UITableView *)tableView heightForRowAtIndexPath:(NSIndexPath *)indexPath
{
    return [AMHeroCell cellHeight];
}
可以看到数据源、代理方法的实现极其简单,且无论模型数据怎么变,cell怎么变,这部分的代码是几乎不变的
案例的额外功能扩展
1)添加功能
从截图可以看到,导航栏有一个加号按钮,实现响应方法:随机添加一个英雄
#pragma mark - 添加cell
- (void) addBarBtnClicked
{
    NSInteger index = random()%self.heroArray.count;
    AMHeroModel * model = self.heroArray[index];
    [self.heroArray insertObject:model atIndex:0];
    [self.tableView reloadData];
}
2)删除功能
从截图可以看到,导航栏有一个删除按钮,点击后UITableView进入编辑状态
#pragma mark - 删除cell
- (void) delBarBtnClicked
{
    [self.tableView setEditing:!self.tableView.isEditing animated:YES];
} 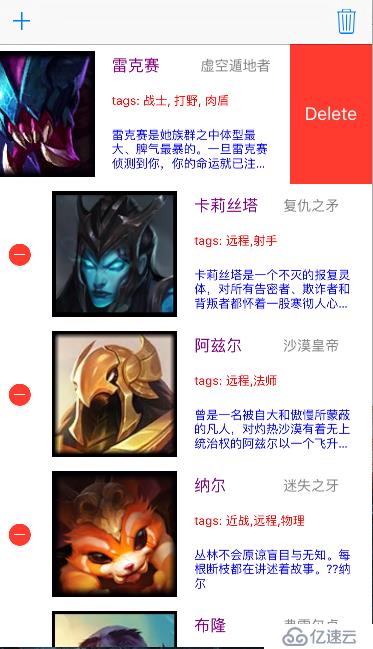
点击编辑状态的删除按钮的响应方法
- (void)tableView:(UITableView *)tableView commitEditingStyle:(UITableViewCellEditingStyle)editingStyle forRowAtIndexPath:(NSIndexPath *)indexPath
{//当进入编辑状态后,点击delete按钮时按钮
[self.heroArray removeObjectAtIndex:indexPath.row];
[self.tableView reloadData];
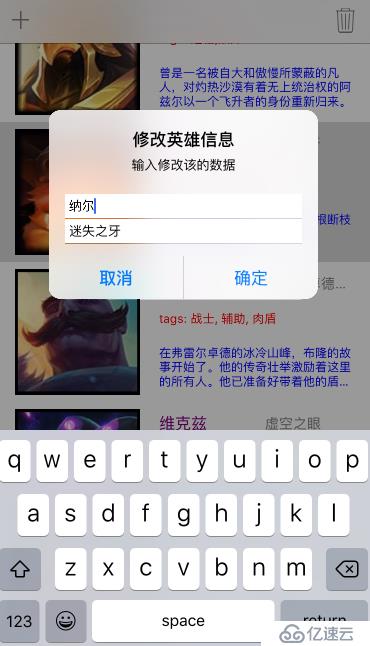
}3)点击一个cell,弹出一个UIAlertController,可以进行简单的数据修改
- (void)tableView:(UITableView *)tableView didSelectRowAtIndexPath:(NSIndexPath *)indexPath
{
    UIAlertController * ac = [UIAlertController alertControllerWithTitle:@"修改英雄信息" message:@"输入修改该的数据" preferredStyle:UIAlertControllerStyleAlert];
    UIAlertAction * a1 = [UIAlertAction actionWithTitle:@"取消" style:UIAlertActionStyleCancel handler:^(UIAlertAction * _Nonnull action) {

    }];
    UIAlertAction * a2 = [UIAlertAction actionWithTitle:@"确定" style:UIAlertActionStyleDefault handler:^(UIAlertAction * _Nonnull action) {
        model.name = ac.textFields[0].text;
        model.title = ac.textFields[1].text;
        [self.tableView reloadData];//重新加载数据
    }];
    [ac addAction:a1];
    [ac addAction:a2];
    [ac addTextFieldWithConfigurationHandler:^(UITextField * _Nonnull textField) {
        textField.text = model.name;
    }];
    [ac addTextFieldWithConfigurationHandler:^(UITextField * _Nonnull textField) {
        textField.text = model.title;
    }];

    [self presentViewController:ac animated:YES completion:nil];
}
效果:
免责声明:本站发布的内容(图片、视频和文字)以原创、转载和分享为主,文章观点不代表本网站立场,如果涉及侵权请联系站长邮箱:is@yisu.com进行举报,并提供相关证据,一经查实,将立刻删除涉嫌侵权内容。


