一、HTML DOM 节点
在 HTML DOM 中,所有事物都是节点。DOM 是被视为节点树的 HTML。
DOM 节点
根据 W3C 的 HTML DOM 标准,HTML 文档中的所有内容都是节点:
整个文档是一个文档节点
每个 HTML 元素是元素节点
HTML 元素内的文本是文本节点
每个 HTML 属性是属性节点
注释是注释节点
HTML DOM 将 HTML 文档视作树结构。这种结构被称为节点树:

通过 HTML DOM,树中的所有节点均可通过 JavaScript 进行访问。所有 HTML 元素(节点)均可被修改,也可以创建或删除节点。
节点树中的节点彼此拥有层级关系。
父(parent)、子(child)和同胞(sibling)等术语用于描述这些关系。父节点拥有子节点。同级的子节点被称为同胞(兄弟或姐妹)。
在节点树中,顶端节点被称为根(root)
每个节点都有父节点、除了根(它没有父节点)
一个节点可拥有任意数量的子
同胞是拥有相同父节点的节点
下面的图片展示了节点树的一部分,以及节点之间的关系:
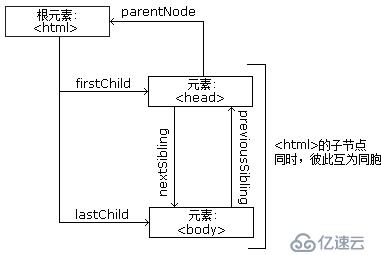
<html>
  <head>
    <title>DOM 教程</title>
  </head>
  <body>
    <h2>DOM 第一课</h2>
    <p>Hello world!</p>
  </body>
</html>
从上面的 HTML 中:
<html> 节点没有父节点;它是根节点
<head> 和 <body> 的父节点是 <html> 节点
文本节点 "Hello world!" 的父节点是 <p> 节点
并且:
<html> 节点拥有两个子节点:<head> 和 <body>
<head> 节点拥有一个子节点:<title> 节点
<title> 节点也拥有一个子节点:文本节点 "DOM 教程"
<h2> 和 <p> 节点是同胞节点,同时也是 <body> 的子节点
并且:
<head> 元素是 <html> 元素的首个子节点
<body> 元素是 <html> 元素的最后一个子节点
<h2> 元素是 <body> 元素的首个子节点
<p> 元素是 <body> 元素的最后一个子节点
DOM 处理中的常见错误是希望元素节点包含文本。
在本例中:<title>DOM 教程</title>,元素节点 <title>,包含值为 "DOM 教程" 的文本节点。
可通过节点的 innerHTML 属性来访问文本节点的值。
您将在稍后的章节中学习更多有关 innerHTML 属性的知识。
三、HTML DOM 方法
方法是我们可以在节点(HTML 元素)上执行的动作。
可通过 JavaScript (以及其他编程语言)对 HTML DOM 进行访问。
所有 HTML 元素被定义为对象,而编程接口则是对象方法和对象属性。
方法是您能够执行的动作(比如添加或修改元素)。
属性是您能够获取或设置的值(比如节点的名称或内容)。
getElementById() 方法返回带有指定 ID 的元素:
var element=document.getElementById("intro");<!DOCTYPE html>
<html>
<body>
<p id="intro">Hello World!</p>
<p>本例演示 <b>getElementById</b> 方法!</p>
<script>
x=document.getElementById("intro");
document.write("<p>来自 intro 段落的文本:" + x.innerHTML + "</p>");
</script>
</body>
</html>一些常用的 HTML DOM 方法:
getElementById(id) - 获取带有指定 id 的节点(元素)
appendChild(node) - 插入新的子节点(元素)
removeChild(node) - 删除子节点(元素)
一些常用的 HTML DOM 属性:
innerHTML - 节点(元素)的文本值
parentNode - 节点(元素)的父节点
childNodes - 节点(元素)的子节点
attributes - 节点(元素)的属性节点
您将在本教程的下一章中学到更多有关属性的知识。
某个人是一个对象。
人的方法可能是 eat(), sleep(), work(), play() 等等。
所有人都有这些方法,但会在不同时间执行它们。
一个人的属性包括姓名、身高、体重、年龄、性别等等。
所有人都有这些属性,但它们的值因人而异。
这里提供一些您将在本教程中学到的常用方法:
| 方法 | 描述 |
|---|---|
| getElementById() | 返回带有指定 ID 的元素。 |
| getElementsByTagName() | 返回包含带有指定标签名称的所有元素的节点列表(集合/节点数组)。 |
| getElementsByClassName() | 返回包含带有指定类名的所有元素的节点列表。 |
| appendChild() | 把新的子节点添加到指定节点。 |
| removeChild() | 删除子节点。 |
| replaceChild() | 替换子节点。 |
| insertBefore() | 在指定的子节点前面插入新的子节点。 |
| createAttribute() | 创建属性节点。 |
| createElement() | 创建元素节点。 |
| createTextNode() | 创建文本节点。 |
| getAttribute() | 返回指定的属性值。 |
| setAttribute() | 把指定属性设置或修改为指定的值。 |
属性是节点(HTML 元素)的值,您能够获取或设置。
可通过 JavaScript (以及其他编程语言)对 HTML DOM 进行访问。
所有 HTML 元素被定义为对象,而编程接口则是对象方法和对象属性。
方法是您能够执行的动作(比如添加或修改元素)。
属性是您能够获取或设置的值(比如节点的名称或内容)。
获取元素内容的最简单方法是使用 innerHTML 属性。
innerHTML 属性对于获取或替换 HTML 元素的内容很有用。
下面的代码获取 id="intro" 的 <p> 元素的 innerHTML:
<!DOCTYPE html>
<html>
<body>

<p id="intro">Hello World!</p>

<script>
var txt=document.getElementById("intro").innerHTML;
document.write(txt);
</script>

</body>
</html>
在上面的例子中,getElementById 是一个方法,而 innerHTML 是属性。
innerHTML 属性可用于获取或改变任意 HTML 元素,包括 <html> 和 <body>。
nodeName 属性规定节点的名称。
nodeName 是只读的
元素节点的 nodeName 与标签名相同
属性节点的 nodeName 与属性名相同
文本节点的 nodeName 始终是 #text
文档节点的 nodeName 始终是 #document
注释:nodeName 始终包含 HTML 元素的大写字母标签名。
nodeValue 属性规定节点的值。
元素节点的 nodeValue 是 undefined 或 null
文本节点的 nodeValue 是文本本身
属性节点的 nodeValue 是属性值
下面的例子会取回 <p id="intro"> 标签的文本节点值:
<!DOCTYPE html>
<html>
<body>

<p id="intro">Hello World!</p>

<script>
x=document.getElementById("intro");
document.write(x.firstChild.nodeValue);
</script>

</body>
</html>
nodeType 属性返回节点的类型。nodeType 是只读的。
比较重要的节点类型有:
| 元素类型 | NodeType |
|---|---|
| 元 素 | 1 |
| 属性 | 2 |
| 文本 | 3 |
| 注释 | 8 |
| 文 档 | 9 |
访问 HTML DOM - 查找 HTML 元素。
访问 HTML 元素等同于访问节点
您能够以不同的方式来访问 HTML 元素:
通过使用 getElementById() 方法
通过使用 getElementsByTagName() 方法
通过使用 getElementsByClassName() 方法
getElementById() 方法返回带有指定 ID 的元素:
node.getElementById("id");下面的例子获取 id="intro" 的元素:
document.getElementById("intro");<!DOCTYPE html>
<html>
<body>
<p id="intro">Hello World!</p>
<p>本例演示 <b>getElementById</b> 方法!</p>
<script>
x=document.getElementById("intro");
document.write("<p>来自 intro 段落的文本:" + x.innerHTML + "</p>");
</script>
</body>
</html>getElementsByTagName() 返回带有指定标签名的所有元素。
node.getElementsByTagName("tagname");下面的例子返回包含文档中所有 <p> 元素的列表:
document.getElementsByTagName("p");<!DOCTYPE html>
<html>
<body>
<p>Hello World!</p>
<p>DOM 很有用!</p>
<p>本例演示 <b>getElementsByTagName</b> 方法。</p>
<script>
x=document.getElementsByTagName("p");
document.write("第一段的文本: " + x[0].innerHTML);
</script>
</body>
</html>下面的例子返回包含文档中所有 <p> 元素的列表,并且这些 <p> 元素应该是 id="main" 的元素的后代(子、孙等等):
document.getElementById("main").getElementsByTagName("p");<!DOCTYPE html>
<html>
<body>
<p>Hello World!</p>
<div id="main">
<p>DOM 很有用!</p>
<p>本例演示 <b>getElementsByTagName</b> 方法。</p>
</div>
<script>
x=document.getElementById("main").getElementsByTagName("p");
document.write("div 中的第一段的文本: " + x[0].innerHTML);
</script>
</body>
</html>如果您希望查找带有相同类名的所有 HTML 元素,请使用这个方法:
document.getElementsByClassName("intro");上面的例子返回包含 class="intro" 的所有元素的一个列表:
注释:getElementsByClassName() 在 Internet Explorer 5,6,7,8 中无效。
六、HTML DOM - 修改
修改 HTML = 改变元素、属性、样式和事件。
修改 HTML DOM 意味着许多不同的方面:
改变 HTML 内容
改变 CSS 样式
改变 HTML 属性
创建新的 HTML 元素
删除已有的 HTML 元素
改变事件(处理程序)
在接下来的章节,我们会深入学习修改 HTML DOM 的常用方法。
改变元素内容的最简答的方法是使用 innerHTML 属性。
下面的例子改变一个 <p> 元素的 HTML 内容:
<!DOCTYPE html>
<html>
<body>

<p id="p1">Hello World!</p>

<script>
document.getElementById("p1").innerHTML="New text!";
</script>

<p>上面的段落被一段脚本改变了。</p>

</body>
</html>
提示:我们将在下面的章节为您解释例子中的细节。
通过 HTML DOM,您能够访问 HTML 元素的样式对象。
下面的例子改变一个段落的 HTML 样式:
<html>

<body>
<p id="p2">Hello world!</p>

<script>
document.getElementById("p2").style.color="blue";
</script>

</body>
</html>
<!DOCTYPE html>
<html>
<body>
<p id="p1">Hello world!</p>
<p id="p2">Hello world!</p>
<script>
document.getElementById("p2").style.color="blue";
document.getElementById("p2").style.fontFamily="Arial";
document.getElementById("p2").style.fontSize="larger";
</script>
</body>
</html>如需向 HTML DOM 添加新元素,您首先必须创建该元素(元素节点),然后把它追加到已有的元素上。
<div id="d1">
<p id="p1">This is a paragraph.</p>
<p id="p2">This is another paragraph.</p>
</div>

<script>
var para=document.createElement("p");
var node=document.createTextNode("This is new.");
para.appendChild(node);

var element=document.getElementById("d1");
element.appendChild(para);
</script>
<!DOCTYPE html>
<html>
<body>
<div id="div1">
<p id="p1">This is a paragraph.</p>
<p id="p2">This is another paragraph.</p>
</div>
<script>
var para=document.createElement("p");
var node=document.createTextNode("This is new.");
para.appendChild(node);
var element=document.getElementById("div1");
element.appendChild(para);
</script>
</body>
</html>通过 HTML DOM,JavaScript 能够访问 HTML 文档中的每个元素。
改变元素内容的最简答的方法是使用 innerHTML 属性。
下面的例子更改 <p> 元素的 HTML 内容:
<html>
<body>
<p id="p1">Hello World!</p>
<script>
document.getElementById("p1").innerHTML="New text!";
</script>
</body>
</html><!DOCTYPE html>
<html>
<body>
<p id="p1">Hello World!</p>
<script>
document.getElementById("p1").innerHTML="New text!";
</script>
<p>上面的段落被一段脚本改变了。</p>
</body>
</html>通过 HTML DOM,您能够访问 HTML 对象的样式对象。
下面的例子更改段落的 HTML 样式:
<html>
<body>
<p id="p2">Hello world!</p>
<script>
document.getElementById("p2").style.color="blue";
</script>
</body>
</html><!DOCTYPE html>
<html>
<body>
<p id="p1">Hello world!</p>
<p id="p2">Hello world!</p>
<script>
document.getElementById("p2").style.color="blue";
document.getElementById("p2").style.fontFamily="Arial";
document.getElementById("p2").style.fontSize="larger";
</script>
</body>
</html>HTML DOM 允许您在事件发生时执行代码。
当 HTML 元素”有事情发生“时,浏览器就会生成事件:
在元素上点击
加载页面
改变输入字段
你可以在下一章学习更多有关事件的内容。
下面两个例子在按钮被点击时改变 <body> 元素的背景色:
<html> <body> <input type="button" onclick="document.body.style.backgroundColor='lavender';" value="Change background color" /> </body> </html>
<!DOCTYPE html> <html> <body> <input type="button" onclick="document.body.style.backgroundColor='lavender';" value="改变背景色"> </body> </html>
在本例中,由函数执行相同的代码:
<html>
<body>
<script>
function ChangeBackground()
{
document.body.style.backgroundColor="lavender";
}
</script>
<input type="button" onclick="ChangeBackground()"
value="Change background color" />
</body>
</html><!DOCTYPE html>
<html>
<body>
<script>
function ChangeBackground()
{
document.body.style.backgroundColor="lavender";
}
</script>
<input type="button" onclick="ChangeBackground()" value="改变背景色" />
</body>
</html>下面的例子在按钮被点击时改变 <p> 元素的文本:
<html>
<body>
<p id="p1">Hello world!</p>
<script>
function ChangeText()
{
document.getElementById("p1").innerHTML="New text!";
}
</script>
<input type="button" onclick="ChangeText()" value="Change text">
</body>
</html><!DOCTYPE html>
<html>
<body>
<p id="p1">Hello world!</p>
<script>
function ChangeText()
{
document.getElementById("p1").innerHTML="New text!";
}
</script>
<input type="button" onclick="ChangeText()" value="改变文本" />
</body>
</html>八、HTML DOM - 元素
添加、删除和替换 HTML 元素。
如需向 HTML DOM 添加新元素,您首先必须创建该元素,然后把它追加到已有的元素上。
<!DOCTYPE html>
<html>
<body>

<div id="div1">
<p id="p1">This is a paragraph.</p>
<p id="p2">This is another paragraph.</p>
</div>

<script>
var para=document.createElement("p");
var node=document.createTextNode("This is new.");
para.appendChild(node);

var element=document.getElementById("div1");
element.appendChild(para);
</script>

</body>
</html>这段代码创建了一个新的 <p> 元素:
var para=document.createElement("p");如需向 <p> 元素添加文本,您首先必须创建文本节点。这段代码创建文本节点:
var node=document.createTextNode("This is a new paragraph.");然后您必须向 <p> 元素追加文本节点:
para.appendChild(node);
最后,您必须向已有元素追加这个新元素。
这段代码查找到一个已有的元素:
var element=document.getElementById("div1");这段代码向这个已存在的元素追加新元素:
element.appendChild(para);
上一个例子中的 appendChild() 方法,将新元素作为父元素的最后一个子元素进行添加。
如果不希望如此,您可以使用 insertBefore() 方法:
<div id="div1">
<p id="p1">This is a paragraph.</p>
<p id="p2">This is another paragraph.</p>
</div>

<script>
var para=document.createElement("p");
var node=document.createTextNode("This is new.");
para.appendChild(node);

var element=document.getElementById("div1");
var child=document.getElementById("p1");
element.insertBefore(para,child);
</script>
编写代码:
<!DOCTYPE html>
<html>
<body>

<div id="div1">
<p id="p1">This is a paragraph.</p>
<p id="p2">This is another paragraph.</p>
</div>

<script>
var para=document.createElement("p");
var node=document.createTextNode("This is new.");
para.appendChild(node);

var element=document.getElementById("div1");
var child=document.getElementById("p1");
element.insertBefore(para,child);
</script>

</body>
</html>如需删除 HTML 元素,您必须清楚该元素的父元素:
<div id="div1">
<p id="p1">This is a paragraph.</p>
<p id="p2">This is another paragraph.</p>
</div>
<script>
var parent=document.getElementById("div1");
var child=document.getElementById("p1");
parent.removeChild(child);
</script>
编写代码:
<!DOCTYPE html>
<html>
<body>

<div id="div1">
<p id="p1">This is a paragraph.</p>
<p id="p2">This is another paragraph.</p>
</div>

<script>
var parent=document.getElementById("div1");
var child=document.getElementById("p1");
parent.removeChild(child);
</script>

</body>
</html>这个 HTML 文档包含一个带有两个子节点(两个 <p> 元素)的 <div> 元素:
<div id="div1">
<p id="p1">This is a paragraph.</p>
<p id="p2">This is another paragraph.</p>
</div>
查找 id="div1" 的元素:
var parent=document.getElementById("div1");查找 id="p1" 的 <p> 元素:
var child=document.getElementById("p1");从父元素中删除子元素:
parent.removeChild(child);
提示:能否在不引用父元素的情况下删除某个元素?
很抱歉。DOM 需要了解您需要删除的元素,以及它的父元素。
这里提供一个常用的解决方法:找到您需要删除的子元素,然后使用 parentNode 属性来查找其父元素:
var child=document.getElementById("p1");
child.parentNode.removeChild(child);如需替换 HTML DOM 中的元素,请使用 replaceChild() 方法:
<div id="div1">
<p id="p1">This is a paragraph.</p>
<p id="p2">This is another paragraph.</p>
</div>

<script>
var para=document.createElement("p");
var node=document.createTextNode("This is new.");
para.appendChild(node);

var parent=document.getElementById("div1");
var child=document.getElementById("p1");
parent.replaceChild(para,child);
</script>
编写代码:
<!DOCTYPE html>
<html>
<body>

<div id="div1">
<p id="p1">This is a paragraph.</p>
<p id="p2">This is another paragraph.</p>
</div>

<script>
var parent=document.getElementById("div1");
var child=document.getElementById("p1");
var para=document.createElement("p");
var node=document.createTextNode("This is new.");
para.appendChild(node);
parent.replaceChild(para,child);
</script>
</body>
</html>
九、HTML DOM - 事件
HTML DOM 允许 JavaScript 对 HTML 事件作出反应。。
当事件发生时,可以执行 JavaScript,比如当用户点击一个 HTML 元素时。
如需在用户点击某个元素时执行代码,请把 JavaScript 代码添加到 HTML 事件属性中:
onclick=JavaScript
HTML 事件的例子:
当用户点击鼠标时
当网页已加载时
当图片已加载时
当鼠标移动到元素上时
当输入字段被改变时
当 HTML 表单被提交时
当用户触发按键时
在本例中,当用户点击时,会改变 <h2> 元素的内容:
<!DOCTYPE html>
<html>
<body>
<h2 onclick="this.innerHTML='hello!'">请点击这段文本!</h2>
</body>
</html>
代码实现:
<!DOCTYPE html>
<html>
<body>

<h2 onclick="this.innerHTML='hello!'">请点击这段文本!</h2>

</body>
</html>
在本例中,会从事件处理程序中调用函数:
<!DOCTYPE html>
<html>
<head>
<script>
function changetext(id)
{
id.innerHTML="hello!";
}
</script>
</head>
<body>
<h2 onclick="changetext(this)">请点击这段文本!</h2>
</body>
</html>
代码实现:
<!DOCTYPE html>
<html>
<head>
<script>
function changetext(id)
{
id.innerHTML="hello!";
}
</script>
</head>
<body>

<h2 onclick="changetext(this)">请点击这段文本!</h2>

</body>
</html>如需向 HTML 元素分配事件,您可以使用事件属性。
向 button 元素分配一个 onclick 事件:
<button onclick="displayDate()">试一试</button>
代码实现:
<!DOCTYPE html>
<html>
<body>

<p>点击按钮来执行 <b>displayDate()</b> 函数。</p>

<button onclick="displayDate()">试一试</button>

<script>
function displayDate()
{
document.getElementById("demo").innerHTML=Date();
}
</script>

<p id="demo"></p>

</body>
</html>
在上面的例子中,当点击按钮时,会执行名为 displayDate 的函数。
HTML DOM 允许您使用 JavaScript 向 HTML 元素分配事件:
为 button 元素分配 onclick 事件:
<script>
document.getElementById("myBtn").onclick=function(){displayDate()};
</script>
代码实现:
<!DOCTYPE html>
<html>
<head>
</head>
<body>

<p>点击按钮来执行 <b>displayDate()</b> 函数。</p>

<button id="myBtn">试一试</button>

<script>
document.getElementById("myBtn").onclick=function(){displayDate()};
function displayDate()
{
document.getElementById("demo").innerHTML=Date();
}
</script>

<p id="demo"></p>

</body>
</html>
在上面的例子中,名为 displayDate 的函数被分配给了 id=myButn" 的 HTML 元素。
当按钮被点击时,将执行函数。
当用户进入或离开页面时,会触发 onload 和 onunload 事件。
onload 事件可用于检查访客的浏览器类型和版本,以便基于这些信息来加载不同版本的网页。
onload 和 onunload 事件可用于处理 cookies。
<body onload="checkCookies()">
<!DOCTYPE html>
<html>
<body onload="checkCookies()">

<script>
function checkCookies()
{
if (navigator.cookieEnabled==true)
    {
    alert("Cookies are enabled")
    }
else
    {
    alert("Cookies are not enabled")
    }
}
</script>

<p>弹出的提示框会告诉你浏览器是否已启用 cookie。</p>
</body>
</html>
onchange 事件常用于输入字段的验证。
下面的例子展示了如何使用 onchange。当用户改变输入字段的内容时,将调用 upperCase() 函数。
<input type="text" id="fname" onchange="upperCase()">
<!DOCTYPE html>
<html>
<head>
<script>
function myFunction()
{
var x=document.getElementById("fname");
x.value=x.value.toUpperCase();
}
</script>
</head>
<body>

请输入你的英文名:<input type="text" id="fname" onchange="myFunction()">
<p>当你离开输入框时,被触发的函数会把你输入的文本转换为大写字母。</p>

</body>
</html>
onmouseover 和 onmouseout 事件可用于在鼠标指针移动到或离开元素时触发函数。
一个简单的 onmouseover-onmouseout 例子:
<!DOCTYPE html>
<html>
<body>

<div
onmouseover="mOver(this)"
onmouseout="mOut(this)"
style="background-color:#D94A38;width:200px;height:50px;padding-top:25px;text-align:center;">
Mouse Over Me
</div>

<script>
function mOver(obj)
{
obj.innerHTML="谢谢你"
}

function mOut(obj)
{
obj.innerHTML="把鼠标指针移动到上面"
}
</script>

</body>
</html>
onmousedown、onmouseup 以及 onclick 事件是鼠标点击的全部过程。首先当某个鼠标按钮被点击时,触发 onmousedown 事件,然后,当鼠标按钮被松开时,会触发 onmouseup 事件,最后,当鼠标点击完成时,触发 onclick 事件。
一个简单的 onmousedown-onmouseup 实例:
<!DOCTYPE html>
<html>
<body>

<div
onmousedown="mDown(this)"
onmouseup="mUp(this)"
style="background-color:#D94A38;width:200px;height:50px;padding-top:25px;text-align:center;">
点击这里
</div>

<script>
function mDown(obj)
{
obj.style.backgroundColor="#1ec5e5";
obj.innerHTML="松开鼠标"
}

function mUp(obj)
{
obj.style.backgroundColor="#D94A38";
obj.innerHTML="谢谢你"
}
</script>

</body>
</html>通过 HTML DOM,您能够使用节点关系在节点树中导航。
getElementsByTagName() 方法返回节点列表。节点列表是一个节点数组。
下面的代码选取文档中的所有 <p> 节点:
var x=document.getElementsByTagName("p");可以通过下标号访问这些节点。如需访问第二个 <p>,您可以这么写:
y=x[1];
代码实现:
<!DOCTYPE html>
<html>
<body>

<p>Hello World!</p>
<p>DOM 很有用!</p>

<script>
x=document.getElementsByTagName("p");
document.write("第二段的 innerHTML 是: " + x[1].innerHTML);
</script>

</body>
</html>
注释:下标号从 0 开始。
length 属性定义节点列表中节点的数量。
您可以使用 length 属性来循环节点列表:
x=document.getElementsByTagName("p");

for (i=0;i<x.length;i++)
{
document.write(x[i].innerHTML);
document.write("<br />");
}
代码实现:
<!DOCTYPE html>
<html>
<body>

<p>Hello World!</p>
<p>DOM 很有用!</p>
<p>本例演示 <b>length</b> 属性。</p>

<script>
x=document.getElementsByTagName("p");
for (i=0;i<x.length;i++)
  {
  document.write(x[i].innerHTML);
  document.write("<br>");
  }
</script>
</body>
</html>获取所有 <p> 元素节点
输出每个 <p> 元素的文本节点的值
您能够使用三个节点属性:parentNode、firstChild 以及 lastChild ,在文档结构中进行导航。
请看下面的 HTML 片段:
<html>
<body>

<p>Hello World!</p>
<div>
  <p>DOM 很有用!</p>
  <p>本例演示节点关系。</p>
</div>

</body>
</html>
首个 <p> 元素是 <body> 元素的首个子元素(firstChild)
<div> 元素是 <body> 元素的最后一个子元素(lastChild)
<body> 元素是首个 <p> 元素和 <div> 元素的父节点(parentNode)
firstChild 属性可用于访问元素的文本:
<html>
<body>

<p id="intro">Hello World!</p>

<script>
x=document.getElementById("intro");
document.write(x.firstChild.nodeValue);
</script>

</body>
</html>
代码实现:
<!DOCTYPE html>
<html>
<body>

<p id="intro">Hello World!</p>

<script>
x=document.getElementById("intro");
document.write(x.firstChild.nodeValue);
</script>

</body>
</html>这里有两个特殊的属性,可以访问全部文档:
document.documentElement - 全部文档
document.body - 文档的主体
<html>
<body>

<p>Hello World!</p>
<div>
<p>DOM 很有用!</p>
<p>本例演示 <b>document.body</b> 属性。</p>
</div>

<script>
alert(document.body.innerHTML);
</script>

</body>
</html>
代码实现:
<!DOCTYPE html>
<html>
<body>

<p>Hello World!</p>
<div>
<p>DOM 很有用!</p>
<p>本例演示 <b>document.body</b> 属性。</p>
</div>

<script>
alert(document.body.innerHTML);
</script>

</body>
</html>
除了 innerHTML 属性,您也可以使用 childNodes 和 nodeValue 属性来获取元素的内容。
下面的代码获取 id="intro" 的 <p> 元素的值:
<html>
<body>

<p id="intro">Hello World!</p>

<script>
var txt=document.getElementById("intro").childNodes[0].nodeValue;
document.write(txt);
</script>

</body>
</html>
代码实现:
<!DOCTYPE html>
<html>
<body>

<p id="intro">Hello World!</p>

<script>
txt=document.getElementById("intro").childNodes[0].nodeValue;
document.write(txt);
</script>

</body>
</html>
在上面的例子中,getElementById 是一个方法,而 childNodes 和 nodeValue 是属性。
在本教程中,我们将使用 innerHTML 属性。不过,学习上面的方法有助于对 DOM 树结构和导航的理解。
免责声明:本站发布的内容(图片、视频和文字)以原创、转载和分享为主,文章观点不代表本网站立场,如果涉及侵权请联系站长邮箱:is@yisu.com进行举报,并提供相关证据,一经查实,将立刻删除涉嫌侵权内容。


