192.168.30.201 rac-a
192.168.30.202 rac-b
10.10.10.10 rac-a-pri
10.10.10.11 rac-b-pri
192.168.30.203 rac-a-vip
192.168.30.204 rac-b-vip
192.168.30.206 scanip
10.10.10.10 RAC-1-pri
10.10.10.11 RAC-2-pri
ASM磁盘需要3个共享磁盘,测试环境ISCSI 现实中FC映射
DATA_DG 用于存放ORACLE数据库 注:oracle软件安装在主机本地
GRID_DG 用于存放GRID软件 注:在A机执行软件自动复制到B机
FLASH_DG 用于存放归档日记 注:归档必须放置共享磁盘中
注:下文A机为RAC-1 B机为RAC-2
#############################
###### 修改设置网卡IP #######
#############################
A、B机器均需要执行
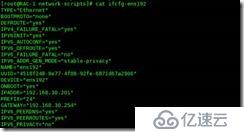
网卡配置文件位置
/etc/sysconfig/network-scripts
#############################
###### 添加Host解析 #######
#############################
A、B机器均需要执行
[root@RAC-1 ~]# vi /etc/hosts
192.168.30.201 RAC-A
192.168.30.202 RAC-B
10.10.10.10 RAC-A-pri
10.10.10.11 RAC-B-pri
192.168.30.203 RAC-A-vip
192.168.30.204 RAC-B-vip
192.168.30.200 scanip

###########################
###### 关闭防火墙 #######
###########################
A节点执行
service iptables stop
chkconfig iptables off
service iptables status
B节点执行;
service iptables stop
chkconfig iptables off
service iptables status
注:如遇到如下状态使用以下代码

systemctl stop iptables.service
systemctl status iptables.service
##########################
###### 关闭SEliux ######
##########################
A、B均需执行
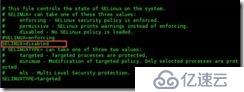
vi /etc/selinux/config
###############################################################################
# This file controls the state of SELinux on the system.
# SELINUX= can take one of these three values:
# enforcing - SELinux security policy is enforced.
# permissive - SELinux prints warnings instead of enforcing.
# disabled - No SELinux policy is loaded.
SELINUX=disabled ######(将enable改成disabled)###
# SELINUXTYPE= can take one of these two values:
# targeted - Targeted processes are protected,
# mls - Multi Level Security protection.
SELINUXTYPE=targeted
###############################################################################
#############################
###### 挂载安装盘 #########
#############################
[root@ola ~]# umount /dev/sr0
[root@ola ~]# mount /dev/cdrom /mnt
或挂载镜像文件
mount rhel-server-7.3-x86_64-dvd.iso /mnt

###########################
###### 编辑yum源########
###########################
cd /etc/yum.repos.d/
vi public-yum-ol6.repo
内容如下:
#############################
[dvd]
name=mydvd
baseurl=file:///mnt
enable=1
gpgcheck=0
#############################
测试yum源
yum clean all
yum update
yum repolist
yum install -y compat-libstdc++* compat-libstdc++* gcc-* gcc-c* glibc-* glibc-devel-* glibc-devel-* ksh-* libgcc-* libgcc-* libstdc++-docs-* libstdc++-devel* libstdc* libstdc++* libaio-* elfutils-* make sysstat compat-* perl unzip* openssh*
注:如下代码可不执行,已整合到上面的代码中。
yum install -y libstdc*
yum install -y libstdc++*
yum install -y libaio-* ########
yum install -y elfutils-* #######
yum install -y make sysstat
yum install -y compat-* ########
yum install -y perl
yum install unixODBC* #########
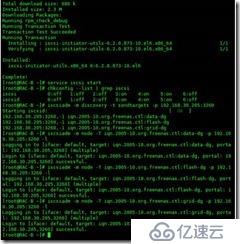
安装cvuqdisk-1.0.9-1.rpm 包依赖
yum search smartctl
yum install -y smartmontools


######################
###### 新增组 ######
######################
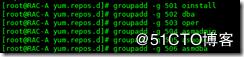
A、B都需执行
groupadd -g 501 oinstall
groupadd -g 502 dba
groupadd -g 503 oper
groupadd -g 504 asmadmin
groupadd -g 505 asmoper
groupadd -g 506 asmdba

##############################################################################################################################################################
useradd -g oinstall -G dba,asmdba,oper oracle
useradd -g oinstall -G asmadmin,asmdba,asmoper,oper,dba grid


##############################
###### 创建需要的目录 ######
##############################
mkdir -p /u01/app/oracle/product/11.2.0/db1
mkdir -p /u01/app/grid/product/11.2.0/crs
mkdir -p /u01/app/oraInventory
mkdir -p /u01/app/11.2.0/grid


##########################
###### 文件夹赋权 ######
##########################
chown -R grid:oinstall /u01/app/oraInventory
chown -R grid:oinstall /u01/app/grid
chown -R oracle:oinstall /u01/app/oracle
chmod -R 775 /u01/app/oracle
chmod -R 775 /u01/app/


chown -R grid:oinstall /u01/app/11.2.0/grid/
chmod -R 775 /u01/app/11.2.0/grid/


############################
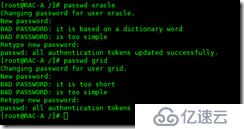
###### 设置账户密码 ######
############################
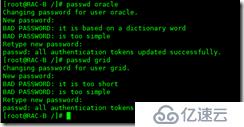
[root@ola ~]# passwd oracle
[root@ola ~]# passwd grid
##########################################
###### 更改grid oracle的环境变量 ######
#################
#### A机配置 ####
#################
vi .bash_profile
PATH=$PATH:$HOME/bin
TMP=/tmp; export TMP
TMPDIR=$TMP; export TMPDIR
ORACLE_BASE=/u01/app/grid; export ORACLE_BASE
ORACLE_HOME=/u01/app/11.2.0/grid; export ORACLE_HOME
ORACLE_SID=+ASM1; export ORACLE_SID
ORACLE_TERM=xterm; export ORACLE_TERM
PATH=/usr/sbin:$PATH; export PATH
PATH=$ORACLE_HOME/bin:$PATH; export PATH
LD_LIBRARY_PATH=$ORACLE_HOME/lib:/lib:/usr/lib; export LD_LIBRARY_PATH
CLASSPATH=$ORACLE_HOME/JRE:$ORACLE_HOME/jlib:$ORACLE_HOME/rdbms/jlib;
export CLASSPATH
NLS_DATE_FORMAT="yyyy-mm-dd HH24:MI:SS"; export NLS_DATE_FORMAT
NLS_LANG=AMERICAN_AMERICA.ZHS16GBK;export NLS_LANG
export PATH
if [ $USER = "oracle" ]; then
if [ $SHELL = "/bin/ksh" ]; then
ulimit -p 16384
ulimit -n 65536
else
ulimit -u 16384 -n 65536
fi
umask 022
fi
#################
#### B机配置 ####
#################
vi .bash_profile
PATH=$PATH:$HOME/bin
TMP=/tmp; export TMP
TMPDIR=$TMP; export TMPDIR
ORACLE_BASE=/u01/app/grid; export ORACLE_BASE
ORACLE_HOME=/u01/app/11.2.0/grid; export ORACLE_HOME
ORACLE_SID=+ASM2; export ORACLE_SID
ORACLE_TERM=xterm; export ORACLE_TERM
PATH=/usr/sbin:$PATH; export PATH
PATH=$ORACLE_HOME/bin:$PATH; export PATH
LD_LIBRARY_PATH=$ORACLE_HOME/lib:/lib:/usr/lib; export LD_LIBRARY_PATH
CLASSPATH=$ORACLE_HOME/JRE:$ORACLE_HOME/jlib:$ORACLE_HOME/rdbms/jlib;
export CLASSPATH
NLS_DATE_FORMAT="yyyy-mm-dd HH24:MI:SS"; export NLS_DATE_FORMAT
NLS_LANG=AMERICAN_AMERICA.ZHS16GBK;export NLS_LANG
export PATH
if [ $USER = "oracle" ]; then
if [ $SHELL = "/bin/ksh" ]; then
ulimit -p 16384
ulimit -n 65536
else
ulimit -u 16384 -n 65536
fi
umask 022
fi
###############################################################################################################################################################
#################
#### A机配置 ####
#################
vi .bash_profile
######################
PATH=$PATH:$HOME/bin
TMP=/tmp; export TMP
TMPDIR=$TMP; export TMPDIR
ORACLE_BASE=/u01/app/oracle; export ORACLE_BASE
ORACLE_HOME=$ORACLE_BASE/product/11.2.0/db1; export ORACLE_HOME
ORACLE_SID=orcl1; export ORACLE_SID
ORACLE_TERM=xterm; export ORACLE_TERM
PATH=/usr/sbin:$PATH; export PATH
PATH=$ORACLE_HOME/bin:$PATH; export PATH
LD_LIBRARY_PATH=$ORACLE_HOME/lib:/lib:/usr/lib; export LD_LIBRARY_PATH
CLASSPATH=$ORACLE_HOME/JRE:$ORACLE_HOME/jlib:$ORACLE_HOME/rdbms/jlib;
export CLASSPATH
NLS_DATE_FORMAT="yyyy-mm-dd HH24:MI:SS"; export NLS_DATE_FORMAT
NLS_LANG=AMERICAN_AMERICA.ZHS16GBK;export NLS_LANG
export PATH
if [ $USER = "oracle" ]; then
if [ $SHELL = "/bin/ksh" ]; then
ulimit -p 16384
ulimit -n 65536
else
ulimit -u 16384 -n 65536
fi
umask 022
fi
#################
#### B机配置 ####
#################
su – oracle
vi .bash_ profile
PATH=$PATH:$HOME/bin
TMP=/tmp; export TMP
TMPDIR=$TMP; export TMPDIR
ORACLE_BASE=/u01/app/oracle; export ORACLE_BASE
ORACLE_HOME=$ORACLE_BASE/product/11.2.0/db1; export ORACLE_HOME
ORACLE_SID=orcl2; export ORACLE_SID
ORACLE_TERM=xterm; export ORACLE_TERM
PATH=/usr/sbin:$PATH; export PATH
PATH=$ORACLE_HOME/bin:$PATH; export PATH
LD_LIBRARY_PATH=$ORACLE_HOME/lib:/lib:/usr/lib; export LD_LIBRARY_PATH
CLASSPATH=$ORACLE_HOME/JRE:$ORACLE_HOME/jlib:$ORACLE_HOME/rdbms/jlib;
export CLASSPATH
NLS_DATE_FORMAT="yyyy-mm-dd HH24:MI:SS"; export NLS_DATE_FORMAT
NLS_LANG=AMERICAN_AMERICA.ZHS16GBK;export NLS_LANG
export PATH
if [ $USER = "oracle" ]; then
if [ $SHELL = "/bin/ksh" ]; then
ulimit -p 16384
ulimit -n 65536
else
ulimit -u 16384 -n 65536
fi
umask 022
fi
完成grid与oracle的环境变量更改
使环境变量生效
$ source .bash_profile
####更改系统变量#####
#####################
root用户视图下
A、B均执行
vi /etc/sysctl.conf
# Controls the maximum shared segment size, in bytes
#kernel.shmmax = 68719476736
# Controls the maximum number of shared memory segments, in pages
#kernel.shmall = 4294967296
fs.aio-max-nr = 1048576
fs.file-max = 6815744
kernel.shmall = 8388608
kernel.shmmax = 19327352832
kernel.shmmni = 4096
kernel.sem = 250 32000 100 128
net.ipv4.ip_local_port_range = 9000 65500
net.core.rmem_default = 262144
net.core.rmem_max = 4194304
net.core.wmem_default = 262144
net.core.wmem_max = 1048586
vm.min_free_kbytes = 102400

vi /etc/security/limits.conf
oracle soft nproc 2047
oracle hard nproc 16384
oracle soft nofile 1024
oracle hard nofile 65536
oracle hard stack 10240
grid soft nproc 2047
grid hard nproc 16384
grid soft nofile 1024
grid hard nofile 65536
grid hard stack 10240

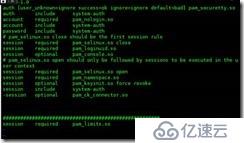
vi /etc/pam.d/login
session required pam_limits.so
注:现实环境大多属于FC映射,无需此操作。
#########################
####可选添加ISCSI磁盘####
yum install -y iscsi*
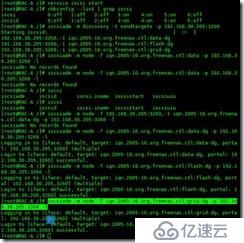
[root@orcl1 ~]# service iscsi start
[root@orcl1 ~]# chkconfig --list | grep iscsi
iscsi 0:off 1:off 2:off 3:on 4:on 5:on 6:off
iscsid 0:off 1:off 2:off 3:on 4:on 5:on 6:off
[root@orcl1 ~]# iscsiadm -m discovery -t sendtargets -p 192.168.30.210[周书轩1] :3260
Starting iscsid: [ OK ]
^Ciscsiadm: caught SIGINT, exiting...
[root@orcl1 ~]# iscsiadm -m discovery -t sendtargets -p 192.168.30.210:3260
192.168.30.210:3260,-1 iqn.2005-10.org.freenas.ctl:data
192.168.30.210:3260,-1 iqn.2005-10.org.freenas.ctl:flash
192.168.30.210:3260,-1 iqn.2005-10.org.freenas.ctl:grid
[root@orcl1 ~]# iscsiadm -m node -T iqn.2005-10.org.freenas.ctl:data -p 192.168.30.205:3260 -l
Logging in to [iface: default, target: iqn.2005-10.org.freenas.ctl:data, portal: 192.168.30.210,3260] (multiple)
Login to [iface: default, target: iqn.2005-10.org.freenas.ctl:data, portal: 192.168.30.210,3260] successful.
[root@orcl1 ~]# iscsiadm -m node -T iqn.2005-10.org.freenas.ctl:flash -p 192.168.30.210:3260 -l
Logging in to [iface: default, target: iqn.2005-10.org.freenas.ctl:flash, portal: 192.168.30.210,3260] (multiple)
Login to [iface: default, target: iqn.2005-10.org.freenas.ctl:flash, portal: 192.168.30.210,3260] successful.
[root@orcl1 ~]# iscsiadm -m node -T iqn.2005-10.org.freenas.ctl:grid -p 192.168.30.210:3260 -l
Logging in to [iface: default, target: iqn.2005-10.org.freenas.ctl:grid, portal: 192.168.30.210,3260] (multiple)
Login to [iface: default, target: iqn.2005-10.org.freenas.ctl:grid, portal: 192.168.30.210,3260] successful.
###########################
###### SSH密钥更改 ######
###########################
su - oracle
mkdir ~/.ssh
chmod 700 ~/.ssh
cd ~/.ssh
ssh-keygen -t rsa

ssh rac-a cat /home/oracle/.ssh/id_rsa.pub >> authorized_keys
ssh rac-b cat /home/oracle/.ssh/id_rsa.pub >> authorized_keys
chmod 600 ~/.ssh/authorized_keys
scp authorized_keys rac-b:/home/oracle/.ssh/
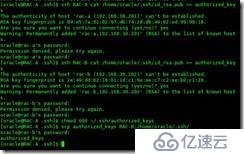
RAC-A# ssh RAC-B
无需密码直接进入

#####################################
####### grid用户下执行 ############
#####################################
su - grid
mkdir ~/.ssh
chmod 700 ~/.ssh
cd ~/.ssh
ssh-keygen -t rsa

ssh rac-a cat /home/grid/.ssh/id_rsa.pub >> authorized_keys
ssh rac-b cat /home/grid/.ssh/id_rsa.pub >> authorized_keys
chmod 600 ~/.ssh/authorized_keys
scp authorized_keys rac-b:/home/grid/.ssh/

echo "options=--whitelisted --replace-whitespace" >> /etc/scsi_id.config


###########################
###### 制作ASM磁盘 ######
###########################
su - root
进入dev目录
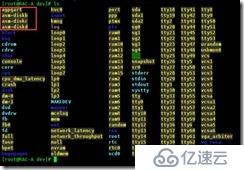
cd /dev
ls

for i in b c d;
> do
> echo "KERNEL==\"sd*\", BUS==\"scsi\", PROGRAM==\"/sbin/scsi_id --whitelisted --replace-whitespace --device=/dev/\$name\", RESULT==\"`/sbin/scsi_id --whitelisted --replace-whitespace --device=/dev/sd$i`\", NAME=\"asm-disk$i\", OWNER=\"grid\", GROUP=\"asmadmin\", MODE=\"0660\"" >> /etc/udev/rules.d/99-oracle-asmdevices.rules
> done

scp /etc/udev/rules.d/99-oracle-asmdevices.rules rac-b:/etc/udev/rules.d/
/sbin/start_udev


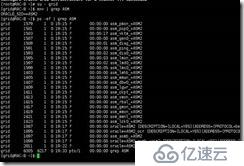
cd /dev/
ls
brw-rw---- 1 oracle oinstall 8, 16 Feb 26 23:54 asm-diskb datadg
brw-rw---- 1 oracle oinstall 8, 32 Feb 26 23:54 asm-diskc
brw-rw---- 1 oracle oinstall 8, 48 Feb 26 23:54 asm-diskd

#################################################
#### 上传grid oracle12C文件 ####
## 文件列表 ##
##p13390677_112040_Linux-x86-64_1of7##oracle12C##
##p13390677_112040_Linux-x86-64_2of7##oracle12C##
##p13390677_112040_Linux-x86-64_3of7## grid ##
#################################################
注:文件只需要上传到RAC-A,软件安装会自动安装到RAC-B机器

tar -xvf Oracle_linux_11.2.0.4_grid.tar

注:由于上文配置oracle、grid 环境变量为能生效,此处重启两天机器。
Reboot

###################################################
########## 测试两端机器的配置一致性 #############
###################################################
su - grid
cd /soft/grid
./runcluvfy.sh stage -pre crsinst -n RAC-A,RAC-2 -fixup –verbose

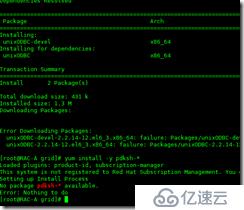
yum install -y libaio-0.3.105 (i386)
yum install -y compat-libstdc++-*
yum install -y libaio-devel-*
yum install -y libgcc-*
yum install -y libstdc++-*
yum install -y unixODBC-*
yum install -y unixODBC-devel-*
yum install -y pdksh-*
############################
###### 安装集群管理 ######
######################
##### ASM密码 ######
######################
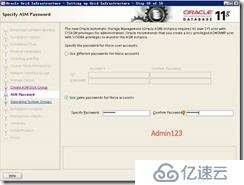
asm盘密码;Admin123
################################
##### 安装ASM磁盘管理包 ######
################################
文件位置:
cd /soft/grid/rpm
rpm -ivh cvuqdisk-1.0.9-1.rpm
传到RAC-B安装


#######################
##### 安装软件 ######
#######################
su - grid
export LANG=C
export DISPLAY=本地IP地址:0.0
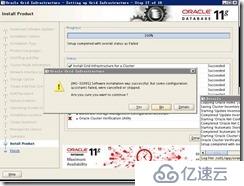
./runInstaller
如出现下图状态,安装java即可
yum install –y java*

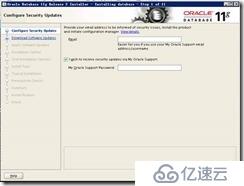
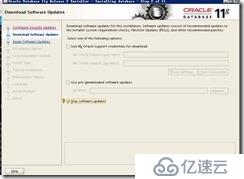
设置邮件通知跳过
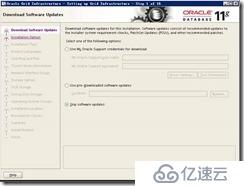
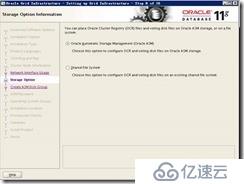
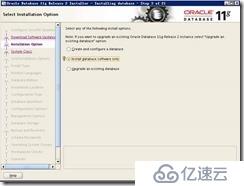
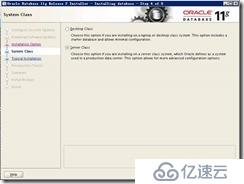
选择配置oracle集群
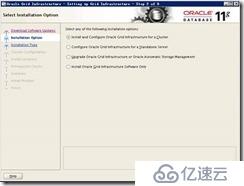
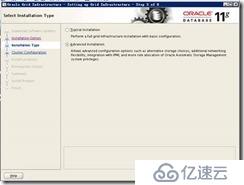
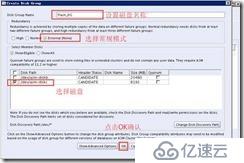
选择高级安装设置(注:必须选择高级安装,否则无法将软件安装到ASM磁盘)
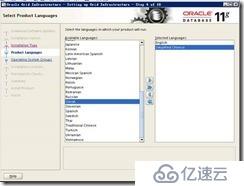
设置语言
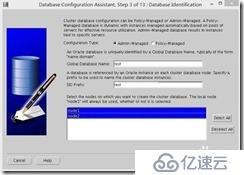
配置集群名称、scanip 集群IP

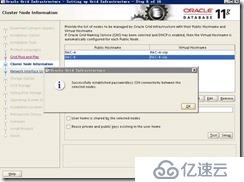
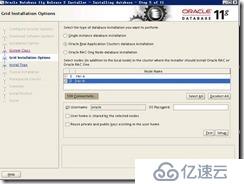
配置添加RAC节点
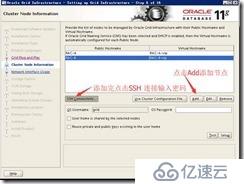
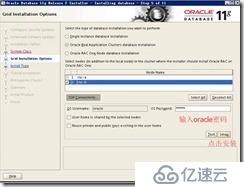
注:RAC-A、RAC-B节点都需要点击SSH Connectiv 之后Setup下
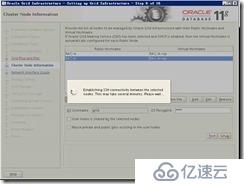
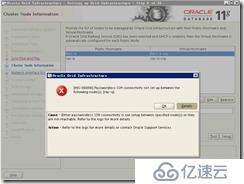
如Next点击报如下错误,将HOSTS解析,与软件中主机名都设置为小写即可
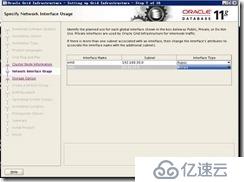
设置网卡属性
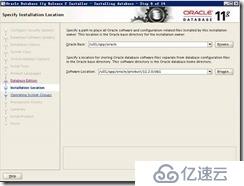
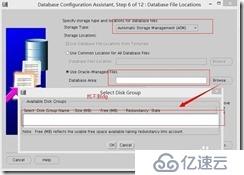
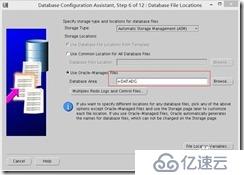
设置安装路径选择ASM磁盘
选择ASM磁盘
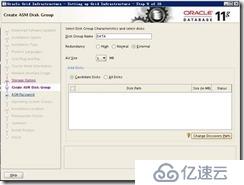
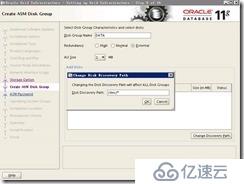
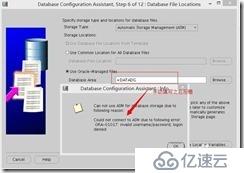
ru检索不到需要点击Change Discovery Path 按钮,设置路径 设置为/dev/*
选择参数

设置ASM磁盘密码
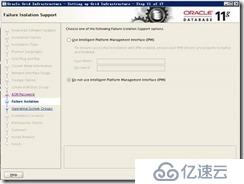
设置IPMI智能管理 跳过
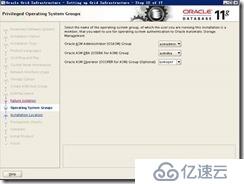
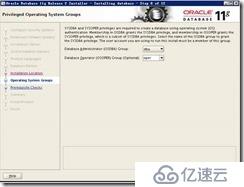
设置ASM磁盘管理组保持默认
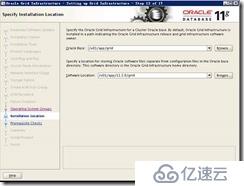
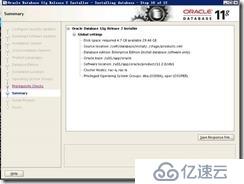
设置安装位置
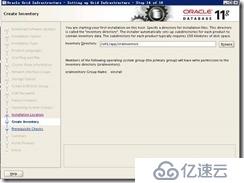
设置库存目录 保持默认
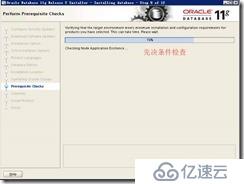
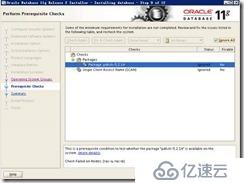
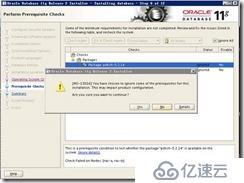
查找缺少依赖包
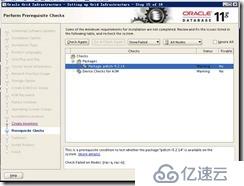
勾选我知道 然后安装

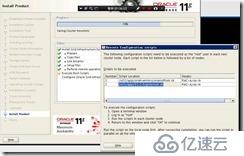
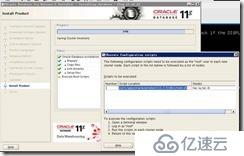
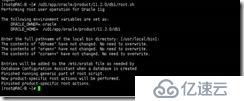
执行脚本 r
安装完成后提示运行两个脚本 需要在RAC-A机器上完全执行完毕后 在再RAC-B机器上运行否则ASM建立失败
root视图下执行
/u01/app/11.2.0.0/oraInventory/orainstRoot.sh
/u01/app/11.2.0.0/oracle/product/db_1/root.sh
注:如果集群创建有问题,或者移除节点,使用如下代码移除节点。
cd /u01/app/11.2.0.0/oracle/product/db_1/crs/install
./rootcrs.pl -deconfig -force -verbose

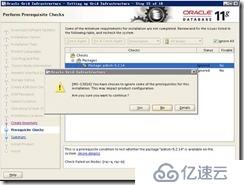
注:此报错为集群验证失败可以忽略
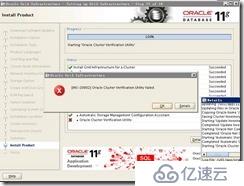
点击yes 完成安装
#####################################
###### 检查ASM在哪个节点运行 ######
#####################################
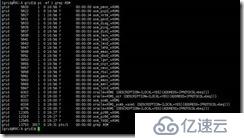
env | grep ASM

ps -ef | grep ASM
grid 1713 1 0 22:34 ? 00:00:00 asm_pmon_+ASM1
grid 1715 1 0 22:34 ? 00:00:00 asm_psp0_+ASM1
grid 1717 1 1 22:34 ? 00:00:02 asm_vktm_+ASM1
节点2
#############################
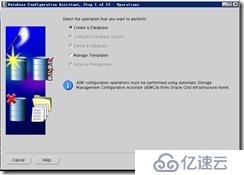
###### Asmca磁盘管理 ######
#############################
安装检查
使用grid用户:
$crsctl start crs
$crsctl check crs
$crsctl start cluster
$crsctl start cluster
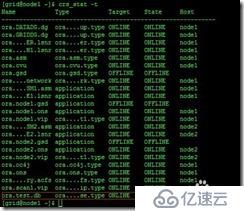
$crs_stat –t
查看集群服务
$crs_stat -t
启停:
./crsctl stop cluster
./crsctl stop crs

[grid@RAC-A grid]$ export LANG=CN
[grid@RAC-A grid]$ export DISPLAY=192.168.30.12:0.0
[grid@RAC-A grid]$ asmca
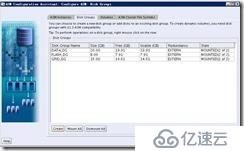
#####################################
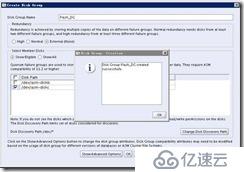
###### 创建ASM磁盘 Flash、Data ######
创建Flash、Date磁盘
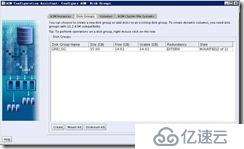
点击Create,进入磁盘设置页面,输入磁盘名称,选择磁盘。

Flash创建完成(存放归档)
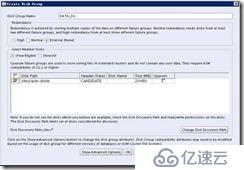
创建Data ASM磁盘
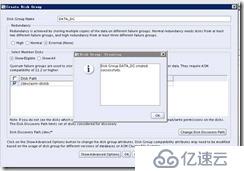
ASM磁盘配置完成
###################################
###### 安装oracle ###############
###################################
解压软件包
tar -xvf Oracle_linux_11.2.0.4_database.tar

切换到Oracle用户
su - oracle
cd /soft/database
./runInstaller
去掉邮件通知
跳过升级
选择只安装数据库软件
选择服务器版
添加节点,点击SSH 连接 输入oacle 密码 注:SSH服务会将文件复制到RAC-B
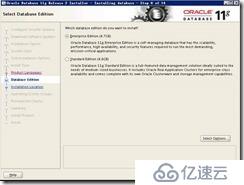
选择高级安装

选择企业版数据库
选择软件安装的目录
设置系统组
先决条件检查
选择忽略所有
点击下一步,点击YES
 点击install安装软件
等待安装完成

RAC-A 、RAC-B执行脚本
/u01/app/oracle/product/11.2.0/db1/root.sh

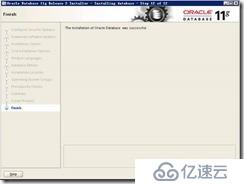
软件安装完成
#####################
####### 建库 ######
su - oracle
export LANG=CN
export DISPLAY=192.168.30.12:0.0
dbca
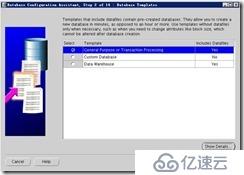
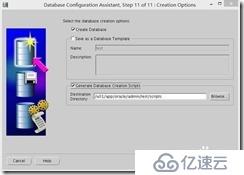
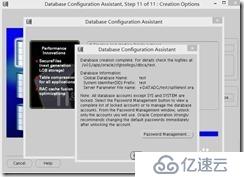
建立RAC数据库

建立数据库
选择一般事务
1. 数据库名称填写test,点击select all
2. 去掉configure enterprise manager,如果需要不用去除
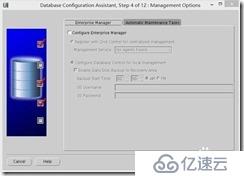
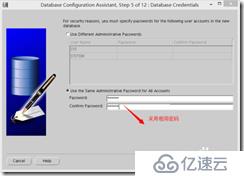
3. sys/system用户密码设置相同
4. [grid@node1 ~]$ id oracle
uid=1200(oracle) gid=1000(oinstall) groups=1000(oinstall),1100(dba)
[grid@node1 ~]$ su -
Password:
[root@node1 ~]# usermod -a -G asmdba oracle
[root@node1 ~]# id oracle
uid=1200(oracle) gid=1000(oinstall) groups=1000(oinstall),1100(dba),1302(asmdba)
两个节点都要
点击cancel,重新dbca
5. 去掉 special fast recovery area,如果需要这一功能,可以不用去除
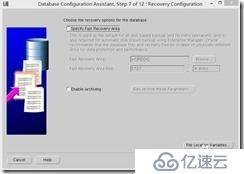
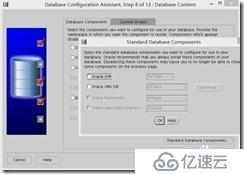
6. 将复选框都去掉
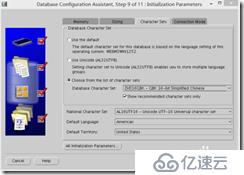
7. 选择 ZHS16GBK-GBK 16 - bit simplified chinese 字符集
8. 开始安装数据库
9. 安装完成之后,检查是否安装成功
查看oracle是否在asmadmin权限组内
[root@orcl2 ~]# id oracle
uid=500(oracle) gid=501(oinstall) groups=501(oinstall),502(dba),503(oper),504(asmadmin),506(asmdba)
如果没有asmadmin权限需要加入
[root@orcl2 ~]# usermod -G asmadmin -a oracle
dbca
ssh racl1 date
ssh racl1-priv date
ssh racl2 date
ssh racl2-priv date
chown -R oracle:oinstall /soft/database/
chmod -R 775 /soft/
sql>show user;查看当前用户
sql>show parameter instance_name;查看当前数据库实例
[周书轩1]ISCSI服务器IP地址
免责声明:本站发布的内容(图片、视频和文字)以原创、转载和分享为主,文章观点不代表本网站立场,如果涉及侵权请联系站长邮箱:is@yisu.com进行举报,并提供相关证据,一经查实,将立刻删除涉嫌侵权内容。


