温馨提示×

温馨提示×

您好,登录后才能下订单哦!

密码登录×
登录注册×
其他方式登录
点击 登录注册 即表示同意《亿速云用户服务条款》

Cacti插件详解之——Weathermap(2)

发布时间:2020-07-09 21:10:12 来源:网络 阅读:1713 作者:Professor哥 栏目:移动开发
把上面的$ENABLED=false;改为$ENABLED=true;然后保存。之后我们刷新页面就可以看到如下页面
Cacti插件详解之——Weathermap(2)
在这里我们可以创建配置文件,或者从一个配置文件创建一个新的配置文件,或者打开一个已有的配置文件进行编辑,这里我们就点击simple.conf文件做一个简单的weathermap配置。点击simple.conf可以看到下图
Cacti插件详解之——Weathermap(2)
这里就是weathermap的编辑页面了,把上面那个几次菜单翻译下吧。
Change File可以会到前面的那个界面改变编辑的图形配置文件。
Add Node就是添加一个节点,点击之后鼠标会变成变成一个十字,在你想要放Node的地方点一下就可以创建一个Node。
Add Link 就是添加添加一条链接,可以把二个Node连接起来,点击Add Link后点击Node,再点击另外一个Node就可以把二个Node连接起来。
Position Legend是调整那个图列的位置,点击之后鼠标会编成十字,点击以下就可以移动到新的位置。
Postion Timestamp就是添加一个图片创建的时间啊什么信息的。
Map Style 可以调整这个图形的风格。比如图形名称、.图形大小、图形背景图片、输出图片目录、位置等

基本使用的也就这几个了。点击一个Node
Cacti插件详解之——Weathermap(2)
这里可以改Node的大小,Node的名称和标签名称,
Info URl是用户把鼠标放在这个Node后会出现一个流量图片,这个图片信息来自那里,
Hover Graph URL 这里是当用户点击这个Node是会跳转到那个图,在这里可以选择点击Pick From Cacti,从cacti中选取,
Icon Filename是图标的图像,这里可以有很多比如Router、Host、firewall。当然也可以自己添加,在weathermap的images里,设置好有点击Submit就可以提交更改了.

我们在设置以下Link,点击Link的那条线
Cacti插件详解之——Weathermap(2)
Maximum Bandwidth Into这里是设置这条Link的最大带宽,这里根据你自己的具体配置设置了,这里端口是1G的端口,出口带宽是300MB因此我设置为300MB,Maximum Bandwidth out 是出去的最大流量带宽,可以根据自己的具体情况设置。Data source是流量从那里获取,这里可以引用mrtg的流量也可以点击Pick form Cacti从cacti里获取,Info URl是用户把鼠标放在这个Node后会出现一个流量图片,这个图片信息来自那里,Hover Graph URL 这里是当用户点击这个Node是会跳转到那个图,这个如果选择从cacti获取会自动取得。从mrtg要自己设置下。别的默认就成。这样我们就我完成了对一张拓扑图的编辑。如下就是我设计的weathermap图像
Cacti插件详解之——Weathermap(2)
注意问题:
1,中文显示,我们可以在配置文件里指定中中文字体的路径
vi /var/www/html/plugins/weathermap/configs/simple.conf
FONTDEFINE 100 /var/www/html/plugins/weathermap/msyh.ttf 9
msyh.ttf是中文字体的名字./usr/share/fonts/下应该会有,指定路径,前面100是字体编号  后面9字体是大小
Cacti插件详解之——Weathermap(2)
添加连接线的上行 下行字体
Cacti插件详解之——Weathermap(2)


 2.每次对图形进行调整后,都是自动保存的,不用保存(也没有那个选项!嘿嘿),要在weathermap里看到修改后的效果要等到下次cacti采集器采集后才会绘图。
3.cacti的日志里可能会显示
WEATHERMAP: Poller[0] [Map 1] simple.conf: About to write image file. If this is the last message in your log, increase memory_limit in php.ini [WMPOLL01]
等信息,不过我修改php.ini里的设置也不起作用,不用管它!
4.可以在cacti的里进行设置,如图,一般默认就成
Cacti插件详解之——Weathermap(2)
二.weathermap独立的使用。

通过在catci里的设置,大家会weathermap已经有了一个认识了,其实它就是用过一个配置文件,绘图,引用cacti或者mrtg的流量和图形就成了

1.安装基本环境

代码:
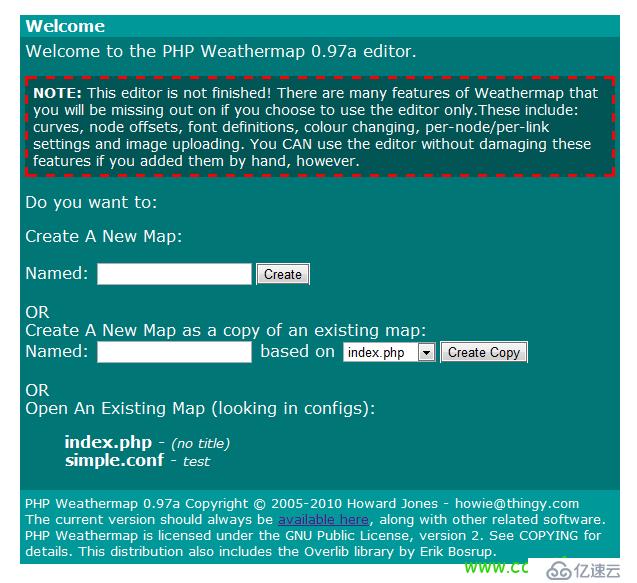
  yum install httpd php php-gd  php-pear rrdtool -y  (rrdtool要添加非官方源) servie http start chkconfig http on service crond start chkconfig crond on wget http://www.network-weathermap.com/fi...rmap-0.97a.zip unzip php-weathermap-0.97a.zip mv weathermap/ /var/www/html/  (浏览器访问地址为:http://xxx.xxx.xxx.xxx/weathermap/ chown -R apache:apache /var/www/html/weathermap/configs/ 
2.配置weathermap

我们要配置我们的图形配置文件

先编辑editor.php
代码:
  vi /var/www/html/weathermap/editor.php 
把里面的$ENABLED=false;改为$ENABLED=true;$ignore_cacti=False;改为$ignore_cacti=True;然后保存。
之后我们打开http://xxx.xxx.xxx.xxx/weathermap/editor.php
就可以像在cacti里一样设计自己的weathermap图形了,

特别注意:
1.在这里ICO的路径要选择绝对路径,不让路径会有错误,导致不能出图。
2.eidtor.php里可以设置拓扑图输出的路径Image的路径直接写名称,不用写路径,Html的路径路径要写绝对路径。
3.在weathermap目录里有个weathermap文件要设置rrdtools的路径。$rrdtool="/usr/bin/rrdtool";
关于配置文件的我们可以weathermap官网找到
weathermap官网的设置:http://www.network-weathermap.com/ma...reference.html 具体的参数这里都有
这里还有一个配置文件的范本http://www.network-weathermap.com/ma...n.html#example
这个是做好的图形;http://www.network-weathermap.com/ma...e/example.html

3.生成图形

设置好图形配置文件后我们就要生成图形了,在cacti里这个是通过cacti的采集器实现的,在单独安装weathermap的后,需要利用系统的计划任务来实现
代码:
  vi /etc/crontab 
添加如下
代码:
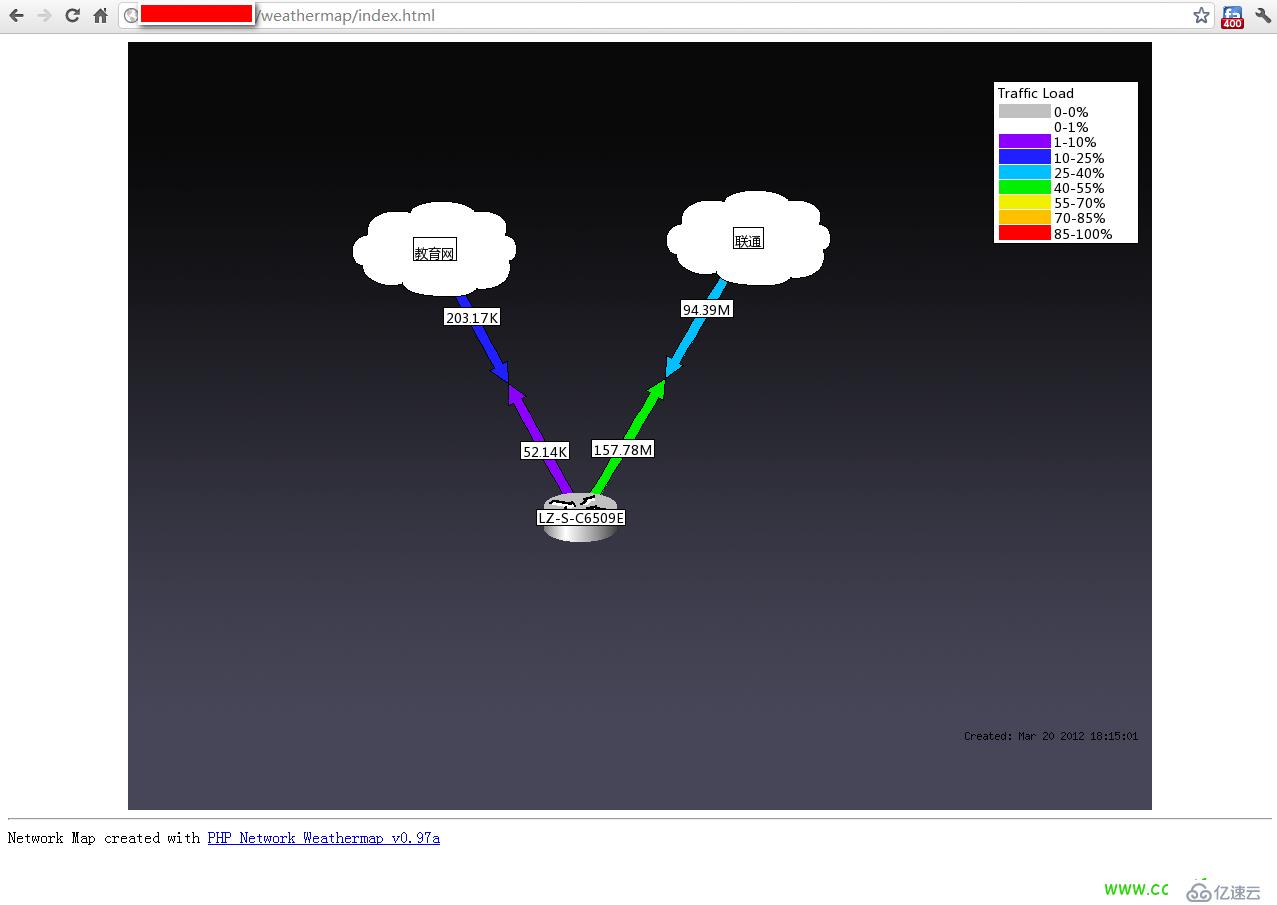
  */5 * * * * root /usr/bin/php /var/www/html/weathermap/weathermap --config /var/www/html/weathermap/configs/simple.conf --image-uri ../weathermap/test.png 
然后我们要做个硬链接不让png图片的路径会有错误
代码:
  ln /test.png /var/www/html/weathermap/test.png 
至此我们的weathermap已经做好我们可以打开http://xxx.xxx.xxx.xxx/weathermap/index.html查看拓扑图。
我最终的拓扑图
Cacti插件详解之——Weathermap(2)

总结:
1.weathermap的用法就说到这里,基本就是这二种了,还有的是自己做一个html,再嵌套一个weathermap的页面就像刚开始给大家说的那个中国科大的,就是通过网页的嵌套做到的,嵌套了mrtg,weathermap的页面。
2.在单独使用weathermap时要特别注意路径问题,不出图形很有可能是路径问题,这个问题我也纠结了很久。
3.最重要的一点,就是关于weathermap的安全性问题,其实在它的官网也说明了。

代码:
  地址:http://www.network-weathermap.com/ma...ti-editor.html   When you are happy that the world can't edit your maps, then enable the editor. This is done by editing the top of editor.php and changing $ENABLED=false; to $ENABLED=true;   You should now be able to go to http://your.server/cacti/plugins/weathermap/editor.php in a browser, and get a welcome page that offers to load or create a config file. That's it. All done. Please see the editor manual page for more about using the editor!  You can also edit an existing map from the Cacti web interface, by choosing Manage..Weathermaps and then clicking on the name of a config file in the list of active maps. The editor will open with that map loaded.  Important Security Note: The editor allows anyone who can access editor.php to change the configuration files for your network weathermaps. There is no authentication built-in for editing, even with the Cacti Plugin. This is why the configuration file doesn't exist by default - the editor won't work until you choose to make it work. It's recommended that you either:  change the ownership of configuration files so that the editor can't write to them once they are complete, or use your webserver's authentication and access control facilities to limit who can access the editor.php URL. On apache, this can be done using the FilesMatch directive and mod_access. 
可以看到在默认情况下editor.php这个是没有做验证的,就是意味每个人都可以编辑你的weathermap图形配置文件!!!!发现很多使用weathermap都没做限制,有些还是直接到公网的,再次特别提醒,一定要做一个验证!
下面我提供一种方法。
修改httpd.conf配置文件
代码:
  vi /etc/httpd/conf/httpd.conf 
在文件最后添加
代码:
                   Order Deny,Allow             Deny from all             Allow from 127.0.0.1          
然后保存,这个路劲是weathermap的路径.这样就可以限制别人访问editor.php的访问.设置好后重启apache,再访问那个页面就会出现这个页面
Cacti插件详解之——Weathermap(2)
当然也可以做一个基于.htaccess的验证。

本文内容都是本人自己理解,如有错误之处,请大牛指正啊,不胜感谢啊!
向AI问一下细节

免责声明:本站发布的内容(图片、视频和文字)以原创、转载和分享为主,文章观点不代表本网站立场,如果涉及侵权请联系站长邮箱:is@yisu.com进行举报,并提供相关证据,一经查实,将立刻删除涉嫌侵权内容。

AI