Nagios的功能以及它所使用的场景在此不必多说.网上很多这方面资料.本文主要介绍Nagios-SNMP-Plugins 来实现对企业中的服务器的硬件的监控,如:磁盘,CPU ,内存,网卡等在出现异常或恢复时通知管理员并使用PNP插件结合rrdtool实现绘图
一.实验环境
1.监控机:CentOS5.4_x32(192.168.1.253)
2.两台被监控机器:Windows (192.168.1.206),Linux(192.168.1.124)
3.所需软件:
Nagios3.3.1
Nagios-plugins-1.4.16
Nagios-snmp-plugins.1.1.1
Rrdtool
Pnp4nagios-0.6.18
sendEmail
二.部署过程
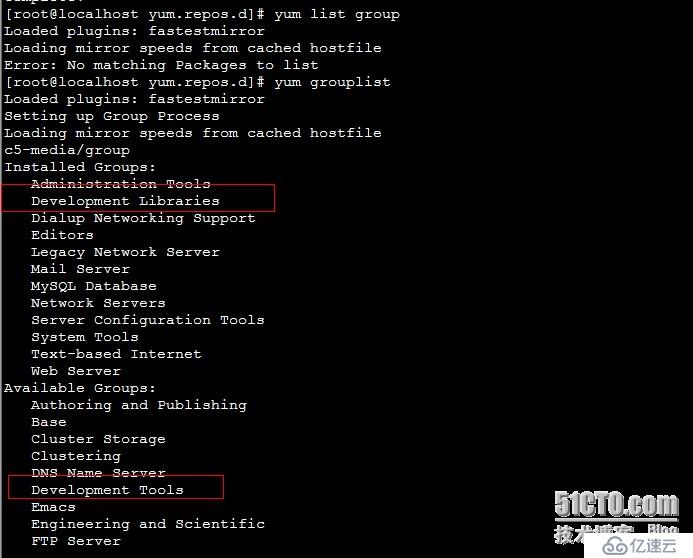
1.确保系统开发组件已安装
2.使用yum安装LAMP环境
yum -y install php php-cli php-common php-pdo php-gd php-mysql php-devel php-mbstrin
yum -y install httpd httpd-devel system-config-httpd
yum -y install mysql-devel mysql-server mysql
yum -y install gd gd-devel
注:以上组件件中有PHP扩展,关于gd gd-devel必需安装不然map会出现异常.ndo2db会将的nagios信息转入MySQL数据库
3.启动Apache和MySQL
chkconfig --add httpd || chkconfig httpd on//添加apache服务开机启动
chkconfig --add mysqld || chkconfig mysqld on //添加MySQL服务 开机启动
service httpd restart 启动Apache
service mysqld restart 启动MySQL
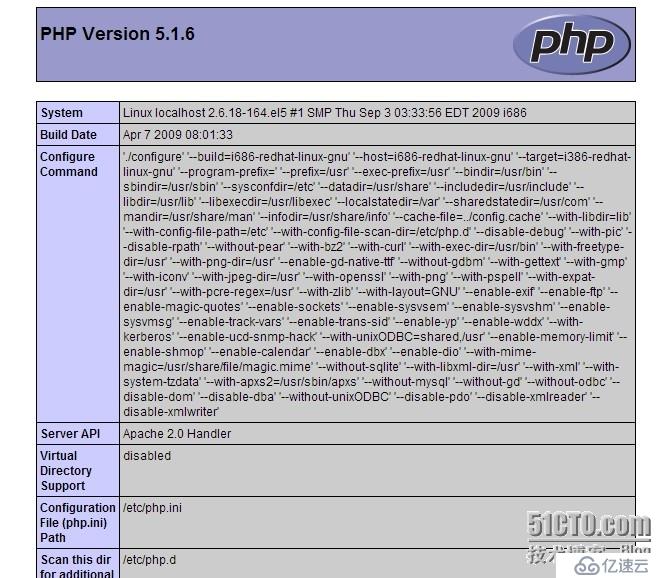
4.建立php测试文件,并验证
vim /var/www/index.php
<?
phpinfo();
?>
三.依次安装所需软件
1.安装Nagios
groupadd nagcmd
useradd -G nagcmd nagios
passwd nagios //手动设置密码
usermod -a -G nagcmd apache
cd nagios-3.3.1
./configure --with-command-group=nagcmd --enable-event-broker //--enable-enevnt-broker参数用于实现NDO的功能
make all
make install
make install-init
make install-commandmode
make install-config
htpasswd -c /usr/local/nagios/etc/htpasswd.users nagiosadmin //指定Nagios的web接口登录密码
make install-webconf
2.安装Nagios-plugins
./configure --with-nagios-user=nagios --with-nagios-group=nagios
make
make install
chkconfig --add nagios || chkconfig nagios on //配置Nagios开机启动
/usr/local/nagios/bin/nagios -v /usr/local/nagios/etc/nagios.cfg //检测无异常即可以启动服务
service nagios restart //重启apache服务
service httpd restart //启动nagios服务
3.安装Nagios-snmp-plugins
Crypt-DES-2.07.tar.gz
Digest-HMAC-1.03.tar.gz
Digest-MD5-2.53.tar.gz
Digest-SHA1-2.13.tar.gz
Net-SNMP-v6.0.1.tar.gz
分别解压进入各目录执行以下操作
perl Makefile
make test
make install
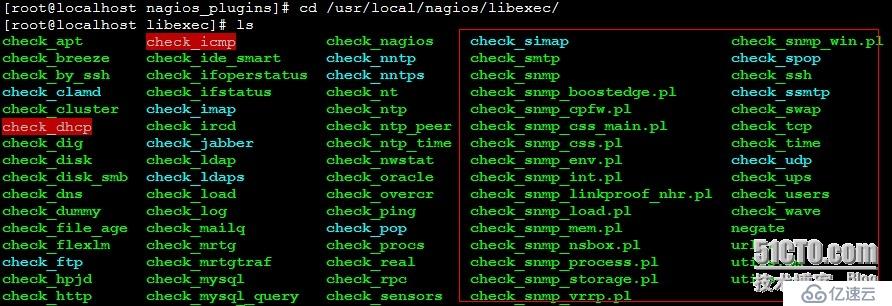
tar -zxvf nagios-snmp-plugins.tar.gz
cd nagios_plugins
./install //依次回车即可,完成后会在/usr/local/nagios/libexec目录中生成相应的健康脚本
重启apache 和nagios
浏览器中输入:http://192.168.1.253/nagios
用户名:nagiosadmin
密码:上面设置的密码
三.配置监控
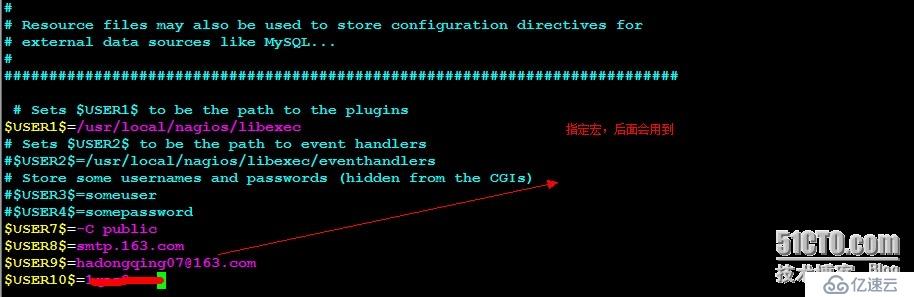
1,配置/usr/local/.nagios/etc/object/command.cfg文件,在文件结尾处添加以下内容.
###############################SNMP
define command {
command_name check_tcpport
command_line $USER1$/check_tcp -H $HOSTADDRESS$ -p $ARG1$ -w $ARG2$ -c $ARG3$
}
define command {
command_name check_snmp_disk
command_line $USER1$/check_snmp_storage.pl -H $HOSTADDRESS$ $USER7$ -p $ARG1$ -m $ARG2$ -w $ARG3$ -c $ARG4$
}
define command {
command_name check_snmp_mem
command_line $USER1$/check_snmp_storage.pl -H $HOSTADDRESS$ $USER7$ -p $ARG1$ -m $ARG2$ -w $ARG3$ -c $ARG4$ -f
}
define command {
command_name check_snmp_cpuload
command_line $USER1$/check_snmp_load.pl -H $HOSTADDRESS$ $USER7$ -p $ARG1$ -w $ARG2$ -c $ARG3$ -f
}
(-f 不可缺少否则无法出图)
配置监控之前先检测被检控主机状态,被控机上开启SNMP服务并配置好团体名及所接收来自哪些区域的请求.
windows
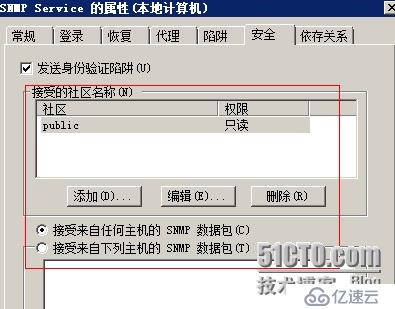
linux
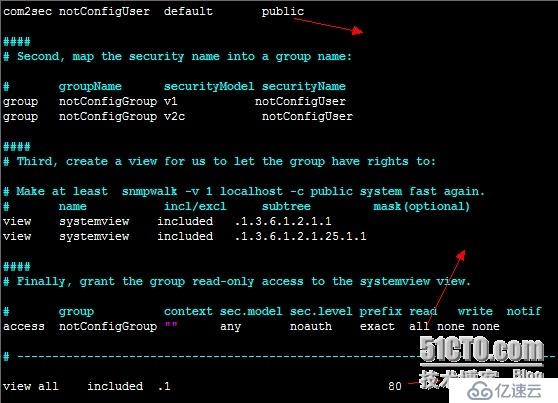

测试成功就可以进行配置了.
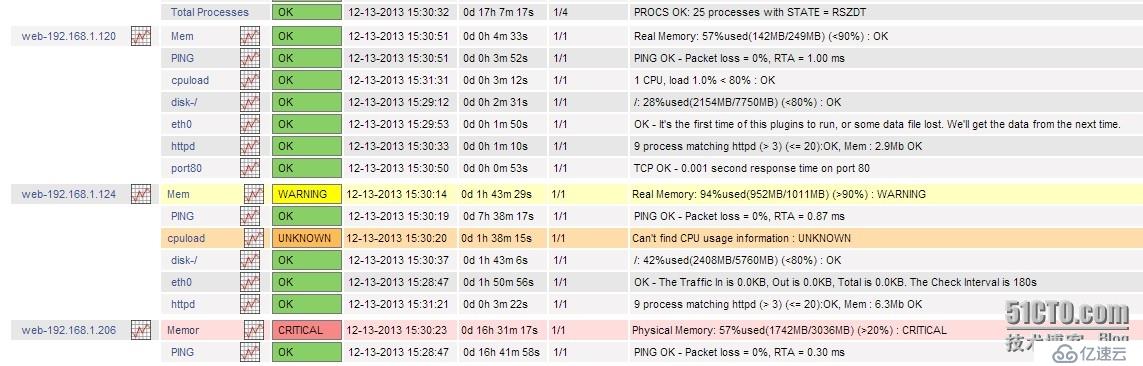
2.定义监控主机
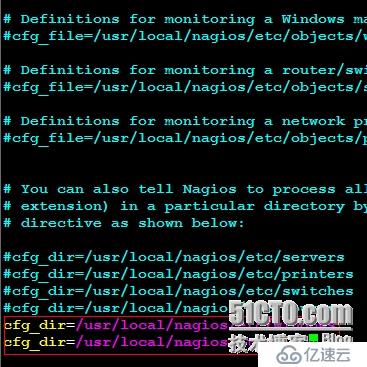
在nagios.cfg中开启被监控主机的目录
添加windows主机监控文件
以下为192.168.1.206这台机器的监控配置
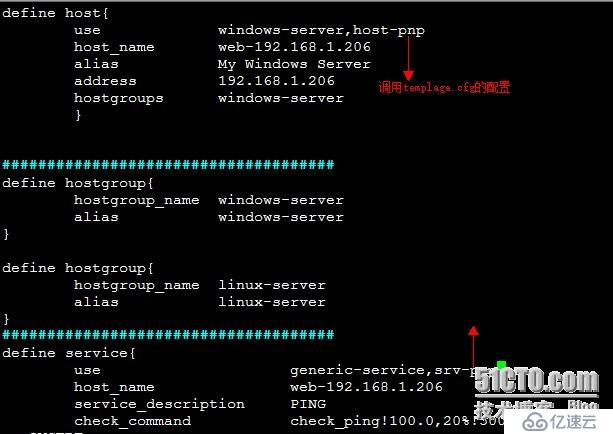
define host{
use windows-server
host_name web-192.168.1.206
alias My Windows Server
address 192.168.1.206
hostgroups windows-server
}
##################################### //这里是分组,注,分组中需要指定一次
define hostgroup{
hostgroup_name windows-server
alias windows-server
}
define hostgroup{
hostgroup_name linux-server
alias linux-server
}
#####################################
define service{
use generic-service
host_name web-192.168.1.206
service_description PING
check_command check_ping!100.0,20%!500.0,60%!5
}
###########Memory
define service{
use generic-service
host_name web-192.168.1.206
service_description Memor
check_command check_snmp_mem!161!"Physical Memory"!10!20
}
检测语法是否有错
/usr/local/nagios/bin/nagios -v /usr/local/nagios/etc/nagios.cfg
无报错即可重启nagios 服务
service nagios restart
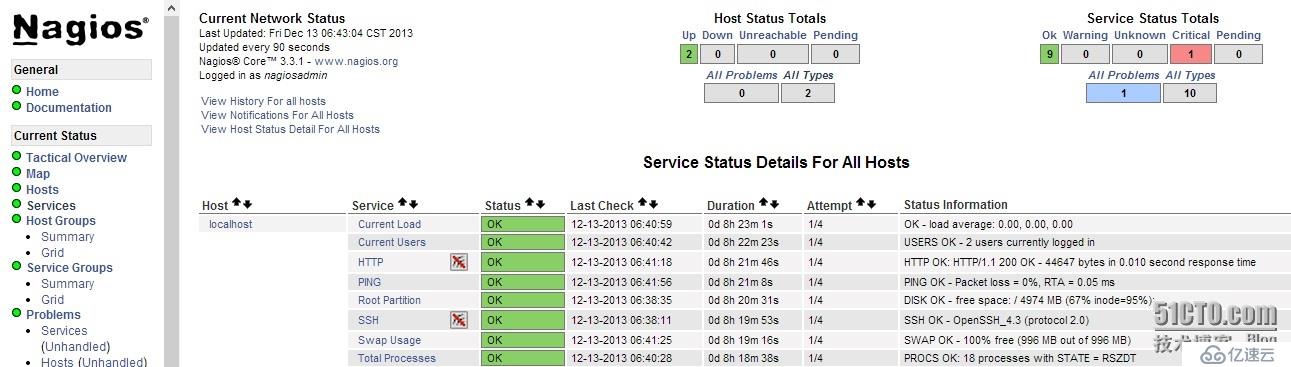
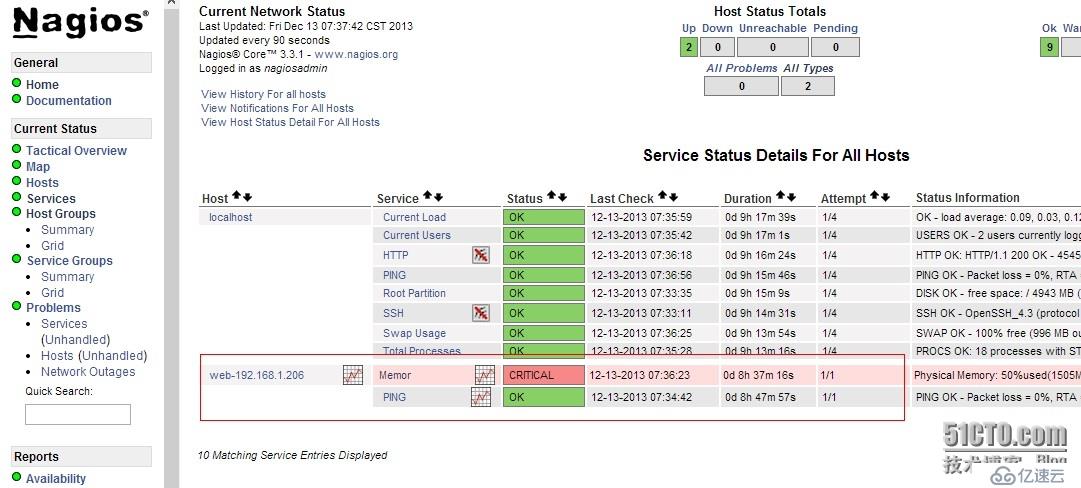
刷新监控页面

三.配置监控对像使用量绘图功能
1.安装cgilib
tar -zxvf cgilib-0.6.tar.gz
cd cgilib-0.6
make
cp aux.h /usr/include/
cp cgi.h /usr/include/
cp libcgi.a /usr/lib/
2.安装rrdtool
yum -y install ruby
yum -y install pango pango-devel
rpm -ivh rrdtool *

3.安装PNP
cd pnp4nagios-0.6.18
./configure --with-nagios-user=nagios --with-nagios-group=nagios --with-rrdtool=/usr/bin/rrdtool --with-perfdata-dir=/usr/local/nagios/share/perfdata
make all
make install
make install-config
4.配置apache
vi /etc/httpd/conf/httpd.conf
末尾添加如下信息
Alias /pnp4nagios "/usr/local/pnp4nagios/share"
<Directory "/usr/local/pnp4nagios/share">
AllowOverride None
Order allow,deny
Allow from all
AuthName "Nagios Access"
AuthType Basic
AuthUserFile /usr/local/nagios/etc/htpasswd.users
Require valid-user
<IfModule mod_rewrite.c>
RewriteEngine On
Options FollowSymLinks
RewriteBase /pnp4nagios/
RewriteRule ^(application|modules|system) - [F,L]
RewriteCond %{REQUEST_FILENAME} !-f
RewriteCond %{REQUEST_FILENAME} !-d
RewriteRule .* index.php/$0 [PT,L]
</IfModule>
</Directory>
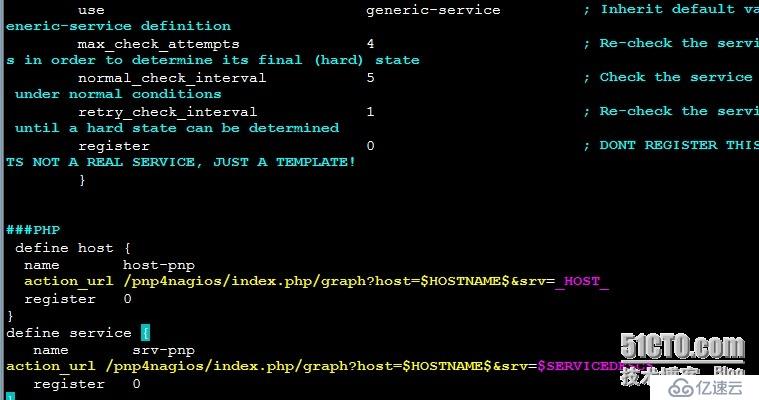
5.配置template.cfg
define host {
name host-pnp
action_url /pnp4nagios/index.php/graph?host=$HOSTNAME$&srv=_HOST_
register 0
}
define service {
name srv-pnp
action_url /pnp4nagios/index.php/graph?host=$HOSTNAME$&srv=$SERVICEDESC$
register 0
}
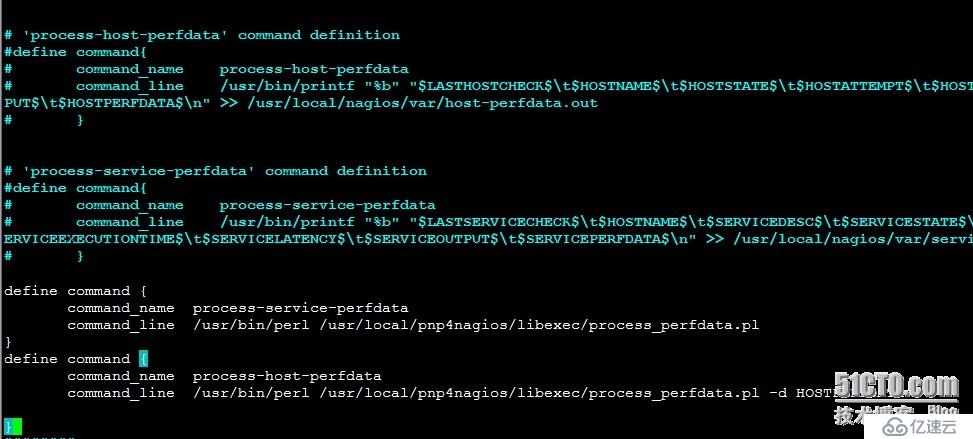
6.配置commands.cfg
先注释原有的再添加
define command {
command_name process-service-perfdata
command_line /usr/bin/perl /usr/local/pnp4nagios/libexec/process_perfdata.pl
}
define command {
command_name process-host-perfdata
command_line /usr/bin/perl /usr/local/pnp4nagios/libexec/process_perfdata.pl -d HOSTPERFDATA
}
7.配置nagios.cfg
process_performance_data=1
enable_environment_macros=1
host_perfdata_command=process-host-perfdata
service_perfdata_command=process-service-perfdata
8.更新PHP至 5.2(CentOS 6.2可yum安装)
yum install php-gd
rpm --import http://repo.webtatic.com/yum/RPM-GPG-KEY-webtatic-andy
wget -P /etc/yum.repos.d/ http://repo.webtatic.com/yum/webtatic.repo
yum --enablerepo=webtatic --exclude=php*5.3* list php
yum --enablerepo=webtatic --exclude=php*5.3* update -y php
验证:
rpm -qa |grep php
service httpd restart
测试PNP .删除或移动/usr/local/pnp4nagios/share/install.php配
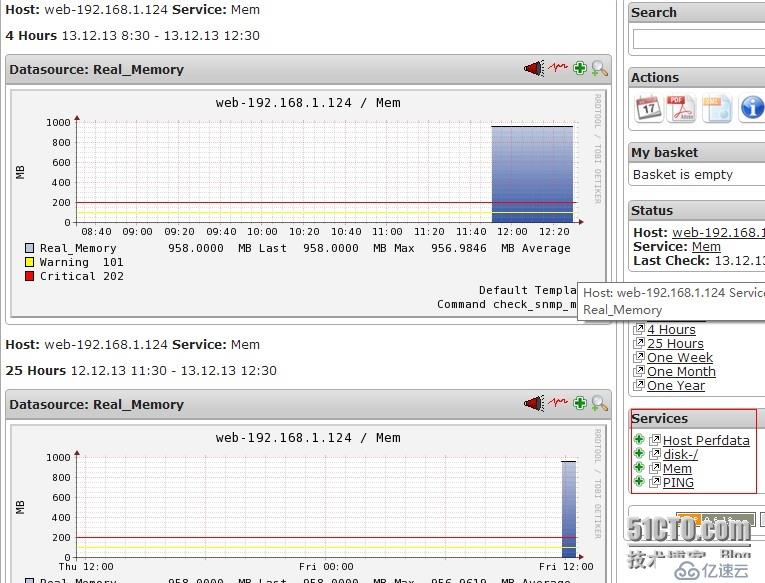
9.为主机或服务配置绘图
重新启动服务.并查看监控页面.需要等一会才能出图
service httpd restart
service nagios restart
三.配置监控LINUX主机也一样,调用的模版文件改成linux-server.分组使用linux-server,前面定义过分组这里不用定义
cd /usr/local/nagios/etc/object/linux
vim 192.168.1.124.cfg
define host{
use linux-server,host-pnp
host_name web-192.168.1.124
alias My Linux Server
address 192.168.1.124
hostgroups linux-server
}
#####################################
define service{
use generic-service,srv-pnp
host_name web-192.168.1.124
service_description PING
check_command check_ping!100.0,20%!500.0,60%!5
}
###########Memory
define service{
use generic-service,srv-pnp
host_name web-192.168.1.124
service_description Mem
check_command check_snmp_mem!161!"Real Memory"!90!99
}
###########disk/
define service{
use generic-service,srv-pnp
host_name web-192.168.1.124
service_description disk-/
check_command check_snmp_stro!161!/!80!90
}
#####CPU
define service{
use generic-service,srv-pnp
host_name web-192.168.1.124
service_description cpuload
check_command check_snmp_cpuload!161!80!90
}
###########Traffic
define service{
use generic-service,srv-pnp
host_name web-192.168.1.124
service_description eth0
check_command check_snmp_traffic!2!200,100!300,200
}
#####Process
define service{
use generic-service,srv-pnp
host_name web-192.168.1.124
service_description httpd
check_command check_snmp_proc!httpd!3!20!100,200
}
define service{
use generic-service,srv-pnp
host_name web-192.168.1.124
service_description port80
check_command check_tcpport!80!0.0023!0.0067
}
五:配置告警功能
1.定义宏变量
2.sendEmail的用法
下载 wget http://caspian.dotconf.net/menu/Software/SendEmail/sendEmail-v1.56.tar.gz
tar -zxvf sendEmail
cd sendEmail
cp -p sendEmail /usr/local/bin
检测发信
/usr/local/bin/sendEmail –f nagios@test.com –t yahoon@test.com –s mail.test.com –u “from nagios” –xu nagios –xp p#3isoda –m happy
解释:-f 表示发送者的邮箱
-t 表示接收者的邮箱
-s 表示SMTP服务器的域名或者ip
-u 表示邮件的主题-xu
表示SMTP验证的用户名-xp
表示SMTP验证的密码(注意,这个密码貌似有限制,例如我用d!5neyland就不能被正确识别)
-m 表示邮件的内容
注:以上内容来源于网络

添加告警配置
# 'notify-service-by-email' command definition
define command{
command_name notify-host-by-email
command_line /usr/bin/printf "%b" "***** Nagios *****nnNotification Type: $NOTIFICATIONTYPE$nHost: $HOSTNAME$nState: $HOSTSTA
TE$nAddress: $HOSTADDRESS$nInfo: $HOSTOUTPUT$nnDate/Time: $LONGDATETIME$n" | /usr/local/bin/sendEmail -s $USER8$ -xu $USER9$ -xp $US
ER10$ -t $CONTACTEMAIL$ -f $USER9$ -l /var/log/sendEmail -u "** $NOTIFICATIONTYPE$ Host Alert: $HOSTNAME$ is $HOSTSTATE$ **" -m "***
** Nagios *****nnNotification Type: $NOTIFICATIONTYPE$nHost: $HOSTNAME$nState: $HOSTSTATE$nAddress: $HOSTADDRESS$nInfo: $HOSTOUTPUT$
nnDate/Time: $LONGDATETIME$n"
}
# 'notify-service-by-email' command definition
define command{
command_name notify-service-by-email
command_line /usr/bin/printf "%b" "***** Nagios *****nnNotification Type: $NOTIFICATIONTYPE$nnService: $SERVICEDESC$nHost: $H
OSTALIAS$nAddress: $HOSTADDRESS$nState: $SERVICESTATE$nnDate/Time: $LONGDATETIME$nnAdditional Info:nn$SERVICEOUTPUT$" | /usr/local/b
in/sendEmail -s $USER8$ -xu $USER9$ -xp $USER10$ -t $CONTACTEMAIL$ -f $USER9$ -l /var/log/sendEmail -u "** $NOTIFICATIONTYPE$ Servic
e Alert: $HOSTALIAS$/$SERVICEDESC$ is $SERVICESTATE$ **" -m "***** Nagios *****nnNotification Type: $NOTIFICATIONTYPE$nnService: $SE
RVICEDESC$nHost: $HOSTALIAS$nAddress: $HOSTADDRESS$nState: $SERVICESTATE$nnDate/Time: $LONGDATETIME$nnAdditional Info:nn$SERVICEOUTP
UT$"
}
定义联系人,可以定义多个用逗号隔开

关掉系统自带的sendmai
service sendmail stop
chkconfig sendmail off
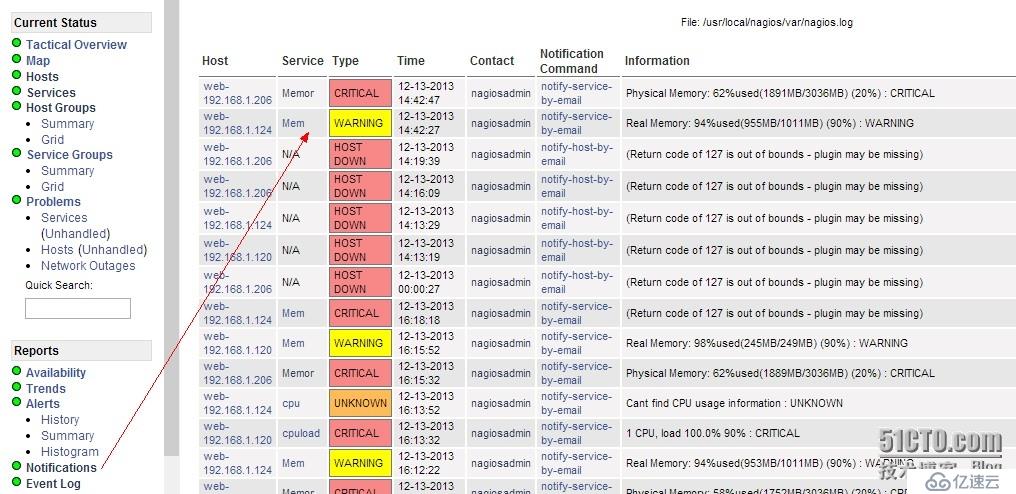
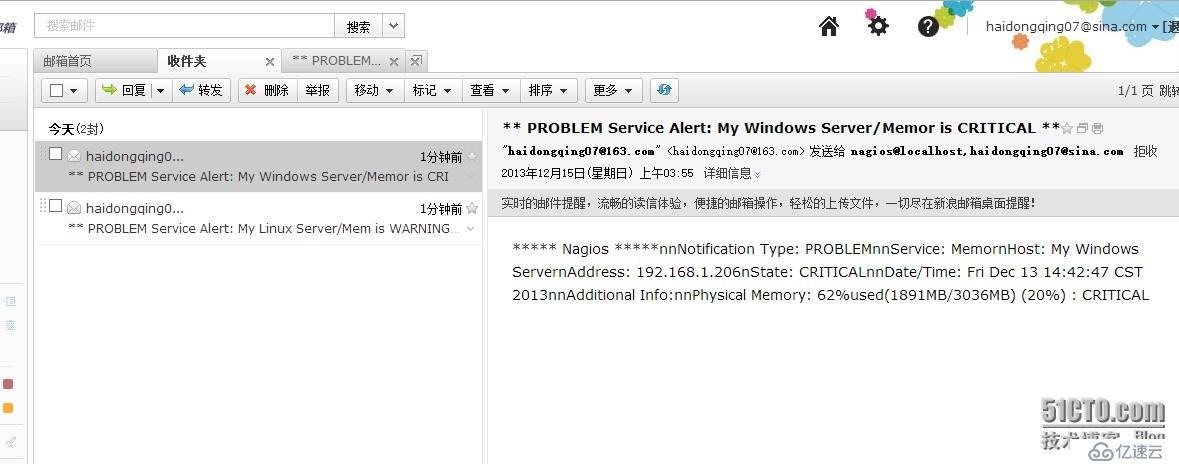
重启服务.观测页面上的notification选项和上面定义的收信邮箱
本次实验先做到这里,稍后附上ndo2db+nagvis的配置..
免责声明:本站发布的内容(图片、视频和文字)以原创、转载和分享为主,文章观点不代表本网站立场,如果涉及侵权请联系站长邮箱:is@yisu.com进行举报,并提供相关证据,一经查实,将立刻删除涉嫌侵权内容。


