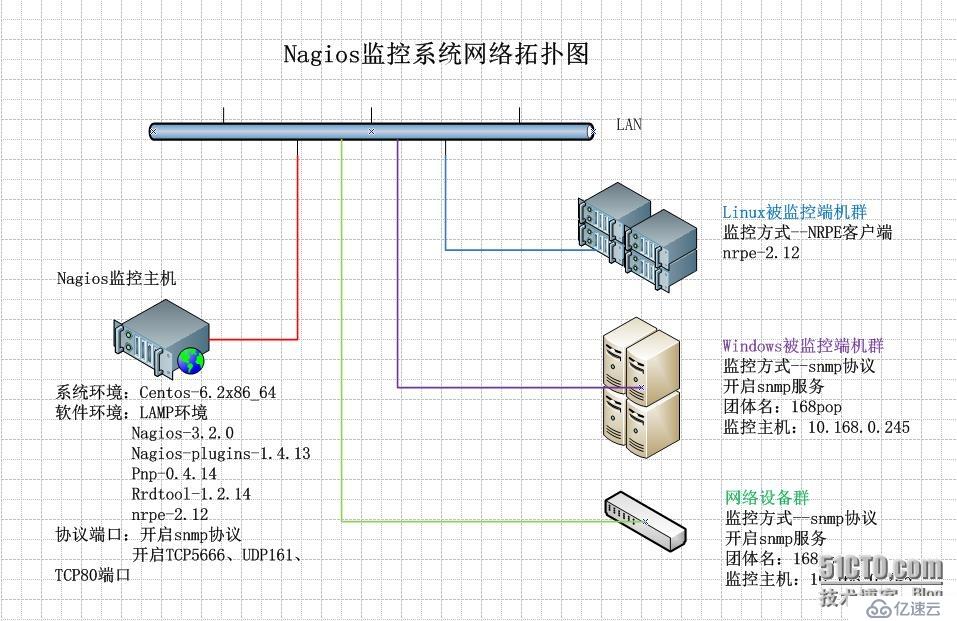
服务器端:
硬件环境:
虚拟机环境
软件环境:
Centos-6.2x86-64
Lamp环境
Nagios-3.2.0版本
Nagios-plugins-1.4.13插件版本
Pnp-0.4.14版本
Rrdtool-1.2.14版本
Nrpe-2.12版本
客户端:
硬件环境:
物理机和虚拟机
软件环境:
Linux客户端:
linux服务器端与linux客户端监控原理:
更多内容: http://exchange.nagios.org/directory/p_w_picpath/93

Centos-6.X-x86-64
Nrpe-2.12版本
Windows客户端:
Windows2008R2
Windows2003R2
需开启Snmp服务
服务器端安装
一,安装前准备:
1,解决perl编译问题:
后面编译的软件有perl程序,这里要提前设置下环境变量。
批量执行命令如下:
echo'export LC_ALL=C'>>/etc/profile
tail-1 /etc/profile
source/etc/profile
echo$LC_ALL
2,关闭防火墙,安装完后启动防火墙。
/etc/init.d/iptablesstop
/etc/init.d/iptablesstart
2.1解决系统时间同步。
echo‘*/5* * * * /usr/sbin/ntpdate time.windows.com’ >>/var/spool/cron/root
[root@nagios~]# crontab -l
*/5* * * * /usr/sbin/ntpdate time.windows.com >/dev/null 2>&1
3,安装nagios所需基础软件包
批量执行命令如下:
yuminstall gcc glibc glibc-common -y
yuminstall gd gd-devel -y
yuminstall httpd php php-gd -y
3.1创建nagios需要的用户及组
批量命令:
/usr/sbin/useradd-m nagios
/usr/sbin/useraddapache
/usr/sbin/groupaddnagcmd
/usr/sbin/usermod-a -G nagcmd nagios
/usr/sbin/usermod-a -G nagcmd apache
id-n -G nagios
id-n -G apache
groupsnagios
groupsapache
3.2 下载软件包
mkdir -p/server/soft
http://prdownloads.sourceforge.net/sourceforge/nagiosplug/nagios-plugins-1.4.16.tar.gz
二,安装nagios
tarzxf nagios-3.2.0.tar.gz
cdnagios-3.2.0
./configure--with-command-group=nagcmd
make all
make install
make install-init
make install-commandmode
make install-config
make install-webconf
提示:如果是编译安装的httpd是,可以执行./configure--with-command-group=nagcmd --with-httpd-conf=/usr/local/apache2/conf/extra 增加一个编译参数即指定编译nagios web配置的生产路径。然后编辑vi/usr/local/apache2/conf/httpd.conf增加 Includeconf/extra/nagios.conf
1,创建nagios web监控界面登入时需要的用户名及密码
htpasswd-c /usr/local/nagios/etc/htpasswd.users admin
输入密码即可
cat/usr/local/nagios/etc/htpasswd.users
提示:如果为单独编译的apache,则操作命令如下
/usr/local/apache2/bin/htpasswd-c /usr/local/nagios/etc/htpasswd.users admin
2,添加接收监控报警的email地址
vi/usr/local/nagios/etc/objects/contacts.cfg +35
email nagios@localhost
改为:
email baochengcai@autohome.com.cn
快速命令:
sed-I 's#nagios@localhost#baochengcai@autohome.com.cn#'/usr/local/nagios/etc/objects/contacts.cfg
3,启动邮件服务。
/etc/init.d/sendmailstart
chkconfigsendmail on
chkconfig--list sendmail
如果sendmail启动比较缓慢,可以修改/etc/hosts
127.0.0.1 nagios localhost.localdomain localhost #增加主机名hostname
4,配置apache服务
启动apache并加入系统开机自启动:
/etc/init.d/httpdstart
chkconfighttpd on
5,安装nagios插件软件包
tarzxf nagios-plugins-1.4.13.tar.gz
cdnagios-plugins-1.4.13
./configure --with-nagios-user=nagios--with-nagios-group=nagios --enable-perl-modules
make
makeinstall
ls /usr/local/nagios/libexec/|wc -l
#编译如遇到make:***[all] Error 2 则configure 加--with-mysql=/usr/local/mysql解决
chkconfig nagios on
chkconfig--list nagios
6,验证nagios配置文件(检查语法)
简单方法:/etc/init.d/nagioscheckconfig
[root@nagios~]# /etc/init.d/nagios checkconfig
Runningconfiguration check... OK.
/usr/local/nagios/bin/nagios-v /usr/local/nagios/etc/nagios.cfg
TotalWarnings: 0
TotalErrors: 0
Thingslook okay - No serious problems were detected during the pre-flight check
#Total Warnings:警告和Total Errors:错误都为0,表示配置正常。
#Total Errors:如果不为0必须解决,否则nagios无法启动。
#Total Warnings:这个如果不为0可以启动nagios。
启动nagios服务
/etc/init.d/nagios start
检查nagios进程:
ps -ef|grep nagios |grep -v grep
检查selinux是否关闭
setenforce0
sed-i ' s#SELINUX=enforcing#SELINUX=disabled# ' /etc/selinux/config
getenforce
7,安装nrpe软件:
tar zxf nrpe-2.12.tar.gz
cd nrpe-2.12
./configure
make all
make install-plugin
make install-daemon
makeinstall-daemon-config
nagios服务器端安装结束,后续需要调整参数。
**Nagios添加多账户管理
检查当前系统账号:
[root@nagios ~]# cat /usr/local/nagios/etc/htpasswd.users
admin:HMcYqU.5Bh5bk
xiaomin:$apr1$GFzBDndr$Rd6Qvbc58PCUTPXNjhs8E1
chenkaixiong:$apr1$M6RLaWz8$8Ghi27zHStHaSZ9W1DVgs/
添加系统登录账号:
[root@nagios ~]# htpasswd -m/usr/local/nagios/etc/htpasswd.users chengcai
Newpassword:
Re-typenew password:
Addingpassword for user chengcai
[root@nagios etc]# cat /usr/local/nagios/etc/htpasswd.users
admin:HMcYqU.5Bh5bk
xiaomin:$apr1$GFzBDndr$Rd6Qvbc58PCUTPXNjhs8E1
chenkaixiong:$apr1$M6RLaWz8$8Ghi27zHStHaSZ9W1DVgs/
chengcai:$apr1$lXiSe1w4$HxIw6xSwjon5NshKfbbSx0
配置账号权限:
[root@nagios etc]# egrep -v "^#|^$" cgi.cfg
main_config_file=/usr/local/nagios/etc/nagios.cfg
physical_html_path=/usr/local/nagios/share
url_html_path=/nagios
show_context_help=0
use_pending_states=1
use_authentication=1
use_ssl_authentication=0
authorized_for_system_information=nagiosadmin,admin
authorized_for_configuration_information=nagiosadmin,admin
authorized_for_system_commands=nagiosadmin,admin
authorized_for_all_services=nagiosadmin,admin
authorized_for_all_hosts=nagiosadmin,admin
authorized_for_all_service_commands=nagiosadmin,admin
authorized_for_all_host_commands=nagiosadmin,admin
authorized_for_read_only=xiaomin,chenkaixiong,chengcai
#注:只给chengcai账号只读权限,如果想给该账号更多权限,可根据配置添加。
default_statusmap_layout=5
default_statuswrl_layout=4
ping_syntax=/bin/ping-n -U -c 5 $HOSTADDRESS$
refresh_rate=90
escape_html_tags=1
action_url_target=_blank
notes_url_target=_blank
lock_author_names=1
客户端安装:-linux:
1,解决perl编译问题:
后面编译的软件有perl程序,这里要提前设置下环境变量。
批量执行命令如下:
yum-y install perl-devel perl
echo'export LC_ALL=C'>>/etc/profile
tail-1 /etc/profile
source/etc/profile
echo$LC_ALL
2,关闭防火墙,安装完后启动防火墙。
/etc/init.d/iptables stop
/etc/init.d/iptablesstart
2.1解决系统时间同步。
echo‘*/5* * * * /usr/sbin/ntpdate time.windows.com’ >>/var/spool/cron/root
[root@nagios~]# crontab -l
*/5* * * * /usr/sbin/ntpdate time.windows.com >/dev/null 2>&1
3,在nagios客户端安装插件
mkdir-p /server/soft
cd/server/soft
rz-y (oldboy_tracining_nagios_soft.zip)#老男孩提供的软件包。
unzipoldboy_tracining_nagios_soft.zip
3.1安装nagios-plugins-1.4.13.tar.gz
/usr/sbin/useraddnagios -M -s /sbin/nologin
tarzxf nagios-plugins-1.4.13.tar.gz
cdnagios-plugins-1.4.13
./configure --with-nagios-user=nagios--with-nagios-group=nagios --enable-perl-modules
make
makeinstall
ls /usr/local/nagios/libexec/|wc -l
#编译如遇到make:***[all] Error 2 则configure 加--with-mysql=/usr/local/mysql解决
3.2,安装nrpe软件:
tarzxf nrpe-2.12.tar.gz
cd nrpe-2.12
./configure
make all
make install-plugin
make install-daemon
makeinstall-daemon-config
3.3安装其他相关的插件【iostat】
#-----------
tarzxf Params-Validate-0.91.tar.gz
cdParams-Validate-0.91
perlMakefile.PL
make
makeinstall
cd..
#-----------
tarzxf Class-Accessor-0.31.tar.gz
cdClass-Accessor-0.31
perlMakefile.PL
make
makeinstall
cd..
#------------
tarzxf Config-Tiny-2.12.tar.gz
cdConfig-Tiny-2.12
perlMakefile.PL
make
makeinstall
cd..
#-------------
tarzxf Math-Calc-Units-1.07.tar.gz
cdMath-Calc-Units-1.07
perlMakefile.PL
make
makeinstall
cd..
#-----------
tarzxf Regexp-Common-2010010201.tar.gz
cdRegexp-Common-2010010201
perlMakefile.PL
make
makeinstall
cd..
#---------------
tarzxf Nagios-Plugin-0.34.tar.gz
cdNagios-Plugin-0.34
perlMakefile.PL
make
makeinstall
cd..
#-------------
yuminstall sysstat -y
#这个命令式安装系统性能分析工具,监控系统性能时程序或脚步会调用这些工具。
3.4配置开发的几个基本脚本插件
cp /server/soft/nagios/check_memory.pl /usr/local/nagios/libexec/
cp /server/soft/nagios/check_iostat /usr/local/nagios/libexec
chmod 755/usr/local/nagios/libexec/check_memory.pl
chmod 755/usr/local/nagios/libexec/check_iostat
dos2unix/usr/local/nagios/libexec/check_memory.pl
dos2unix/usr/local/nagios/libexec/check_iostat
3.5配置nrpe
cd/usr/local/nagios/etc
vinrpe.cfg +79
加入可以监控本机的nagios server端IP,如下:
allowed_hosts=10.168.0.217
#注:如果机器大于500台做集群或分布式监控时,可以使用多个nagiosserver-,ip要用逗号隔开。
#可用一条命令执行。↓
# perl -pi -e's/allowed_hosts=127.0.0.1/allowed_hosts=10.168.0.245/g'/usr/local/nagios/etc/nrpe.cfg
grep allowed_host/usr/local/nagios/etc/nrpe.cfg
更改nrpe配置文件信息。
cd /usr/local/nagios/etc
vi nrpe.cfg (shift+g切换到结尾)#注释掉或者干脆删除199-203行,同时在下面新添加要监控的内容。
command[check_load]=/usr/local/nagios/libexec/check_load-w 15,10,5 -c 30,25,20
command[check_mem]=/usr/local/nagios/libexec/check_memory.pl-w 10% -c 3%
command[check_disk]=/usr/local/nagios/libexec/check_disk-w 15% -c 7% -p /
command[check_swap]=/usr/local/nagios/libexec/check_swap-w 20% -c 10%
command[check_iostat]=/usr/local/nagios/libexec/check_iostat-w 6 -c 10
#-c为严重报警
启动:nagios client
/usr/local/nagios/bin/nrpe-c /usr/local/nagios/etc/nrpe.cfg -d
echo"/usr/local/nagios/bin/nrpe -c /usr/local/nagios/etc/nrpe.cfg -d">>/etc/rc.local
ps-ef|grep nagios
netstat-lnt|grep 5666
lsof-I :5666
#重启client端nagios nrpe服务的组合命令
pkill nrpe &&/usr/local/nagios/bin/nrpe -c /usr/local/nagios/etc/nrpe.cfg -d
客户端安装:-windows:
windows:
添加服务:
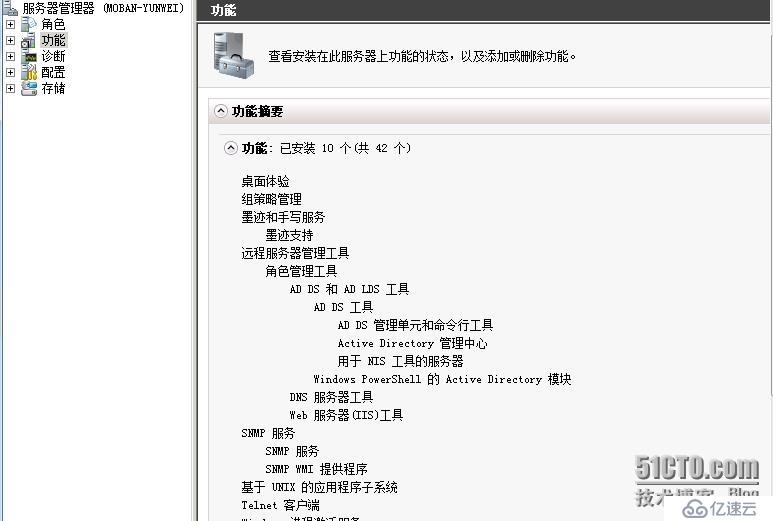
添加完snmp服务后对服务进行设置.
打开本地服务:
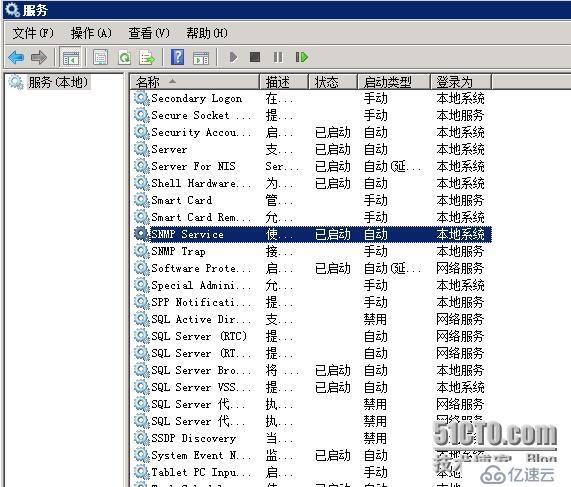
右键属性,添加团体名和监控主机IP地址.
启动服务即可。
免责声明:本站发布的内容(图片、视频和文字)以原创、转载和分享为主,文章观点不代表本网站立场,如果涉及侵权请联系站长邮箱:is@yisu.com进行举报,并提供相关证据,一经查实,将立刻删除涉嫌侵权内容。


