公众号:java乐园
1、上一篇学习了服务提供者provider,但是并不是单单就学习了服务提供者。中间还穿插使用了Hikari数据源和spring cloud整合mybatis。但是上篇使用mybatis时还是沿用了老的方式,需要配置mapper对应的xml文件。先来看看上篇使用mybatis的主要步骤
一、 pom.xml文件引用
<dependency>
            <groupId>org.mybatis</groupId>
            <artifactId>mybatis-spring</artifactId>
            <version>1.3.2</version>
        </dependency>

        <dependency>
            <groupId>org.mybatis.spring.boot</groupId>
            <artifactId>mybatis-spring-boot-starter</artifactId>
            <version>1.3.2</version>
        </dependency>
二、 application.yml配置文件加入mybtias配置项
mybatis:
    mapperLocations: classpath:sc/provider/dao/*.xml
    #configLocation: classpath:mybatis-config.xml
三、 编写mapper文件user-mapper.xml
<?xml version="1.0" encoding="UTF-8" ?>
<!DOCTYPE mapper PUBLIC "-//mybatis.org//DTD Mapper 3.0//EN" "http://mybatis.org/dtd/mybatis-3-mapper.dtd" >
<mapper namespace="sc.provider.dao.UserDao" >

    <select id="getUser" parameterType="java.lang.Long"  resultType="sc.provider.model.User">
        select id, userName, age, position from t_user where id = #{id,jdbcType=INTEGER}
    </select>

    <select id="listUser" resultType="sc.provider.model.User">
        select id, userName, age, position from t_user
    </select>

    <insert id="addUser" parameterType="sc.provider.model.User">
        insert into t_user (
             id, userName, age, position
        ) values (
             #{id,jdbcType=INTEGER},
             #{userName,jdbcType=VARCHAR},
             #{age,jdbcType=INTEGER},
             #{position,jdbcType=VARCHAR}
        )
    </insert>

    <update id="updateUser" parameterType="sc.provider.model.User">
             update t_user set
             userName = #{userName,jdbcType=VARCHAR},
             age = #{age,jdbcType=INTEGER},
             position = #{position,jdbcType=VARCHAR}
             where id = #{id,jdbcType=INTEGER}
    </update>

    <delete id="deleteUser" parameterType="java.lang.Long">
     delete from t_user
            where id = #{id,jdbcType=INTEGER}
    </delete>

</mapper>
四、 编写UserDao.java
package sc.provider.dao;

import java.util.List;

import sc.provider.model.User;

public interface UserDao {

    User getUser(Long id);

    List<User> listUser();

    int addUser(User user);

    int updateUser(User user);

    int deleteUser(Long id);

}
五、 在ProviderApplication.java添加
@MapperScan(basePackages="sc.provider.dao")经过上面五个步骤才能使用mybatis。本篇将和大家看看不能简化spring cloud 整合mybatis的步骤(在sc-eureka-client-provider工程上改造)
一、 依赖必不可少
<dependency>
            <groupId>org.mybatis</groupId>
            <artifactId>mybatis-spring</artifactId>
            <version>1.3.2</version>
        </dependency>

        <dependency>
            <groupId>org.mybatis.spring.boot</groupId>
            <artifactId>mybatis-spring-boot-starter</artifactId>
            <version>1.3.2</version>
        </dependency>
二、 删除application.yml关于mybatis的配置
三、 删除mapper文件user-mapper.xml文件
四、 改造UserDao.java类
package sc.provider.dao;

import java.util.List;

import org.apache.ibatis.annotations.Delete;
import org.apache.ibatis.annotations.Insert;
import org.apache.ibatis.annotations.Mapper;
import org.apache.ibatis.annotations.Select;
import org.apache.ibatis.annotations.Update;

import sc.provider.model.User;

@Mapper
public interface UserDao {

    @Select(value="select id, userName, age, position from t_user where id = #{id,jdbcType=INTEGER}")
    User getUser(Long id);

    @Select(value="select id, userName, age, position from t_user")
    List<User> listUser();

    @Insert(value="insert into t_user (id, userName, age, position) values ( #{id,jdbcType=INTEGER},#{userName,jdbcType=VARCHAR},#{age,jdbcType=INTEGER},#{position,jdbcType=VARCHAR})")
    int addUser(User user);

    @Update(value="update t_user set userName = #{userName,jdbcType=VARCHAR},age = #{age,jdbcType=INTEGER},position = #{position,jdbcType=VARCHAR} where id = #{id,jdbcType=INTEGER}")
    int updateUser(User user);

    @Delete(value=" delete from t_user where id = #{id,jdbcType=INTEGER}")
    int deleteUser(Long id);

}
五、 @MapperScan注解必不可少
package sc.provider;

import org.mybatis.spring.annotation.MapperScan;
import org.springframework.boot.SpringApplication;
import org.springframework.boot.autoconfigure.SpringBootApplication;
import org.springframework.cloud.netflix.eureka.EnableEurekaClient;

@SpringBootApplication
@EnableEurekaClient
@MapperScan(basePackages="sc.provider.dao")
public class ProviderApplication {

    public static void main(String[] args) {
        SpringApplication.run(ProviderApplication.class, args);
    }

}
经过以上步骤就把使用xml方式的mybatis改造成使用annotation方式的mybatis了。
2、启动注册中心sc-eureka-server,启动sc-eureka-client-provider-annotation(使用sc-eureka-client-provider项目改造),验证是否改造成功
方式一:
方式二:
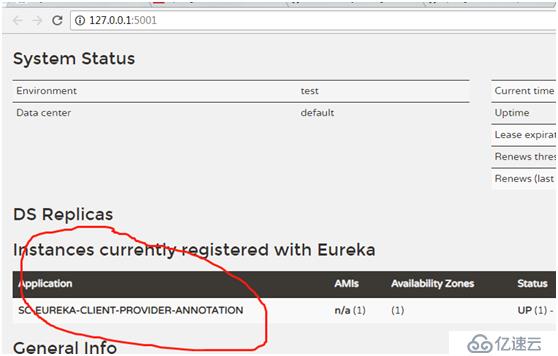
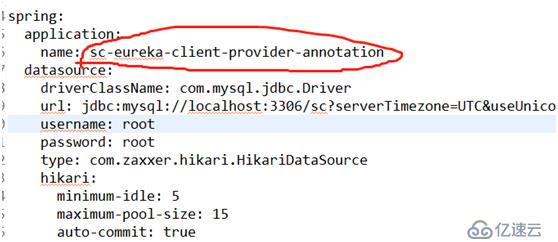
圈住的名字是在application.yml配置的
3、使用postman方法相应restful接口,这里就不一一访问了,可以参考上一篇文章的访问方式
添加:
http://127.0.0.1:8300/user/addUser
查询:
http://127.0.0.1:8300/user/getUser/4
列表:
http://127.0.0.1:8300/user/listUser
更新:
http://127.0.0.1:8300/user/updateUser
删除:
http://127.0.0.1:8300/user/deleteUser/2
免责声明:本站发布的内容(图片、视频和文字)以原创、转载和分享为主,文章观点不代表本网站立场,如果涉及侵权请联系站长邮箱:is@yisu.com进行举报,并提供相关证据,一经查实,将立刻删除涉嫌侵权内容。


