Visual Studio Code 2020еҰӮдҪ•е®үиЈ…еҸҠCPPзҺҜеўғй…ҚзҪ®
иҝҷзҜҮж–Үз« дё»иҰҒд»Ӣз»ҚVisual Studio Code 2020еҰӮдҪ•е®үиЈ…еҸҠCPPзҺҜеўғй…ҚзҪ®пјҢж–Үдёӯд»Ӣз»Қзҡ„йқһеёёиҜҰз»ҶпјҢе…·жңүдёҖе®ҡзҡ„еҸӮиҖғд»·еҖјпјҢж„ҹе…ҙи¶Јзҡ„е°Ҹдјҷдјҙ们дёҖе®ҡиҰҒзңӢе®ҢпјҒ
1пјүдёӢиҪҪпјҢзӣҙжҺҘзӮ№дёӢдёҖжӯҘе®үиЈ…еҚіеҸҜ
е®ҳзҪ‘дёӢиҪҪең°еқҖпјҡhttps://code.visualstudio.com/
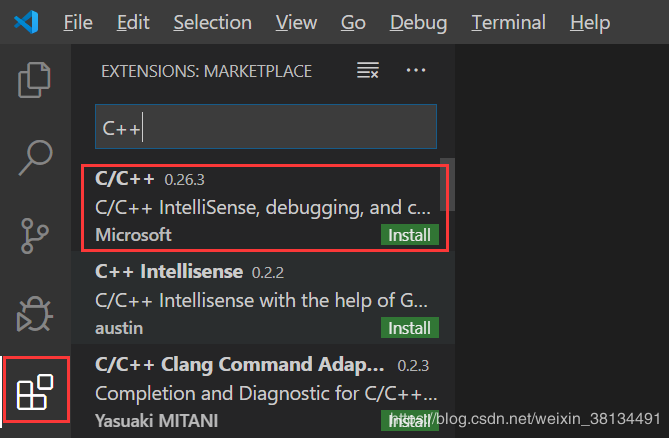
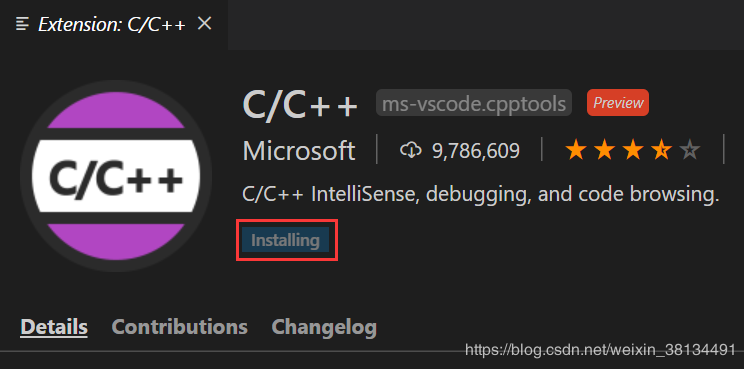
2пјүе®үиЈ…cpptoolsе·Ҙе…·
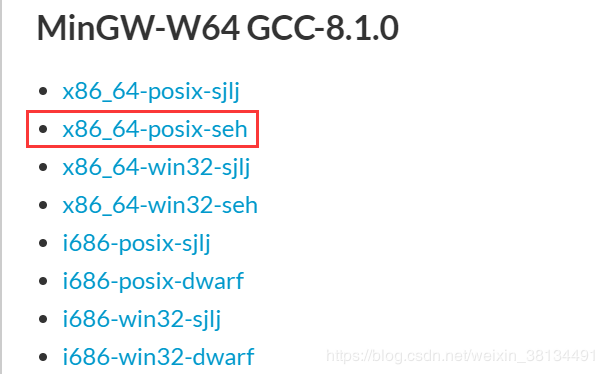
3пјүдёӢиҪҪMinGW
дёӢиҪҪең°еқҖпјҡhttps://sourceforge.net/projects/mingw-w64/files/
дёӢиҪҪзҡ„ж–Ү件пјҡиҝӣе…ҘзҪ‘з«ҷеҗҺдёҚиҰҒзӮ№еҮ» "Download Lasted Version"пјҢеҫҖдёӢж»‘пјҢжүҫеҲ°жңҖж–°зүҲзҡ„ "x86_64-posix-seh"гҖӮ
е®үиЈ…MinGWпјҡдёӢиҪҪеҗҺжҳҜдёҖдёӘ7zзҡ„еҺӢзј©еҢ…пјҢи§ЈеҺӢеҗҺ移еҠЁеҲ°дҪ жғіе®үиЈ…зҡ„дҪҚзҪ®еҚіеҸҜгҖӮжҲ‘зҡ„е®үиЈ…дҪҚзҪ®жҳҜпјҡC:\64-posix-seh\mingw64
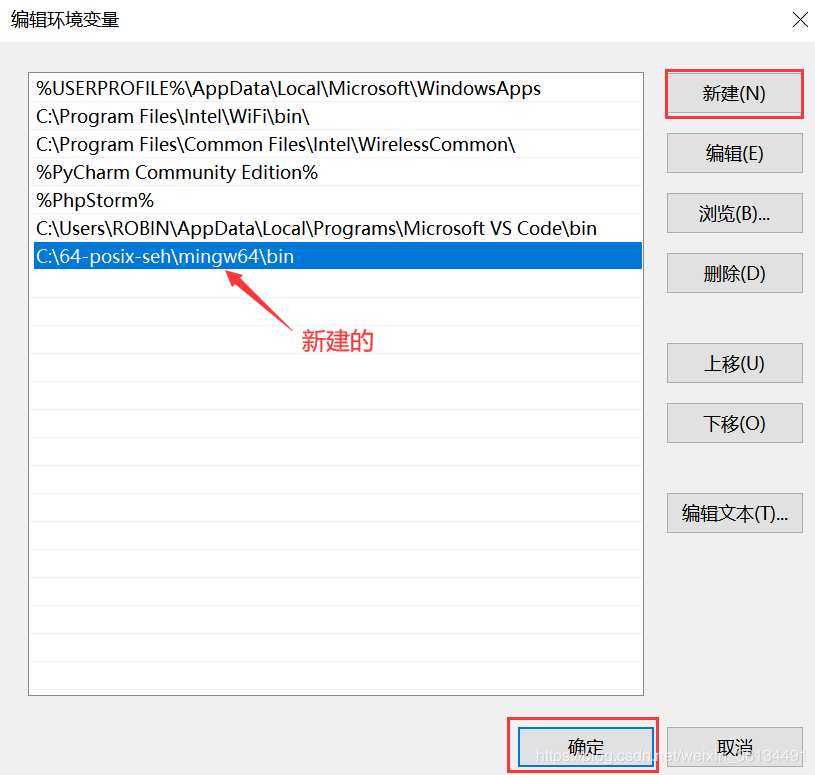
4пјүй…ҚзҪ®зҺҜеўғеҸҳйҮҸ
жҲ‘зҡ„з”өи„‘пјҲеҸій”®еұһжҖ§пјү-> й«ҳзә§зі»з»ҹи®ҫзҪ® -> зҺҜеўғеҸҳйҮҸ ->зӮ№еҮ» Path еҗҺйҖү зј–иҫ‘ -> ж–°е»әеҸҳйҮҸпјҲеҸҳйҮҸеҖјдёәbinж–Ү件зҡ„и·Ҝеҫ„пјү
й…ҚзҪ®еҜ№иұЎпјҡWinGWпјҢжүҖд»ҘжҠҠдҪ еҲҡеҲҡе®үиЈ…WinGWзҡ„и·Ҝеҫ„жӢ·иҙқдёҖдёӢ
й…ҚзҪ®зҺҜеўғеҸҳйҮҸпјҡеңЁжӯӨд»Ҙwin10дёәдҫӢпјҢеҲ°иҫҫ第6жӯҘд№ӢеҗҺпјҢеүҚйқўжү“ејҖзҡ„зӘ—еҸЈйғҪиҰҒжҢүдёӢзЎ®е®ҡпјҢеҗҰеҲҷдјҡеӨұиҙҘгҖӮ
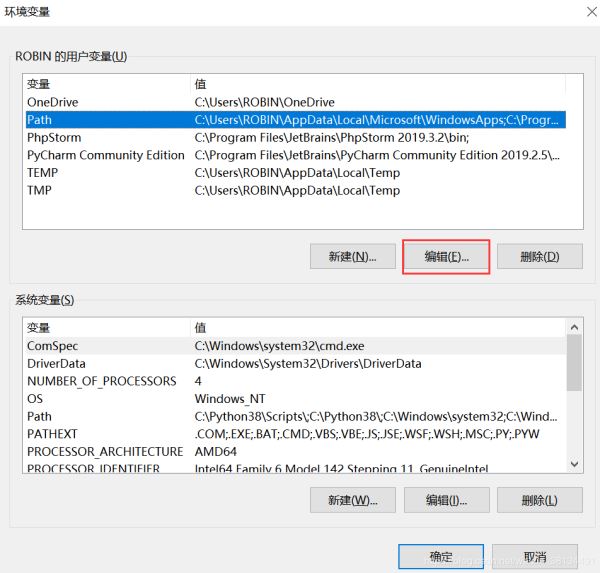
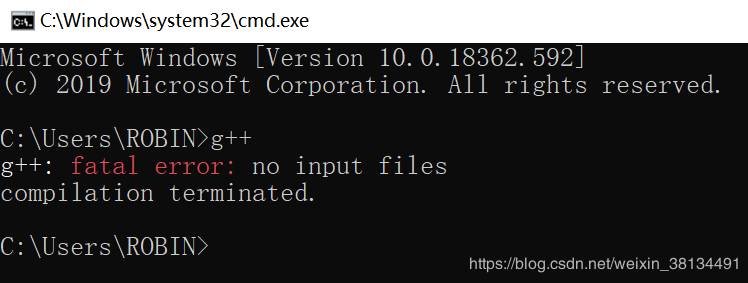
жіЁпјҡйӘҢиҜҒдёҖдёӢзҺҜеўғеҸҳйҮҸжҳҜеҗҰй…ҚзҪ®жҲҗеҠҹ
жҢүдёӢ win + RпјҢиҫ“е…ҘcmdпјҢеӣһиҪҰй”®д№ӢеҗҺиҫ“е…Ҙg++пјҢеҶҚеӣһиҪҰпјҢеҰӮжһңжҸҗзӨәд»ҘдёӢдҝЎжҒҜ[1]пјҢеҲҷзҺҜеўғеҸҳйҮҸй…ҚзҪ®жҲҗеҠҹгҖӮ
еҰӮжһңжҸҗзӨәд»ҘдёӢдҝЎжҒҜ[2]пјҢеҲҷзҺҜеўғеҸҳйҮҸй…ҚзҪ®еӨұиҙҘгҖӮ

5пјүдҪҝз”Ёз®ҖеҚ•зҡ„.cppж–Ү件й…ҚзҪ®C++зҺҜеўғ
еңЁз”өи„‘жЎҢйқўж–°е»әз©әж–Ү件еӨ№code
жү“ејҖVScode --> жү“ејҖж–Ү件еӨ№ --> йҖүжӢ©еҲҡеҲҡеҲӣе»әзҡ„ж–Ү件еӨ№code
ж–°е»әtest.cppж–Ү件(д»ҘжңҖз®ҖеҚ•зҡ„ HelloWorld.cpp дёәдҫӢ)
#include <stdio.h>
#include <windows.h>
int main()
{
 printf("Hello World\n");
 system("pause");
 return 0;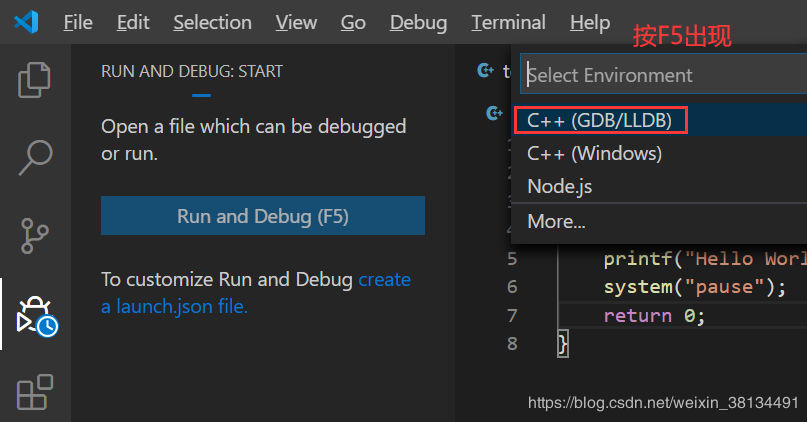
}иҝӣе…Ҙи°ғиҜ•з•Ңйқўж·»еҠ й…ҚзҪ®зҺҜеўғпјҢйҖүжӢ© C++(GDB/LLDB)пјҢеҶҚйҖүжӢ© g++.exeпјҢд№ӢеҗҺдјҡиҮӘеҠЁз”ҹжҲҗ launch.json й…ҚзҪ®ж–Ү件
зј–иҫ‘ launch.json й…ҚзҪ®ж–Ү件
{
// Use IntelliSense to learn about possible attributes.
// Hover to view descriptions of existing attributes.
// For more information, visit: https://go.microsoft.com/fwlink/?linkid=830387
"version": "0.2.0",
"configurations": [
{
"name": "g++.exe build and debug active file",
"type": "cppdbg",
"request": "launch",
"program": "${fileDirname}\\${fileBasenameNoExtension}.exe",
"args": [],
"stopAtEntry": false,
"cwd": "${workspaceFolder}",
"environment": [],
"externalConsole": true, //дҝ®ж”№жӯӨйЎ№пјҢи®©е…¶еј№еҮәз»Ҳз«Ҝ
"MIMode": "gdb",
"miDebuggerPath": "C:\\64-posix-seh\\mingw64\\bin\\gdb.exe",
"setupCommands": [
{
"description": "дёә gdb еҗҜз”Ёж•ҙйҪҗжү“еҚ°",
"text": "-enable-pretty-printing",
"ignoreFailures": true
}
],
"preLaunchTask": "task g++" //дҝ®ж”№жӯӨйЎ№ еҺҹжқҘжҳҜ: g++.exe build active file
}
]
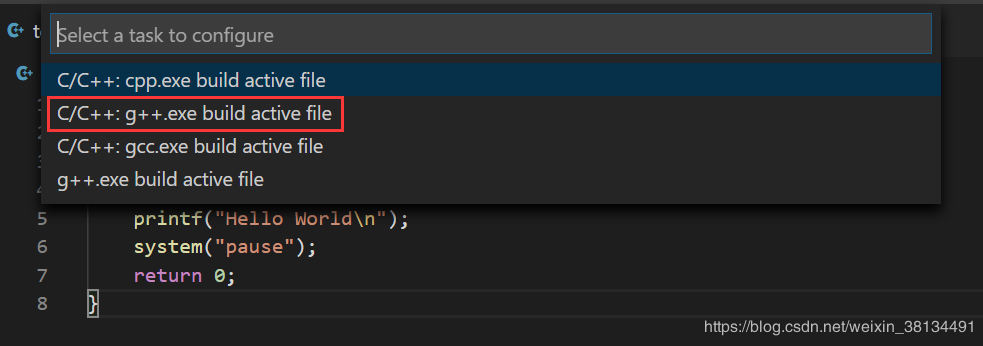
}иҝ”еӣһ.cppж–Ү件пјҢжҢүF5иҝӣиЎҢи°ғиҜ•пјҢдјҡеј№еҮәжүҫдёҚеҲ°д»»еҠЎ"task g++"пјҢйҖүжӢ© "й…ҚзҪ®д»»еҠЎ"пјҢ然еҗҺйҖүжӢ©g++.exe дјҡиҮӘеҠЁз”ҹжҲҗ tasks.json ж–Ү件
зј–иҫ‘ tasks.json ж–Ү件
{
// See https://go.microsoft.com/fwlink/?LinkId=733558
// for the documentation about the tasks.json format
"version": "2.0.0",
"tasks": [
{
"type": "shell",
"label": "task g++", //дҝ®ж”№жӯӨйЎ№ еҺҹжқҘжҳҜ: g++.exe build active file
"command": "C:\\64-posix-seh\\mingw64\\bin\\g++.exe",
"args": [
"-g",
"${file}",
"-o",
"${fileDirname}\\${fileBasenameNoExtension}.exe"
],
"options": {
"cwd": "C:\\64-posix-seh\\mingw64\\bin"
},
"problemMatcher": [
"$gcc"
],
"group": "build"
}
]
}жіЁпјҡ
launch.json ж–Ү件дёӯ "preLaunchTask" зҡ„еҖј еҝ…йЎ»дёҺ tasks.json ж–Ү件дёӯ "label"зҡ„еҖјдёҖиҮҙгҖӮ
еҖјзҡ„и®ҫзҪ®зңӢдёӘдәәе–ңеҘҪпјҢдҝқжҢҒй»ҳи®Өд№ҹжҳҜOKзҡ„гҖӮ
6пјүиҝҗиЎҢ
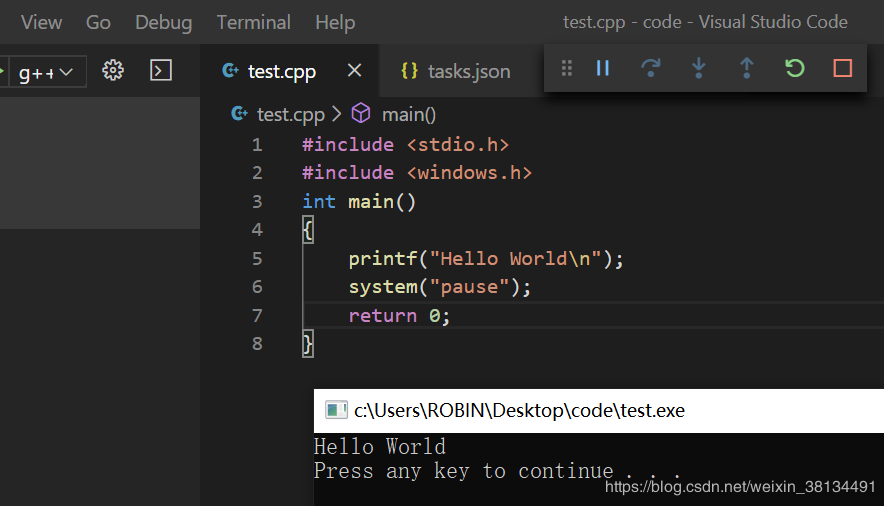
иҝ”еӣһ HelloWorld.cpp ж–Ү件пјҢжҢүF5и°ғиҜ•пјҢеҸ‘зҺ°е®Ңе…ЁOKдәҶпјҒ
д»ҘдёҠжҳҜвҖңVisual Studio Code 2020еҰӮдҪ•е®үиЈ…еҸҠCPPзҺҜеўғй…ҚзҪ®вҖқиҝҷзҜҮж–Үз« зҡ„жүҖжңүеҶ…е®№пјҢж„ҹи°ўеҗ„дҪҚзҡ„йҳ…иҜ»пјҒеёҢжңӣеҲҶдә«зҡ„еҶ…е®№еҜ№еӨ§е®¶жңүеё®еҠ©пјҢжӣҙеӨҡзӣёе…ізҹҘиҜҶпјҢж¬ўиҝҺе…іжіЁдәҝйҖҹдә‘иЎҢдёҡиө„и®Ҝйў‘йҒ“пјҒ


