如何在Android中启动Service?很多新手对此不是很清楚,为了帮助大家解决这个难题,下面小编将为大家详细讲解,有这方面需求的人可以来学习下,希望你能有所收获。
Android Service的启动过程分析
启动一个Service只需调用Context的startService方法,传进一个Intent即可。看起来好像很简单的说,那是因为Android为了方便开发者,做了很大程度的封装。那么你真的有去学习过Service是怎么启动的吗?Service的onCreate方法回调前都做了哪些准备工作?
先上一张图大致了解下,灰色背景框起来的是同一个类中的方法,如下图:
Service启动过程
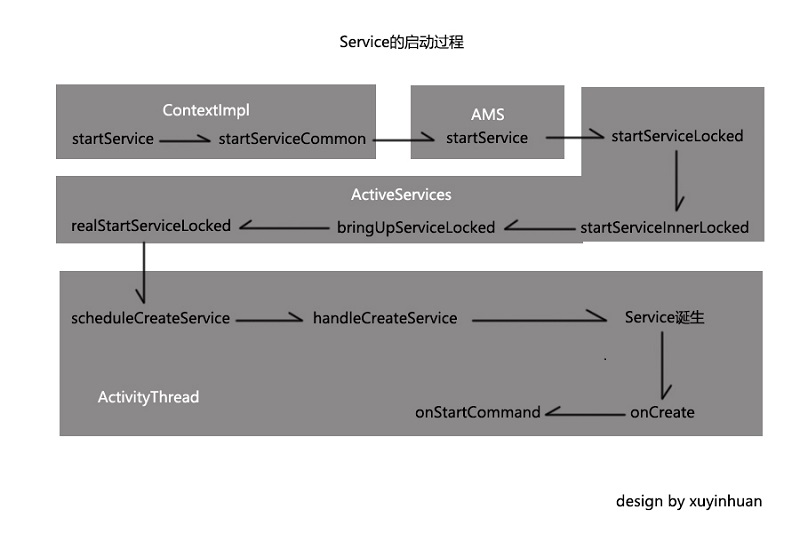
那接下来就从源码的角度来分析Service的启动过程。
当然是从Context的startService方法开始,Context的实现类是ContextImpl,那么我们就看到ContextImpl的startService方法即可,如下:
@Override
public ComponentName startService(Intent service) {
 warnIfCallingFromSystemProcess();
 return startServiceCommon(service, mUser);
}
会转到startServiceCommon方法,那跟进startServiceCommon方法方法瞧瞧。
private ComponentName startServiceCommon(Intent service, UserHandle user) {
 try {
  validateServiceIntent(service);
  service.prepareToLeaveProcess();
  ComponentName cn = ActivityManagerNative.getDefault().startService(
   mMainThread.getApplicationThread(), service, service.resolveTypeIfNeeded(
      getContentResolver()), getOpPackageName(), user.getIdentifier());

 //代码省略

  return cn;
 } catch (RemoteException e) {
  throw new RuntimeException("Failure from system", e);
 }
}
可以看到调用了ActivityManagerNative.getDefault()的startService方法来启动Service,ActivityManagerNative.getDefault()是ActivityManagerService,简称AMS。
那么现在启动Service的过程就转移到了ActivityManagerService,我们关注ActivityManagerService的startService方法即可,如下:
@Override
public ComponentName startService(IApplicationThread caller, Intent service,
  String resolvedType, String callingPackage, int userId)
  throws TransactionTooLargeException {

  //代码省略

 synchronized(this) {
  final int callingPid = Binder.getCallingPid();
  final int callingUid = Binder.getCallingUid();
  final long origId = Binder.clearCallingIdentity();
  ComponentName res = mServices.startServiceLocked(caller, service,
    resolvedType, callingPid, callingUid, callingPackage, userId);
  Binder.restoreCallingIdentity(origId);
  return res;
 }
}
在上述的代码中,调用了ActiveServices的startServiceLocked方法,那么现在Service的启动过程从AMS转移到了ActiveServices了。
继续跟进ActiveServices的startServiceLocked方法,如下:
ComponentName startServiceLocked(IApplicationThread caller, Intent service, String resolvedType,
  int callingPid, int callingUid, String callingPackage, int userId)
  throws TransactionTooLargeException {

 //代码省略

 ServiceLookupResult res =
  retrieveServiceLocked(service, resolvedType, callingPackage,
    callingPid, callingUid, userId, true, callerFg);

 //代码省略


 ServiceRecord r = res.record;

 //代码省略

 return startServiceInnerLocked(smap, service, r, callerFg, addToStarting);
}
在startServiceLocked方法中又会调用startServiceInnerLocked方法,
我们瞧瞧startServiceInnerLocked方法,
ComponentName startServiceInnerLocked(ServiceMap smap, Intent service, ServiceRecord r,
  boolean callerFg, boolean addToStarting) throws TransactionTooLargeException {
 ProcessStats.ServiceState stracker = r.getTracker();
 if (stracker != null) {
  stracker.setStarted(true, mAm.mProcessStats.getMemFactorLocked(), r.lastActivity);
 }
 r.callStart = false;
 synchronized (r.stats.getBatteryStats()) {
  r.stats.startRunningLocked();
 }
 String error = bringUpServiceLocked(r, service.getFlags(), callerFg, false);

 //代码省略

 return r.name;
}
startServiceInnerLocked方法内部调用了bringUpServiceLocked方法,此时启动过程已经快要离开ActiveServices了。继续看到bringUpServiceLocked方法。如下:
private final String bringUpServiceLocked(ServiceRecord r, int intentFlags, boolean execInFg,
  boolean whileRestarting) throws TransactionTooLargeException {

  //代码省略

  if (app != null && app.thread != null) {
   try {
    app.addPackage(r.appInfo.packageName, r.appInfo.versionCode, mAm.mProcessStats);
    realStartServiceLocked(r, app, execInFg);
    return null;
   }

  //代码省略

  return null;
}
省略了大部分if判断,相信眼尖的你一定发现了核心的方法,那就是
realStartServiceLocked,没错,看名字就像是真正启动Service。那么事不宜迟跟进去探探吧。如下:
private final void realStartServiceLocked(ServiceRecord r,
  ProcessRecord app, boolean execInFg) throws RemoteException {

 //代码省略

 boolean created = false;
 try {

  //代码省略
  app.forceProcessStateUpTo(ActivityManager.PROCESS_STATE_SERVICE);
  app.thread.scheduleCreateService(r, r.serviceInfo,
    mAm.compatibilityInfoForPackageLocked(r.serviceInfo.applicationInfo),
    app.repProcState);
  r.postNotification();
  created = true;
 } catch (DeadObjectException e) {
  Slog.w(TAG, "Application dead when creating service " + r);
  mAm.appDiedLocked(app);
  throw e;
 }

 //代码省略

 sendServiceArgsLocked(r, execInFg, true);

 //代码省略

}
找到了。app.thread调用了scheduleCreateService来启动Service,而app.thread是一个ApplicationThread,也是ActivityThread的内部类。此时已经到了主线程。
那么我们探探ApplicationThread的scheduleCreateService方法。如下:
public final void scheduleCreateService(IBinder token,
  ServiceInfo info, CompatibilityInfo compatInfo, int processState) {
 updateProcessState(processState, false);
 CreateServiceData s = new CreateServiceData();
 s.token = token;
 s.info = info;
 s.compatInfo = compatInfo;

 sendMessage(H.CREATE_SERVICE, s);
}
对待启动的Service组件信息进行包装,然后发送了一个消息。我们关注这个CREATE_SERVICE消息即可。
public void handleMessage(Message msg) {

  //代码省略

  case CREATE_SERVICE:
   Trace.traceBegin(Trace.TRACE_TAG_ACTIVITY_MANAGER, "serviceCreate");
   handleCreateService((CreateServiceData)msg.obj);
   Trace.traceEnd(Trace.TRACE_TAG_ACTIVITY_MANAGER);
   break;

  //代码省略

}
在handleMessage方法中接收到这个消息,然后调用了handleCreateService方法,跟进handleCreateService探探究竟:
private void handleCreateService(CreateServiceData data) {
 // If we are getting ready to gc after going to the background, well
 // we are back active so skip it.
 unscheduleGcIdler();

 LoadedApk packageInfo = getPackageInfoNoCheck(
   data.info.applicationInfo, data.compatInfo);
 Service service = null;
 try {
  java.lang.ClassLoader cl = packageInfo.getClassLoader();
  service = (Service) cl.loadClass(data.info.name).newInstance();
 } catch (Exception e) {
  if (!mInstrumentation.onException(service, e)) {
   throw new RuntimeException(
    "Unable to instantiate service " + data.info.name
    + ": " + e.toString(), e);
  }
 }

 try {
  if (localLOGV) Slog.v(TAG, "Creating service " + data.info.name);

  ContextImpl context = ContextImpl.createAppContext(this, packageInfo);
  context.setOuterContext(service);

  Application app = packageInfo.makeApplication(false, mInstrumentation);
  service.attach(context, this, data.info.name, data.token, app,
    ActivityManagerNative.getDefault());
  service.onCreate();
  mServices.put(data.token, service);
  try {
   ActivityManagerNative.getDefault().serviceDoneExecuting(
     data.token, SERVICE_DONE_EXECUTING_ANON, 0, 0);
  } catch (RemoteException e) {
   // nothing to do.
  }
 } catch (Exception e) {
  if (!mInstrumentation.onException(service, e)) {
   throw new RuntimeException(
    "Unable to create service " + data.info.name
    + ": " + e.toString(), e);
  }
 }
}
终于击破,这个方法很核心的。一点点分析
首先获取到一个LoadedApk对象,在通过这个LoadedApk对象获取到一个类加载器,通过这个类加载器来创建Service。如下:
java.lang.ClassLoader cl = packageInfo.getClassLoader();
service = (Service) cl.loadClass(data.info.name).newInstance();
接着调用ContextImpl的createAppContext方法创建了一个ContextImpl对象。
之后再调用LoadedApk的makeApplication方法来创建Application,这个创建过程如下:
public Application makeApplication(boolean forceDefaultAppClass,
  Instrumentation instrumentation) {
 if (mApplication != null) {
  return mApplication;
 }

 Application app = null;

 String appClass = mApplicationInfo.className;
 if (forceDefaultAppClass || (appClass == null)) {
  appClass = "android.app.Application";
 }

 try {
  java.lang.ClassLoader cl = getClassLoader();
  if (!mPackageName.equals("android")) {
   initializeJavaContextClassLoader();
  }
  ContextImpl appContext = ContextImpl.createAppContext(mActivityThread, this);
  app = mActivityThread.mInstrumentation.newApplication(
    cl, appClass, appContext);
  appContext.setOuterContext(app);
 } catch (Exception e) {
  if (!mActivityThread.mInstrumentation.onException(app, e)) {
   throw new RuntimeException(
    "Unable to instantiate application " + appClass
    + ": " + e.toString(), e);
  }
 }
 mActivityThread.mAllApplications.add(app);
 mApplication = app;

 if (instrumentation != null) {
  try {
   instrumentation.callApplicationOnCreate(app);
  } catch (Exception e) {
   if (!instrumentation.onException(app, e)) {
    throw new RuntimeException(
     "Unable to create application " + app.getClass().getName()
     + ": " + e.toString(), e);
   }
  }
 }

 // Rewrite the R 'constants' for all library apks.
 SparseArray<String> packageIdentifiers = getAssets(mActivityThread)
   .getAssignedPackageIdentifiers();
 final int N = packageIdentifiers.size();
 for (int i = 0; i < N; i++) {
  final int id = packageIdentifiers.keyAt(i);
  if (id == 0x01 || id == 0x7f) {
   continue;
  }

  rewriteRValues(getClassLoader(), packageIdentifiers.valueAt(i), id);
 }

 return app;
}
当然Application是只有一个的,从上述代码中也可以看出。
在回来继续看handleCreateService方法,之后service调用了attach方法关联了ContextImpl和Application等
最后service回调了onCreate方法,
service.onCreate();
mServices.put(data.token, service);
并将这个service添加进了一个了列表进行管理。
至此service启动了起来,以上就是service的启动过程。
你可能还想要知道onStartCommand方法是怎么被回调的?可能细心的你发现了在ActiveServices的realStartServiceLocked方法中,那里还有一个sendServiceArgsLocked方法。是的,那个就是入口。
那么我们跟进sendServiceArgsLocked方法看看onStartCommand方法是怎么回调的。
private final void sendServiceArgsLocked(ServiceRecord r, boolean execInFg,
  boolean oomAdjusted) throws TransactionTooLargeException {
 final int N = r.pendingStarts.size();

  //代码省略

  try {

  //代码省略

   r.app.thread.scheduleServiceArgs(r, si.taskRemoved, si.id, flags, si.intent);
  } catch (TransactionTooLargeException e) {
   if (DEBUG_SERVICE) Slog.v(TAG_SERVICE, "Transaction too large: intent="
     + si.intent);
   caughtException = e;
  } catch (RemoteException e) {
   // Remote process gone... we'll let the normal cleanup take care of this.
   if (DEBUG_SERVICE) Slog.v(TAG_SERVICE, "Crashed while sending args: " + r);
   caughtException = e;
  }

  //代码省略
}
可以看到onStartCommand方法回调过程和onCreate方法的是很相似的,都会转到app.thread。那么现在就跟进ApplicationThread的scheduleServiceArgs。
你也可能猜到了应该又是封装一些Service的信息,然后发送一个消息, handleMessage接收。是的,源码如下:
public final void scheduleServiceArgs(IBinder token, boolean taskRemoved, int startId,
 int flags ,Intent args) {
 ServiceArgsData s = new ServiceArgsData();
 s.token = token;
 s.taskRemoved = taskRemoved;
 s.startId = startId;
 s.flags = flags;
 s.args = args;

 sendMessage(H.SERVICE_ARGS, s);
}
public void handleMessage(Message msg) {
//代码省略
case SERVICE_ARGS:
Trace.traceBegin(Trace.TRACE_TAG_ACTIVITY_MANAGER, "serviceStart");
handleServiceArgs((ServiceArgsData)msg.obj);
Trace.traceEnd(Trace.TRACE_TAG_ACTIVITY_MANAGER);
break;
//代码省略
}咦,真的是这样。谜底应该就在handleServiceArgs方法了,那么赶紧瞧瞧,源码如下:
private void handleServiceArgs(ServiceArgsData data) {
 Service s = mServices.get(data.token);
 if (s != null) {
  try {
   if (data.args != null) {
    data.args.setExtrasClassLoader(s.getClassLoader());
    data.args.prepareToEnterProcess();
   }
   int res;
   if (!data.taskRemoved) {
    res = s.onStartCommand(data.args, data.flags, data.startId);
   } else {
    s.onTaskRemoved(data.args);
    res = Service.START_TASK_REMOVED_COMPLETE;
   }

   QueuedWork.waitToFinish();

   try {
    ActivityManagerNative.getDefault().serviceDoneExecuting(
      data.token, SERVICE_DONE_EXECUTING_START, data.startId, res);
   } catch (RemoteException e) {
    // nothing to do.
   }
   ensureJitEnabled();
  } catch (Exception e) {
   if (!mInstrumentation.onException(s, e)) {
    throw new RuntimeException(
      "Unable to start service " + s
      + " with " + data.args + ": " + e.toString(), e);
   }
  }
 }
}
可以看到回调了onStartCommand方法。
看完上述内容是否对您有帮助呢?如果还想对相关知识有进一步的了解或阅读更多相关文章,请关注亿速云行业资讯频道,感谢您对亿速云的支持。
免责声明:本站发布的内容(图片、视频和文字)以原创、转载和分享为主,文章观点不代表本网站立场,如果涉及侵权请联系站长邮箱:is@yisu.com进行举报,并提供相关证据,一经查实,将立刻删除涉嫌侵权内容。


