本篇内容主要讲解“如何理解GridView”,感兴趣的朋友不妨来看看。本文介绍的方法操作简单快捷,实用性强。下面就让小编来带大家学习“如何理解GridView”吧!
(一)DataKeyName属性
(1)DataKeyNames一般都是用来对当前行做唯一标示的,所以一般为数据库的ID。
(2)GridView.DataKeys[e.RowIndex],e.RowIndex是获取事件对应的行,GridView.DataKeys[e.RowIndex]就是获取对应行的唯一标示也就是DataKeyNames所指定列的值。
(3)DataList和Repeater是没有的该属性的。
在代码中这样使用:(定义的该函数在下面都需要调用)
/// <summary>
/// 实现数据绑定功能
/// </summary>
private void BindToDataGird()
{
 SqlConnection con = DB.CreateCon();
 SqlDataAdapter sda = new SqlDataAdapter();
 sda.SelectCommand = new SqlCommand("select employeeID,FirstName,LastName,Title,BirthDate from employees ", con);
 DataSet ds = new DataSet();
 sda.Fill(ds, "emp");   //将查询到的数据添加到DataSet中。
 this.GridView1.DataKeyNames =new string[]{ "employeeID"}; //DataKeyNames的使用
 this.GridView1.DataSource = ds.Tables["emp"];
 this.DataBind();
}
如何取值?
DataKey key = GridView1.DataKeys[e.RowIndex];//其中e为GridViewDelete(或者Edit)EventArgs e
string empID = key[0].ToString();
(二)分页
由于GridView中封装了分页的功能。这里实现起来很容易。先需要设置属性:AllowPaging/PageSize/PageSetting。然后编写事件代码:
protected void GridView1_PageIndexChanging(object sender, GridViewPageEventArgs e)
{
 this.GridView1.PageIndex = e.NewPageIndex;
 this.BindToDataGird();
}
(三)排序
首先设置AllowSorting属性为true.事件代码:
protected void GridView1_Sorting(object sender, GridViewSortEventArgs e)
{
 if (ViewState["order"] == null)  //使用ViewState设置双向排序。
 {
  ViewState["order"] = "ASC";
 }
 else
 {
  if (ViewState["order"].ToString() == "ASC")
  {
   ViewState["order"] = "DESC";
  }
  else
  {
   ViewState["order"] = "ASC";
  }
 }
 //数据绑定显示
 SqlConnection con = DB.CreateCon();
 SqlDataAdapter sda = new SqlDataAdapter();
 sda.SelectCommand = new SqlCommand("select employeeID,FirstName,LastName,Title,BirthDate from employees ", con);
 DataSet ds = new DataSet();
 sda.Fill(ds, "emp");
 ds.Tables["emp"].DefaultView.Sort = e.SortExpression + " " + ViewState["order"].ToString(); //设置排序
 this.GridView1.DataSource = ds.Tables["emp"].DefaultView; //将表的默认视图作为数据源。
 this.DataBind();
}
(四)删除
这里需要注意一点:就是获取某一行的主键值。
protected void GridView1_RowDeleting(object sender, GridViewDeleteEventArgs e)
{
 DataKey key = GridView1.DataKeys[e.RowIndex];
 string empID = key[0].ToString();
 SqlConnection con = DB.CreateCon();
 SqlCommand cmd = new SqlCommand("delete from employees where employeeID= '"+empID+"'" , con);
 con.Open();
 cmd.ExecuteNonQuery();
 this.BindToDataGird();
}
(五)编辑(更新和取消)
protected void GridView1_RowEditing(object sender, GridViewEditEventArgs e)
{
this.GridView1.EditIndex = e.NewEditIndex;
this.BindToDataGird();
}
protected void GridView1_RowCancelingEdit(object sender, GridViewCancelEditEventArgs e)
{
this.GridView1.EditIndex = -1; //设置索引值为负取消编辑。
this.BindToDataGird();
}
protected void GridView1_RowUpdating(object sender, GridViewUpdateEventArgs e)
{
DataKey key = GridView1.DataKeys[e.RowIndex];
string empID = key[0].ToString();
string lastName=((TextBox)(GridView1.Rows [e.RowIndex ] .Cells [2].Controls [0])).Text ; //将GridView中某列中控件强制转换为TextBox,然后取出它的值。
Response.Write(empID +"&" + lastName ); //用于测试。
this.GridView1.EditIndex = -1;
this.BindToDataGird();
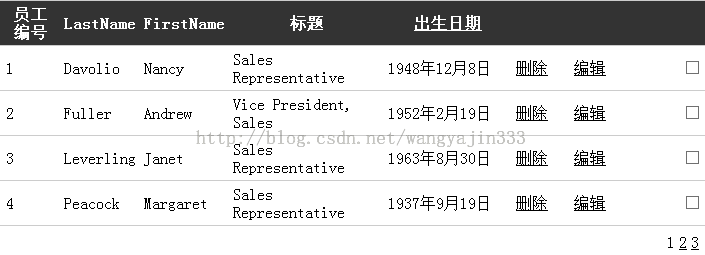
}附结果图:
到此,相信大家对“如何理解GridView”有了更深的了解,不妨来实际操作一番吧!这里是亿速云网站,更多相关内容可以进入相关频道进行查询,关注我们,继续学习!
免责声明:本站发布的内容(图片、视频和文字)以原创、转载和分享为主,文章观点不代表本网站立场,如果涉及侵权请联系站长邮箱:is@yisu.com进行举报,并提供相关证据,一经查实,将立刻删除涉嫌侵权内容。


