本篇文章给大家分享的是有关怎么在Canvas中添加事件,小编觉得挺实用的,因此分享给大家学习,希望大家阅读完这篇文章后可以有所收获,话不多说,跟着小编一起来看看吧。
isPointInPath的作用:顾名思义,我们很直观的可以知道该方法用以判断点是否处于路径当中。
isPointInPath的入参出参:ctx.isPointInPath([path, ]x, y [, fillRule]),该方法的参数有4个,其中path和fillRule为选填,x和y为必填。我们依次介绍4个参数。
path:看到这个参数,我开始以为是beginPath或者closePath的返回值,很可惜的是这两个方法并没有返回值,在查阅了资料后,发现是Path3D构造函数new的对象。Path3D构造函数具体用法。不过可惜的是该方法可能由于兼容性的问题,目前看了一些开源框架都还未使用。
x,y:这两个参数很好理解,就是x轴和y轴的距离,需要注意的是,其相对位置是Canvas的左上角。
fillRule:nonzero(默认),evenodd。非零环绕规则和奇偶规则是图形学中判断一个点是否处于多边形内的规则,其中非零环绕规则是Canvas的默认规则。想具体了解这两种规则的,可以自己去查阅资料,这里就不增加篇幅介绍了。
上面介绍完了入参,那么isPointInPath方法的出参想必大家都可以猜到了,就是true和false。
使用isPointInPath
上一节介绍完isPointInPath方法后,我们现在就来使用它吧。
先来一个简单的demo:
  const canvas = document.getElementById('canvas')
  const ctx = canvas.getContext('2d')

  ctx.beginPath()
  ctx.moveTo(10, 10)
  ctx.lineTo(10, 50)
  ctx.lineTo(50, 50)
  ctx.lineTo(50, 10)
  ctx.fillStyle= 'black'
  ctx.fill()
  ctx.closePath()

  canvas.addEventListener('click', function (e) {
    const canvasInfo = canvas.getBoundingClientRect()
    console.log(ctx.isPointInPath(e.clientX - canvasInfo.left, e.clientY - canvasInfo.top))
  })
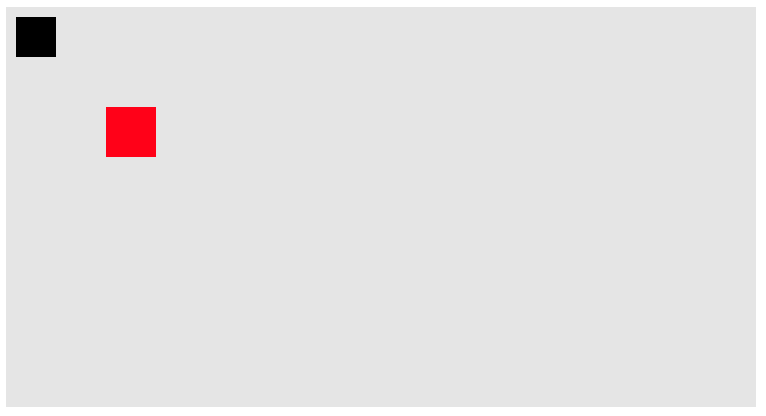
如图所示,灰色部分为Canvas所占据的区域,黑色为我们实际添加事件的区域,在我们点击黑色区域后,实际也的确如我们所愿,打印出来的值为true。貌似Canvas的事件监听就这么简单的解决了,不过事情真有这么简单吗。显然是不可能的!我们再来举个例子,这时候有两个区域,并且我们需要分别给其绑定不同的事件:
  const canvas = document.getElementById('canvas')
  const ctx = canvas.getContext('2d')

  ctx.beginPath()
  ctx.moveTo(10, 10)
  ctx.lineTo(10, 50)
  ctx.lineTo(50, 50)
  ctx.lineTo(50, 10)
  ctx.fillStyle= 'black'
  ctx.fill()
  ctx.closePath()

  ctx.beginPath()
  ctx.moveTo(100, 100)
  ctx.lineTo(100, 150)
  ctx.lineTo(150, 150)
  ctx.lineTo(150, 100)
  ctx.fillStyle= 'red'
  ctx.fill()
  ctx.closePath()

  canvas.addEventListener('click', function (e) {
    const canvasInfo = canvas.getBoundingClientRect()
    console.log(ctx.isPointInPath(e.clientX - canvasInfo.left, e.clientY - canvasInfo.top))
  })
这个时候,结果就不再如同我们所预计的一样,当点击其中黑色区域时,打印的值为false,点击红色区域时,打印的值为true。
其实原因很简单,因为上述代码,我们实际创建了两个Path,而isPointInPath方法实际只检测当前点是否处于最后一个Path当中,而例子中红色区域为最后一个Path,所以只有点击红色区域时,isPointInPath方法才能判断为true。现在我们改造一下代码:
  const canvas = document.getElementById('canvas')
  const ctx = canvas.getContext('2d')
  let drawArray = []

  function draw1 () {
    ctx.beginPath()
    ctx.moveTo(10, 10)
    ctx.lineTo(10, 50)
    ctx.lineTo(50, 50)
    ctx.lineTo(50, 10)
    ctx.fillStyle= 'black'
    ctx.fill()
  }

  function draw2 () {
    ctx.beginPath()
    ctx.moveTo(100, 100)
    ctx.lineTo(100, 150)
    ctx.lineTo(150, 150)
    ctx.lineTo(150, 100)
    ctx.fillStyle= 'red'
    ctx.fill()
    ctx.closePath()
  }

  drawArray.push(draw1, draw2)

  drawArray.forEach(it => {
    it()
  })

  canvas.addEventListener('click', function (e) {
    ctx.clearRect(0, 0, 400, 750)
    const canvasInfo = canvas.getBoundingClientRect()
    drawArray.forEach(it => {
      it()
      console.log(ctx.isPointInPath(e.clientX - canvasInfo.left, e.clientY - canvasInfo.top))
    })
  })
上面的代码我们进行了一个很大的改造,我们将每个Path放入到一个单独的函数当中,并将它们push到一个数组当中。当触发点击事件时,我们清空Canvas,并遍历数组重新绘制,每当绘制一个Path进行一次判断,从而在调用isPointInPath方法时,我们能实时的获取当前的最后一个Path,进而判断出当前点所处的Path当中。
现在我们已经间接的实现了对每个Path的单独事件监听,可是其实现的方式需要一次又一次的重绘,那么有办法不需要重绘就能监听事件吗?
首先我们需要知道一次又一次重绘的原因是因为isPointInPath方法是监听的最后一个Path,不过我们在介绍这个方法的时候,说过其第一个参数是一个Path对象,当我们传递了这个参数后,Path就不再去取最后一个Path而是使用我们传递进去的这个Path,现在我们来个demo来验证其可行性:
  const canvas = document.getElementById('canvas')
  const ctx = canvas.getContext('2d')

  const path2 = new Path3D();
  path2.rect(10, 10, 100,100);
  ctx.fill(path2)
  const path3 = new Path3D();
  path3.moveTo(220, 60);
  path3.arc(170, 60, 50, 0, 2 * Math.PI);
  ctx.stroke(path3)

  canvas.addEventListener('click', function (e) {
    console.log(ctx.isPointInPath(path2, e.clientX, e.clientY))
    console.log(ctx.isPointInPath(path3, e.clientX, e.clientY))
  })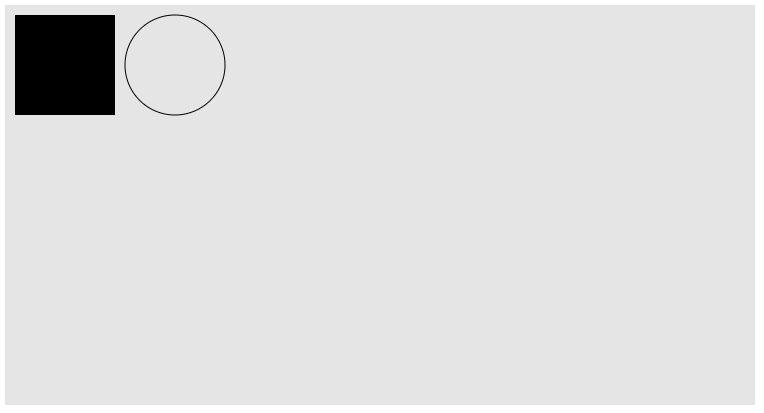
如上图所示,我们点击了左边图形,打印true,false;点击右边图形,打印false,true。打印的结果表明是没有问题的,不过由于其兼容性还有待加强,所以目前建议还是使用重绘方式来监听事件。
结语
Canvas的事件监听讲到这里基本就差不多了,原理很简单,大家应该都能掌握。
github地址,欢迎start
附录
自己写的一个demo
  const canvas = document.getElementById('canvas')

  class rectangular {
    constructor (
      ctx,
      {
        top = 0,
        left = 0,
        width = 30,
        height = 50,
        background = 'red'
      }
    ) {
      this.ctx = ctx
      this.top = top
      this.left = left
      this.width = width
      this.height = height
      this.background = background
    }

    painting () {
      this.ctx.beginPath()
      this.ctx.moveTo(this.left, this.top)
      this.ctx.lineTo(this.left + this.width, this.top)
      this.ctx.lineTo(this.left + this.width, this.top + this.height)
      this.ctx.lineTo(this.left, this.top + this.height)
      this.ctx.fillStyle = this.background
      this.ctx.fill()
      this.ctx.closePath()
    }

    adjust (left, top) {
      this.left += left
      this.top += top
    }
  }

  class circle {
    constructor (
      ctx,
      {
        center = [],
        radius = 10,
        background = 'blue'
      }
    ) {
      this.ctx = ctx
      this.center = [center[0] === undefined ? radius : center[0], center[1] === undefined ? radius : center[1]]
      this.radius = radius
      this.background = background
    }

    painting () {

      this.ctx.beginPath()
      this.ctx.arc(this.center[0], this.center[1], this.radius, 0, Math.PI * 2, false)
      this.ctx.fillStyle = this.background
      this.ctx.fill()
      this.ctx.closePath()
    }

    adjust (left, top) {
      this.center[0] += left
      this.center[1] += top
    }
  }

  class demo {
    constructor (canvas) {
      this.canvasInfo = canvas.getBoundingClientRect()
      this.renderList = []
      this.ctx = canvas.getContext('2d')
      this.canvas = canvas
      this.rectangular = (config) => {
        let target = new rectangular(this.ctx, {...config})
        this.addRenderList(target)
        return this
      }

      this.circle = (config) => {
        let target = new circle(this.ctx, {...config})
        this.addRenderList(target)
        return this
      }
      this.addEvent()
    }

    addRenderList (target) {
      this.renderList.push(target)
    }

    itemToLast (index) {
      const lastItem = this.renderList.splice(index, 1)[0]

      this.renderList.push(lastItem)
    }

    painting () {
      this.ctx.clearRect(0, 0, this.canvasInfo.width, this.canvasInfo.height)
      this.renderList.forEach(it => it.painting())
    }

    addEvent () {
      const that = this
      let startX, startY

      canvas.addEventListener('mousedown', e => {
        startX = e.clientX
        startY = e.clientY
        let choosedIndex = null
        this.renderList.forEach((it, index) => {
          it.painting()
          if (this.ctx.isPointInPath(startX, startY)) {
            choosedIndex = index
          }
        })

        if (choosedIndex !== null) {
          this.itemToLast(choosedIndex)
        }

        document.addEventListener('mousemove', mousemoveEvent)
        document.addEventListener('mouseup', mouseupEvent)
        this.painting()
      })

      function mousemoveEvent (e) {
        const target = that.renderList[that.renderList.length - 1]
        const currentX = e.clientX
        const currentY = e.clientY
        target.adjust(currentX - startX, currentY - startY)
        startX = currentX
        startY = currentY
        that.painting()
      }

      function mouseupEvent (e) {
        const target = that.renderList[that.renderList.length - 1]
        const currentX = e.clientX
        const currentY = e.clientY

        target.adjust(currentX - startX, currentY - startY)
        startX = currentX
        startY = currentY
        that.painting()
        document.removeEventListener('mousemove', mousemoveEvent)
        document.removeEventListener('mouseup', mouseupEvent)
      }
    }
  }

  const yes = new demo(canvas)
    .rectangular({})
    .rectangular({top: 60, left: 60, background: 'blue'})
    .rectangular({top: 30, left: 20, background: 'green'})
    .circle()
    .circle({center: [100, 30], background: 'red', radius: 5})
    .painting()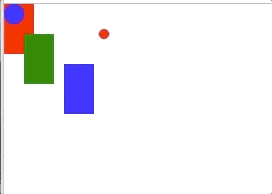
以上就是怎么在Canvas中添加事件,小编相信有部分知识点可能是我们日常工作会见到或用到的。希望你能通过这篇文章学到更多知识。更多详情敬请关注亿速云行业资讯频道。
免责声明:本站发布的内容(图片、视频和文字)以原创、转载和分享为主,文章观点不代表本网站立场,如果涉及侵权请联系站长邮箱:is@yisu.com进行举报,并提供相关证据,一经查实,将立刻删除涉嫌侵权内容。


