这篇文章主要介绍Android API如何实现人脸检测,文中介绍的非常详细,具有一定的参考价值,感兴趣的小伙伴们一定要看完!
图片来源:Wikipedia
所谓人脸检测就是指从一副图片或者一帧视频中标定出所有人脸的位置和尺寸。人脸检测是人脸识别系统中的一个重要环节,也可以独立应用于视频监控。在数字媒体日益普及的今天,利用人脸检测技术还可以帮助我们从海量图片数据中快速筛选出包含人脸的图片。 在目前的数码相机中,人脸检测可以用来完成自动对焦,即“脸部对焦”。“脸部对焦”是在自动曝光和自动对焦发明后,二十年来最重要的一次摄影技术革新。家用数码相机,占绝大多数的照片是以人为拍摄主体的,这就要求相机的自动曝光和对焦以人物为基准。
via cdstm.cn
构建一个人脸检测的Android Activity
你可以构建一个通用的Android Activity,我们扩展了基类ImageView,成为MyImageView,而我们需要进行检测的包含人脸的位图文件必须是565格式,API才能正常工作。被检测出来的人脸需要一个置信测度(confidence measure),这个措施定义在android.media.FaceDetector.Face.CONFIDENCE_THRESHOLD。
最重要的方法实现在setFace(),它将FaceDetector对象实例化,同时调用findFaces,结果存放在faces里,人脸的中点转移到MyImageView。代码如下:
public class TutorialOnFaceDetect1 extends Activity { private MyImageView mIV; private Bitmap mFaceBitmap; private int mFaceWidth = 200; private int mFaceHeight = 200; private static final int MAX_FACES = 1; private static String TAG = "TutorialOnFaceDetect"; @Override public void onCreate(Bundle savedInstanceState) { super.onCreate(savedInstanceState); mIV = new MyImageView(this); setContentView(mIV, new LayoutParams(LayoutParams.WRAP_CONTENT, LayoutParams.WRAP_CONTENT)); // load the photo Bitmap b = BitmapFactory.decodeResource(getResources(), R.drawable.face3); mFaceBitmap = b.copy(Bitmap.Config.RGB_565, true); b.recycle(); mFaceWidth = mFaceBitmap.getWidth(); mFaceHeight = mFaceBitmap.getHeight(); mIV.setImageBitmap(mFaceBitmap); // perform face detection and set the feature points setFace(); mIV.invalidate(); } public void setFace() { FaceDetector fd; FaceDetector.Face [] faces = new FaceDetector.Face[MAX_FACES]; PointF midpoint = new PointF(); int [] fpx = null; int [] fpy = null; int count = 0; try { fd = new FaceDetector(mFaceWidth, mFaceHeight, MAX_FACES); count = fd.findFaces(mFaceBitmap, faces); } catch (Exception e) { Log.e(TAG, "setFace(): " + e.toString()); return; } // check if we detect any faces if (count > 0) { fpx = new int[count]; fpy = new int[count]; for (int i = 0; i < count; i++) { try { faces[i].getMidPoint(midpoint); fpx[i] = (int)midpoint.x; fpy[i] = (int)midpoint.y; } catch (Exception e) { Log.e(TAG, "setFace(): face " + i + ": " + e.toString()); } } } mIV.setDisplayPoints(fpx, fpy, count, 0); } }接下来的代码中,我们在MyImageView中添加setDisplayPoints() ,用来在被检测出的人脸上标记渲染。图1展示了一个标记在被检测处的人脸上处于中心位置。
// set up detected face features for display public void setDisplayPoints(int [] xx, int [] yy, int total, int style) { mDisplayStyle = style; mPX = null; mPY = null; if (xx != null && yy != null && total > 0) { mPX = new int[total]; mPY = new int[total]; for (int i = 0; i < total; i++) { mPX[i] = xx[i]; mPY[i] = yy[i]; } } }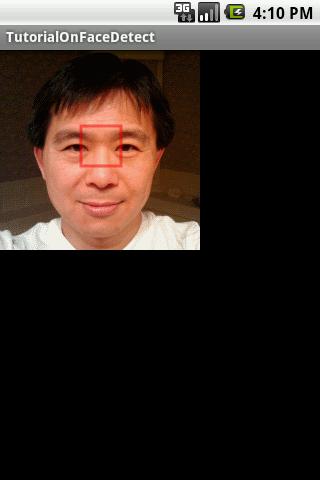
图1:单一人脸检测
多人脸检测
通过FaceDetector可以设定检测到人脸数目的上限。比如设置最多只检测10张脸:
private static final int MAX_FACES = 10;
图2展示检测到多张人脸的情况。

图2:多人人脸检测
定位眼睛中心位置
Android人脸检测返回其他有用的信息,例同时会返回如eyesDistance,pose,以及confidence。我们可以通过eyesDistance来定位眼睛的中心位置。
下面的代码中,我们将setFace()放在doLengthyCalc()中。同时图3展示了定位眼睛中心位置的效果。
public class TutorialOnFaceDetect extends Activity { private MyImageView mIV; private Bitmap mFaceBitmap; private int mFaceWidth = 200; private int mFaceHeight = 200; private static final int MAX_FACES = 10; private static String TAG = "TutorialOnFaceDetect"; private static boolean DEBUG = false; protected static final int GUIUPDATE_SETFACE = 999; protected Handler mHandler = new Handler(){ // @Override public void handleMessage(Message msg) { mIV.invalidate(); super.handleMessage(msg); } }; @Override public void onCreate(Bundle savedInstanceState) { super.onCreate(savedInstanceState); mIV = new MyImageView(this); setContentView(mIV, new LayoutParams(LayoutParams.WRAP_CONTENT, LayoutParams.WRAP_CONTENT)); // load the photo Bitmap b = BitmapFactory.decodeResource(getResources(), R.drawable.face3); mFaceBitmap = b.copy(Bitmap.Config.RGB_565, true); b.recycle(); mFaceWidth = mFaceBitmap.getWidth(); mFaceHeight = mFaceBitmap.getHeight(); mIV.setImageBitmap(mFaceBitmap); mIV.invalidate(); // perform face detection in setFace() in a background thread doLengthyCalc(); } public void setFace() { FaceDetector fd; FaceDetector.Face [] faces = new FaceDetector.Face[MAX_FACES]; PointF eyescenter = new PointF(); float eyesdist = 0.0f; int [] fpx = null; int [] fpy = null; int count = 0; try { fd = new FaceDetector(mFaceWidth, mFaceHeight, MAX_FACES); count = fd.findFaces(mFaceBitmap, faces); } catch (Exception e) { Log.e(TAG, "setFace(): " + e.toString()); return; } // check if we detect any faces if (count > 0) { fpx = new int[count * 2]; fpy = new int[count * 2]; for (int i = 0; i < count; i++) { try { faces[i].getMidPoint(eyescenter); eyesdist = faces[i].eyesDistance(); // set up left eye location fpx[2 * i] = (int)(eyescenter.x - eyesdist / 2); fpy[2 * i] = (int)eyescenter.y; // set up right eye location fpx[2 * i + 1] = (int)(eyescenter.x + eyesdist / 2); fpy[2 * i + 1] = (int)eyescenter.y; if (DEBUG) { Log.e(TAG, "setFace(): face " + i + ": confidence = " + faces[i].confidence() + ", eyes distance = " + faces[i].eyesDistance() + ", pose = ("+ faces[i].pose(FaceDetector.Face.EULER_X) + "," + faces[i].pose(FaceDetector.Face.EULER_Y) + "," + faces[i].pose(FaceDetector.Face.EULER_Z) + ")" + ", eyes midpoint = (" + eyescenter.x + "," + eyescenter.y +")"); } } catch (Exception e) { Log.e(TAG, "setFace(): face " + i + ": " + e.toString()); } } } mIV.setDisplayPoints(fpx, fpy, count * 2, 1); } private void doLengthyCalc() { Thread t = new Thread() { Message m = new Message(); public void run() { try { setFace(); m.what = TutorialOnFaceDetect.GUIUPDATE_SETFACE; TutorialOnFaceDetect.this.mHandler.sendMessage(m); } catch (Exception e) { Log.e(TAG, "doLengthyCalc(): " + e.toString()); } } }; t.start(); } }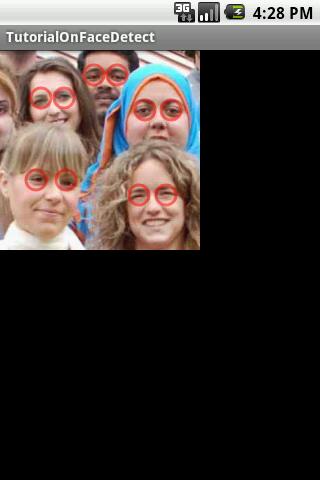
以上是“Android API如何实现人脸检测”这篇文章的所有内容,感谢各位的阅读!希望分享的内容对大家有帮助,更多相关知识,欢迎关注亿速云行业资讯频道!
免责声明:本站发布的内容(图片、视频和文字)以原创、转载和分享为主,文章观点不代表本网站立场,如果涉及侵权请联系站长邮箱:is@yisu.com进行举报,并提供相关证据,一经查实,将立刻删除涉嫌侵权内容。


