本篇文章给大家分享的是有关springboot中怎么构建多模块,小编觉得挺实用的,因此分享给大家学习,希望大家阅读完这篇文章后可以有所收获,话不多说,跟着小编一起来看看吧。
先介绍下背景,项目为什么需要用多模块?springmvc难道还不够?
(1)设计模式真言:“高内聚、低耦合”,springmvc项目,一般会把项目分成多个包:controller、service、dao、util等,但是随着项目的复杂性提高,想复用其他一个模块的话,因为是包的形式,剥离出来会比较困难,耦合性有点强,常用的方法就是复制代码修改,但是这样会做很多无用功与增加出错几率。
(2)springboot多模块简单来说,就是把按包分模块的模式,借助maven升级到jar的方式,抽象性更加强了,假如jar再升级到到war或者多个集合jar,就成微服务了( springcloud入门系列),在多模块jar模式下可以将某个jar拿出来对外共用,能大大提高代码复用率与开发效率。
(1)新建springboot项目;
(2)在新建后的springboot项目中新建多个module;
(3)修改pom文件以及删除多余的文件及文件夹。
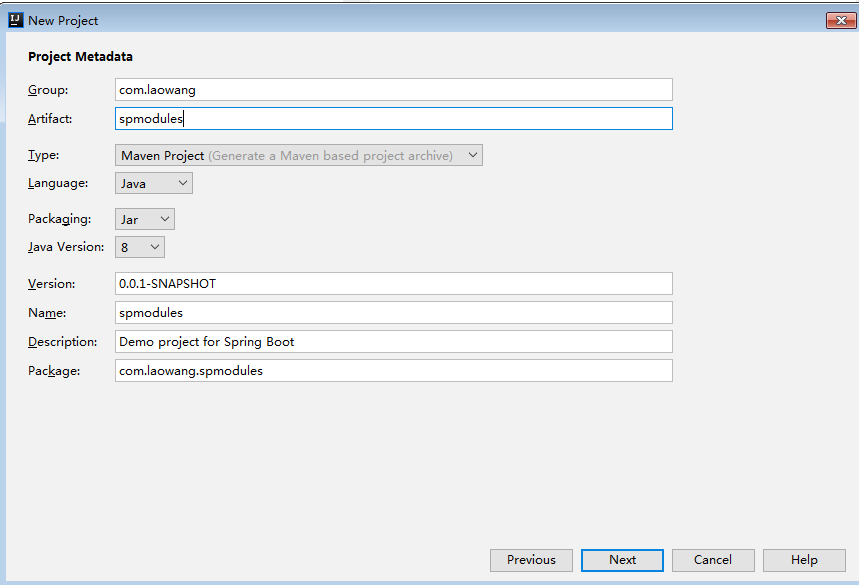
(1)new->project

(2)next,名字改一下。
(1)在springboot项目上点击右键->new->module

其余方式跟上面的springboot方式一样,不再多说了。
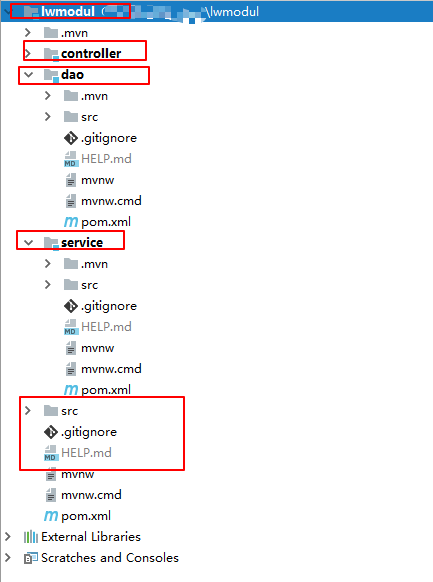
(2)新建三个module:controller、service、dao,新建后的效果图如下:
(1)springboot项目
整体删除src文件夹。
(2)module模块
将service和dao下面的application启动类和对应配置文件application.yml/prpperty,一起删除了,cotroller模块的不动。
根据springmvc架构,几个module之间依赖顺序 controller->service->dao
(1)修改springboot最外层pom.xml
这个是父pom.xml,用于加载一些全局的或者公共的jar包,以及配置打包。
此pom文件中,需要需改两个地方:
一是修改打包模式为pom;
二是新建modules标签,将3个module增加进来。
如下:
 <packaging>pom</packaging>

<modules>
        <module>controller</module>
        <module>service</module>
        <module>dao</module>
</modules>
(2)修改cotroller的pom.xml文件
修改<parent>标签为本项目springboot项目的gav信息和依赖service的jar包信息。
<!--<parent>--> <!--<groupId>org.springframework.boot</groupId>--> <!--<artifactId>spring-boot-starter-parent</artifactId>--> <!--<version>2.1.6.RELEASE</version>--> <!--<relativePath/> <!– lookup parent from repository –>--> <!--</parent>--> <parent> <groupid>com.laowang</groupid> <artifactid>lwmodul</artifactid> <version>0.0.1-SNAPSHOT</version> </parent> <dependency> <groupid>com.laowang</groupid> <artifactid>service</artifactid> <version>0.0.1-SNAPSHOT</version> </dependency>
(3)修改service的pom.xml文件
与controller类似,只是依赖改为dao。
<!--<parent>--> <!--<groupId>org.springframework.boot</groupId>--> <!--<artifactId>spring-boot-starter-parent</artifactId>--> <!--<version>2.1.6.RELEASE</version>--> <!--<relativePath/> <!– lookup parent from repository –>--> <!--</parent>--> <parent> <groupid>com.laowang</groupid> <artifactid>lwmodul</artifactid> <version>0.0.1-SNAPSHOT</version> </parent> <dependency> <groupid>com.laowang</groupid> <artifactid>dao</artifactid> <version>0.0.1-SNAPSHOT</version> </dependency>
(4)修改dao的pom.xml文件
只需修改parent,不需要再配置依赖了。
<!--<parent>--> <!--<groupId>org.springframework.boot</groupId>--> <!--<artifactId>spring-boot-starter-parent</artifactId>--> <!--<version>2.1.6.RELEASE</version>--> <!--<relativePath/> <!– lookup parent from repository –>--> <!--</parent>--> <parent> <groupid>com.laowang</groupid> <artifactid>lwmodul</artifactid> <version>0.0.1-SNAPSHOT</version> </parent>
(5)启动
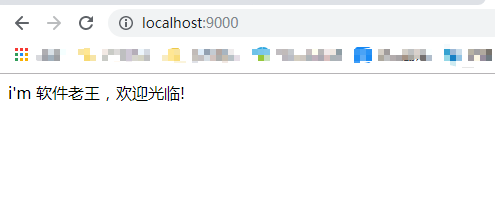
在Cotroller模块中使用启动类ControllerApplication启动,空项目的话,看到这一行就说明成功了。
Started ControllerApplication in 2.485 seconds (JVM running for 3.639)
(1)controller下面的application.property改下端口号(不更改的话默认是:8080)。
server.port=9000
(2)增加依赖
<dependency>
      <groupid>org.springframework.boot</groupid>
      <artifactid>spring-boot-starter-web</artifactid>
</dependency>
在启动类ControllerApplication增加一个标签(@RestController)和一个请求方法(home())。
package com.laowang.controller;

import org.springframework.boot.SpringApplication;
import org.springframework.boot.autoconfigure.SpringBootApplication;
import org.springframework.web.bind.annotation.RequestMapping;
import org.springframework.web.bind.annotation.RestController;

@RestController
@SpringBootApplication
public class ControllerApplication {

    public static void main(String[] args) {
        SpringApplication.run(ControllerApplication.class, args);
    }

    @RequestMapping("/")
    public String home() {
        return "i'm 软件老王,欢迎光临!";

    }
}
以上就是springboot中怎么构建多模块,小编相信有部分知识点可能是我们日常工作会见到或用到的。希望你能通过这篇文章学到更多知识。更多详情敬请关注亿速云行业资讯频道。
免责声明:本站发布的内容(图片、视频和文字)以原创、转载和分享为主,文章观点不代表本网站立场,如果涉及侵权请联系站长邮箱:is@yisu.com进行举报,并提供相关证据,一经查实,将立刻删除涉嫌侵权内容。


