Springbootж•ҙеҗҲactiveMQд№ӢTopicпјҢдёҚжҮӮд№ҹеҫ—жҮӮдәҶеҗ§
еүҚиЁҖВ
д»ҠеӨ©е’ҢеӨ§е®¶еҲҶдә«springbootж•ҙеҗҲactiveMqд№Ӣtopic(дё»йўҳ) - - еҸ‘еёғ/и®ўйҳ…жЁЎејҸ,зұ»дјјеҫ®дҝЎе…¬дј—еҸ·пјҢжҲ‘们关注公е…ұе°ұеҸҜд»Ҙ收еҲ°ж¶ҲжҒҜпјҢtopicйңҖиҰҒж¶Ҳиҙ№иҖ…е…Ҳи®ўйҳ…жүҚиғҪ收еҲ°ж¶ҲжҒҜпјҢеҰӮжһңжІЎжңүж¶Ҳиҙ№иҖ…и®ўйҳ…пјҢз”ҹдә§иҖ…дә§з”ҹзҡ„ж¶ҲжҒҜе°ұжҳҜеәҹж¶ҲжҒҜ(еҸ‘еёғ/и®ўйҳ…жЁЎејҸпјҢз”ҹдә§иҖ…з”ҹдә§дәҶдёҖдёӘж¶ҲжҒҜпјҢеҸҜд»Ҙз”ұеӨҡдёӘж¶Ҳиҙ№иҖ…иҝӣиЎҢж¶Ҳиҙ№)гҖӮжң¬ж¬Ўе®һдҫӢж”ҜжҢҒwebsocketгҖҒж¶ҲжҒҜйҮҚеҸ‘гҖҒжҢҒд№…еҢ–вҖҰ
зүҲжң¬дҝЎжҒҜпјҡSpringBoot2.1.5 ActiveMQ 5.15.10В
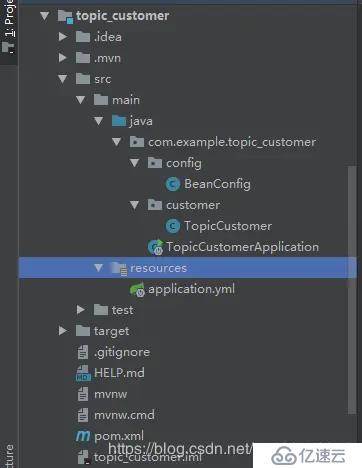
ж¶Ҳиҙ№иҖ…е·ҘзЁӢВ
ж¶Ҳиҙ№иҖ…е·ҘзЁӢзӣ®еҪ•В В
pomж–Ү件В
<dependency>
            <groupId>org.springframework.boot</groupId>
            <artifactId>spring-boot-starter</artifactId>
        </dependency>

        <dependency>
            <groupId>org.springframework.boot</groupId>
            <artifactId>spring-boot-starter-test</artifactId>
            <scope>test</scope>
        </dependency>

        <dependency>
            <groupId>org.springframework.boot</groupId>
            <artifactId>spring-boot-starter-activemq</artifactId>
        </dependency>

        <dependency>
            <groupId>org.springframework.boot</groupId>
            <artifactId>spring-boot-starter-websocket</artifactId>
        </dependency>
ymlж–Ү件й…ҚзҪ®В
server
port: 8085
spring:
activemq:
broker-url: tcp://localhost:61616
user: admin
password: admin
jms:
pub-sub-domain: true
#иҮӘе·ұзҡ„дё»йўҳеҗҚеӯ—
myTopic: boot_actviemq_topic
й…ҚзҪ®зұ»В
package com.example.topic_customer.config;
import org.apache.activemq.ActiveMQConnectionFactory;
import org.apache.activemq.RedeliveryPolicy;
import org.apache.activemq.command.ActiveMQTopic;
import org.springframework.beans.factory.annotation.Value;
import org.springframework.context.annotation.Bean;
import org.springframework.context.annotation.Configuration;
import org.springframework.jms.config.DefaultJmsListenerContainerFactory;
import org.springframework.stereotype.Component;
import org.springframework.web.socket.server.standard.ServerEndpointExporter;
import javax.jms.ConnectionFactory;
import javax.jms.Topic;
/**
* @Date 2019/11/13 10:22
* @Desc ж¶Ҳиҙ№иҖ…й…ҚзҪ®зұ»
*/
@Configuration
public class BeanConfig {
@Value("${myTopic}")
private String myTopic;
/**
* websocketй…ҚзҪ®
*
* @return
*/
@Bean
public ServerEndpointExporter serverEndpointExporter() {
return new ServerEndpointExporter();
}
@Bean
public Topic topic() {
return new ActiveMQTopic(myTopic);
}
public RedeliveryPolicy redeliveryPolicy() {
RedeliveryPolicy redeliveryPolicy = new RedeliveryPolicy();
//жҳҜеҗҰеңЁжҜҸж¬Ўе°қиҜ•йҮҚж–°еҸ‘йҖҒеӨұиҙҘеҗҺ,еўһй•ҝиҝҷдёӘзӯүеҫ…ж—¶й—ҙ
redeliveryPolicy.setUseExponentialBackOff(true);
//йҮҚеҸ‘ж¬Ўж•°,й»ҳи®Өдёә6ж¬Ў,иҝҷйҮҢи®ҫзҪ®дёә10ж¬Ў,-1иЎЁзӨәдёҚйҷҗж¬Ўж•°
redeliveryPolicy.setMaximumRedeliveries(-1);
//йҮҚеҸ‘ж—¶й—ҙй—ҙйҡ”,й»ҳи®Өдёә1жҜ«з§’,и®ҫзҪ®дёә10000жҜ«з§’
redeliveryPolicy.setInitialRedeliveryDelay(10000);
//иЎЁзӨәжІЎжңүжӢ–延еҸӘжңүUseExponentialBackOff(true)дёәtrueж—¶з”ҹж•Ҳ
//第дёҖж¬ЎеӨұиҙҘеҗҺйҮҚж–°еҸ‘йҖҒд№ӢеүҚзӯүеҫ…10000жҜ«з§’,第дәҢж¬ЎеӨұиҙҘеҶҚзӯүеҫ…10000 * 2жҜ«з§’
//第дёүж¬Ўзҝ»еҖҚ10000 * 2 * 2пјҢд»ҘжӯӨзұ»жҺЁ
redeliveryPolicy.setBackOffMultiplier(2);
//жҳҜеҗҰйҒҝе…Қж¶ҲжҒҜзў°ж’һ
redeliveryPolicy.setUseCollisionAvoidance(true);
//и®ҫзҪ®йҮҚеҸ‘жңҖеӨ§жӢ–延时й—ҙ360000жҜ«з§’ иЎЁзӨәжІЎжңүжӢ–延еҸӘжңүUseExponentialBackOff(true)дёәtrueж—¶з”ҹж•Ҳ
redeliveryPolicy.setMaximumRedeliveryDelay(360000);
return redeliveryPolicy;
}
public ConnectionFactory connectionFactory() {
ActiveMQConnectionFactory connectionFactory = new ActiveMQConnectionFactory();
//и®ҫзҪ®йҮҚеҸ‘еұһжҖ§
connectionFactory.setRedeliveryPolicy(redeliveryPolicy());
return connectionFactory;
}
/**
* JMS йҳҹеҲ—зҡ„зӣ‘еҗ¬е®№еҷЁе·ҘеҺӮ
*/
@Bean(name = "jmsTopicListener")
public DefaultJmsListenerContainerFactory jmsTopicListenerContainerFactory() {
DefaultJmsListenerContainerFactory factory =
new DefaultJmsListenerContainerFactory();
factory.setConnectionFactory(connectionFactory());
factory.setPubSubDomain(true);
factory.setSessionTransacted(true);
factory.setAutoStartup(true);
//ејҖеҗҜжҢҒд№…еҢ–и®ўйҳ…
factory.setSubscriptionDurable(true);
//йҮҚиҝһй—ҙйҡ”ж—¶й—ҙ
factory.setRecoveryInterval(1000L);
factory.setClientId("topic_provider:zb1");
return factory;
}
}
и®ҫзҪ®ж¶Ҳиҙ№иҖ…жҢҒд№…еҢ–дё»иҰҒжңүдёӨзӮ№пјҡВ
- //ејҖеҗҜжҢҒд№…еҢ–и®ўйҳ…factory.setSubscriptionDurable(true);
2.factory.setClientId(вҖңtopic_provider:zb1вҖқ); // иҝҷдёӘеҸҜд»ҘйҡҸдҫҝи®ҫзҪ®В
.TopicCustomerзұ»В
package com.example.topic_customer.customer;
import lombok.Data;
import org.springframework.jms.annotation.JmsListener;
import org.springframework.stereotype.Component;
import javax.jms.JMSException;
import javax.jms.TextMessage;
import javax.websocket.OnClose;
import javax.websocket.OnError;
import javax.websocket.OnMessage;
import javax.websocket.OnOpen;
import javax.websocket.server.ServerEndpoint;
import java.util.concurrent.CopyOnWriteArraySet;
/**
* @Date 2019/11/13 13:31
* @Desc
*/
@Component
@ServerEndpoint("/websocket")
@Data
public class TopicCustomer {
/**
* жҜҸдёӘе®ўжҲ·з«ҜйғҪдјҡжңүзӣёеә”зҡ„session,жңҚеҠЎз«ҜеҸҜд»ҘеҸ‘йҖҒзӣёе…іж¶ҲжҒҜ
*/
private javax.websocket.Session session;
/**
* J.U.CеҢ…дёӢзәҝзЁӢе®үе…Ёзҡ„зұ»пјҢдё»иҰҒз”ЁжқҘеӯҳж”ҫжҜҸдёӘе®ўжҲ·з«ҜеҜ№еә”зҡ„webSocketиҝһжҺҘ
*/
private static CopyOnWriteArraySet<TopicCustomer> copyOnWriteArraySet = new CopyOnWriteArraySet<>();
@OnOpen
public void onOpen(javax.websocket.Session session) {
this.session = session;
copyOnWriteArraySet.add(this);
}
@OnClose
public void onClose() {
copyOnWriteArraySet.remove(this);
}
@OnMessage
public void onMessage(String message) {
}
@OnError
public void onError(javax.websocket.Session session, Throwable error) {
error.printStackTrace();
}
@JmsListener(destination = "${myTopic}", containerFactory = "jmsTopicListener")
public void receive(TextMessage textMessage, javax.jms.Session session) throws JMSException {
//йҒҚеҺҶе®ўжҲ·з«Ҝ
for (TopicCustomer webSocket : copyOnWriteArraySet) {
try {
//жңҚеҠЎеҷЁдё»еҠЁжҺЁйҖҒ
webSocket.session.getBasicRemote().sendText(textMessage.getText());
System.out.println("-- жҺҘ收еҲ°topicжҢҒд№…еҢ–ж¶ҲжҒҜ -- " + textMessage.getText());
} catch (Exception e) {
System.out.println("-----жөӢиҜ•йҮҚеҸ‘-----");
session.rollback();// жӯӨдёҚеҸҜзңҒз•Ҙ йҮҚеҸ‘дҝЎжҒҜдҪҝз”Ё
}
}
}
}
еҗҜеҠЁзұ»
package com.example.topic_customer;

import org.springframework.boot.SpringApplication;
import org.springframework.boot.autoconfigure.SpringBootApplication;

@SpringBootApplication
public class TopicCustomerApplication {

    public static void main(String[] args) {
        SpringApplication.run(TopicCustomerApplication.class, args);
    }
}
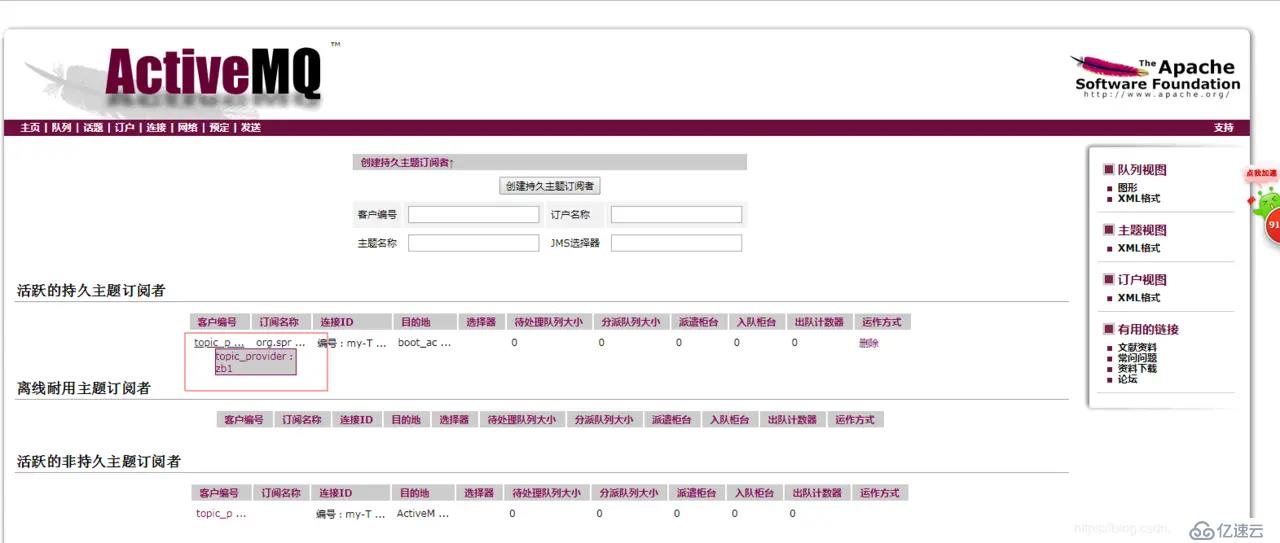
ж¶Ҳиҙ№иҖ…еҗҜеҠЁжҲҗеҠҹеҗҺmqзҡ„жҲӘеӣҫ:В
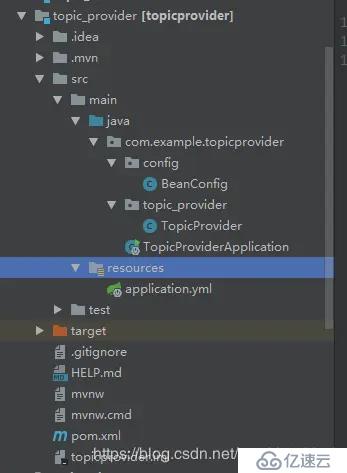
з”ҹдә§иҖ…е·ҘзЁӢВ
з”ҹдә§иҖ…е·ҘзЁӢзӣ®еҪ•В
ymlй…ҚзҪ®ж–Ү件В
server:
  port: 8084
spring:
  activemq:
    broker-url: tcp://localhost:61616
    user: admin
    password: admin
  jms:
    pub-sub-domain: true

myTopic: boot_actviemq_topic
й…ҚзҪ®зұ»В
package com.example.topicprovider.config;
import org.apache.activemq.ActiveMQConnectionFactory;
import org.apache.activemq.RedeliveryPolicy;
import org.apache.activemq.command.ActiveMQTopic;
import org.springframework.beans.factory.annotation.Value;
import org.springframework.context.annotation.Bean;
import org.springframework.jms.config.DefaultJmsListenerContainerFactory;
import org.springframework.stereotype.Component;
import javax.jms.ConnectionFactory;
import javax.jms.Topic;
/**
* @Date 2019/11/13 10:22
* @Desc з”ҹдә§иҖ…й…ҚзҪ®ж–Ү件
*/
@Component
public class BeanConfig {
@Value("${myTopic}")
private String myTopic;
public RedeliveryPolicy redeliveryPolicy(){
RedeliveryPolicy redeliveryPolicy= new RedeliveryPolicy();
//жҳҜеҗҰеңЁжҜҸж¬Ўе°қиҜ•йҮҚж–°еҸ‘йҖҒеӨұиҙҘеҗҺ,еўһй•ҝиҝҷдёӘзӯүеҫ…ж—¶й—ҙ
redeliveryPolicy.setUseExponentialBackOff(true);
//йҮҚеҸ‘ж¬Ўж•°,й»ҳи®Өдёә6ж¬Ў,иҝҷйҮҢи®ҫзҪ®дёә10ж¬Ў,-1иЎЁзӨәдёҚйҷҗж¬Ўж•°
redeliveryPolicy.setMaximumRedeliveries(-1);
//йҮҚеҸ‘ж—¶й—ҙй—ҙйҡ”,й»ҳи®Өдёә1жҜ«з§’,и®ҫзҪ®дёә10000жҜ«з§’
redeliveryPolicy.setInitialRedeliveryDelay(10000);
//иЎЁзӨәжІЎжңүжӢ–延еҸӘжңүUseExponentialBackOff(true)дёәtrueж—¶з”ҹж•Ҳ
//第дёҖж¬ЎеӨұиҙҘеҗҺйҮҚж–°еҸ‘йҖҒд№ӢеүҚзӯүеҫ…10000жҜ«з§’,第дәҢж¬ЎеӨұиҙҘеҶҚзӯүеҫ…10000 * 2жҜ«з§’
//第дёүж¬Ўзҝ»еҖҚ10000 * 2 * 2пјҢд»ҘжӯӨзұ»жҺЁ
redeliveryPolicy.setBackOffMultiplier(2);
//жҳҜеҗҰйҒҝе…Қж¶ҲжҒҜзў°ж’һ
redeliveryPolicy.setUseCollisionAvoidance(true);
//и®ҫзҪ®йҮҚеҸ‘жңҖеӨ§жӢ–延时й—ҙ360000жҜ«з§’ иЎЁзӨәжІЎжңүжӢ–延еҸӘжңүUseExponentialBackOff(true)дёәtrueж—¶з”ҹж•Ҳ
redeliveryPolicy.setMaximumRedeliveryDelay(360000);
return redeliveryPolicy;
}
@Bean
public Topic topic() {
return new ActiveMQTopic(myTopic);
}
public ConnectionFactory connectionFactory(){
ActiveMQConnectionFactory connectionFactory = new ActiveMQConnectionFactory();
//и®ҫзҪ®йҮҚеҸ‘еұһжҖ§
connectionFactory.setRedeliveryPolicy(redeliveryPolicy());
return connectionFactory;
}
/**
* JMS йҳҹеҲ—зҡ„зӣ‘еҗ¬е®№еҷЁе·ҘеҺӮ
*/
@Bean(name = "jmsTopicListener")
public DefaultJmsListenerContainerFactory jmsTopicListenerContainerFactory() {
DefaultJmsListenerContainerFactory factory =
new DefaultJmsListenerContainerFactory();
factory.setConnectionFactory(connectionFactory());
factory.setPubSubDomain(true);
factory.setSessionTransacted(true);
factory.setAutoStartup(true);
//ејҖеҗҜжҢҒд№…еҢ–и®ўйҳ…
factory.setSubscriptionDurable(true);
//йҮҚиҝһй—ҙйҡ”ж—¶й—ҙ
factory.setRecoveryInterval(1000L);
return factory;
}
}
TopicProviderзұ»В
package com.example.topicprovider.topic_provider;
import org.springframework.beans.factory.annotation.Autowired;
import org.springframework.jms.core.JmsMessagingTemplate;
import org.springframework.jms.core.JmsTemplate;
import org.springframework.scheduling.annotation.Scheduled;
import org.springframework.stereotype.Component;
import javax.jms.Topic;
import java.util.UUID;
/**
* @Date 2019/11/13 10:25
* @Desc
*/
@Component
public class TopicProvider {
@Autowired
private Topic topic;
@Autowired
private JmsTemplate jmsTemplate;
@Scheduled(fixedDelay = 10000)
private void produceMsg() {
jmsTemplate.convertAndSend(topic, "дё»йўҳз”ҹдә§иҖ…" + UUID.randomUUID().toString().substring(1, 7));
System.out.println( jmsTemplate.getDeliveryMode());
System.out.println("дё»йўҳз”ҹдә§иҖ…1");
}
}
еҗҜеҠЁзұ»В
package com.example.topicprovider;

import org.springframework.boot.SpringApplication;
import org.springframework.boot.autoconfigure.SpringBootApplication;
import org.springframework.scheduling.annotation.EnableScheduling;

@SpringBootApplication
@EnableScheduling
public class TopicProviderApplication {

    public static void main(String[] args) {
        SpringApplication.run(TopicProviderApplication.class, args);
    }
}
еҗҜеҠЁжҲҗеҠҹеҗҺз»“жһңеӣҫ:
жңҖеҗҺ
е–ңж¬ўзҡ„еҸҜд»Ҙе…іжіЁжҲ‘зҡ„е…¬дј—еҸ·пјҡjavaе°Ҹз“ңе“Ҙзҡ„еҲҶдә«е№іеҸ°гҖӮи°ўи°ўж”ҜжҢҒпјҒ


