FastDFS是一个开源的轻量级分布式文件系统,它对文件进行管理,功能包括:文件存储、文件同步、文件访问(文件上传、文件下载)等,解决了大容量存储和负载均衡的问题。特别适合以文件为载体的在线服务,如相册网站、视频网站等等。
FastDFS为互联网量身定制,充分考虑了冗余备份、负载均衡、线性扩容等机制,并注重高可用、高性能等指标,使用FastDFS很容易搭建一套高性能的文件服务器集群提供文件上传、下载等服务。
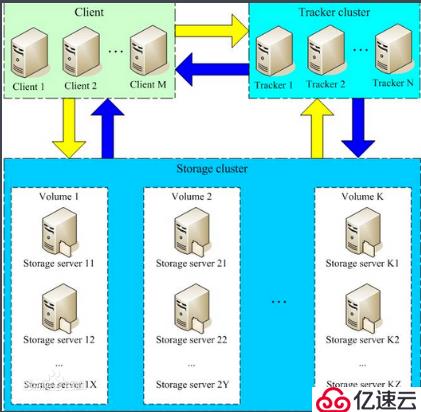
FastDFS服务端有两个角色:跟踪器(tracker)和存储节点(storage)。跟踪器主要做调度工作,在访问上起负载均衡的作用。
跟踪器和存储节点都可以由一台或多台服务器构成。跟踪器和存储节点中的服务器均可以随时增加或下线而不会影响线上服务。其中跟踪器中的所有服务器都是对等的,可以根据服务器的压力情况随时增加或减少。
在卷中增加服务器时,同步已有的文件由系统自动完成,同步完成后,系统自动将新增服务器切换到线上提供服务。
| 名称 | 角色 | IP地址 |
|---|---|---|
| centos7-1 | tracker | 192.168.142.66 |
| centos7-2 | storage+nginx | 192.168.142.77 |
安装基础环境包
[root@storage ~]# yum -y install libevent libevent-devel perl make gcc zlib zlib-devel pcre pcre-devel gcc-c++ openssl-devel安装libfastcommon
[root@storage ~]# wget https://github.com/happyfish200/libfastcommon/archive/V1.0.38.tar.gz
[root@storage ~]# tar zxf V1.0.38.tar.gz -C /opt/
[root@storage ~]# cd /opt/libfastcommon-1.0.38/
编译并建立软链接以方便系统识别
#编译安装
[root@storage libfastcommon-1.0.38]# ./make.sh && ./make.sh install

#建立软链接方便系统识别
[root@storage libfastcommon-1.0.38]# ln -s /usr/lib64/libfastcommon.so /usr/local/lib/libfastcommon.so
[root@storage libfastcommon-1.0.38]# ln -s /usr/lib64/libfdfsclient.so /usr/local/lib/libfdfsclient.so
[root@storage libfastcommon-1.0.38]# ln -s /usr/lib64/libfdfsclient.so /usr/lib/libfdfsclient.so下载安装
#安装fastDFS
[root@storage ~]# wget https://github.com/happyfish200/fastdfs/archive/V5.11.tar.gz
[root@storage ~]# tar zxf V5.11.tar.gz -C /opt/
[root@storage ~]# cd /opt/fastdfs-5.11/
编译
#编译安装
[root@storage fastdfs-5.11]# ./make.sh && ./make.sh install
将模板文件进行更改
[root@storage fastdfs-5.11]# cd /etc/fdfs/              //配置文件模板路径
[root@storage fdfs]# cp tracker.conf.sample tracker.conf
[root@storage fdfs]# cp storage.conf.sample storage.conf
[root@storage fdfs]# cp client.conf.sample client.conf建立数据文件、日志文件存放目录
[root@tracker ~]# mkdir -m 755 -p /opt/fastdfs修改tracker配置文件
[root@tracker ~]# vim /etc/fdfs/tracker.conf
#修改以下配置
port=22122         //tracker服务默认端口22122即可
base_path=/opt/fastdfs      //tracker存储data和log的跟路径,必须提前创建好
http.server_port=8080 //tracker服务器上启动http服务进程,没装忽略
开启服务并设置开机自启
#开启服务(命令支持start|stop|restart)
[root@tracker ~]# fdfs_trackerd /etc/fdfs/tracker.conf start
[root@tracker ~]# netstat -atnp | grep 22122
tcp        0      0 0.0.0.0:22122           0.0.0.0:*               LISTEN      43776/fdfs_trackerd

#设置开机自启
[root@tracker ~]# vim  /etc/rc.local
#末行添加
fdfs_trackerd   /etc/fdfs/tracker.conf start

[root@tracker ~]# systemctl stop firewalld
[root@tracker ~]# setenforce 0建立数据文件、日志文件存放目录
[root@storage ~]# mkdir -m 755 -p /opt/fastdfs修改storage配置文件
[root@storage ~]# vim /etc/fdfs/storage.conf
#修改以下配置
group_name=group1        //默认组名,根据实际情况修改
port=23000       //storge默认23000,同一个组的storage端口号必须一致
base_path=/opt/fastdfs          //storage日志文件的根路径
store_path_count=1              //与下面路径个数相同,默认为1
store_path0=/opt/fastdfs       //提供的存储路径(默认与日志文件存放在一起)
tracker_server=192.168.142.66:22122      //自己的tracker服务器IP(重点!!!)
http.server_port=80            //http访问文件的端口默认为8888,nginx中配置的监听端口保持一致
开启服务并设置开机自启
#开启服务(命令支持start|stop|restart)
[root@storage ~]# fdfs_storaged  /etc/fdfs/storage.conf start
[root@storage ~]# netstat -atnp | grep 23000
tcp        0      0 0.0.0.0:23000           0.0.0.0:*               LISTEN      40430/fdfs_storaged

#设置开机自启
[root@storage ~]# vim  /etc/rc.local
#末行添加
fdfs_storaged   /etc/fdfs/storage.conf start

[root@storage ~]# systemctl stop firewalld
[root@storage ~]# setenforce 0
检查是否与tracker监控端关联成功
[root@storage ~]# fdfs_monitor /etc/fdfs/storage.conf
Storage 1:
                id = 192.168.142.77
                ip_addr = 192.168.142.77 (storage)  ACTIVE
                http domain =
......省略这里为了减少虚拟机开启的数量,就在storage端进行nginx的安装
安装nginx及其组件
[root@storage ~]# tar zxf nginx-1.12.0.tar.gz -C /opt/

#下载fastdfs-nginx-module安装包
[root@storage ~]# wget https://github.com/happyfish200/fastdfs-nginx-module/archive/V1.20.tar.gz
[root@storage ~]# tar zxf V1.20.tar.gz -C /opt/
编译&安装
[root@storage ~]# cd /opt/nginx-1.12.0
[root@storage nginx-1.12.0]# ./configure \
--prefix=/usr/local/nginx \
--add-module=/opt/fastdfs-nginx-module-1.20/src/             //fastdfs-nginx-module模块
[root@storage nginx-1.12.0]# make && make install
注意:
可能的报错:
/usr/include/fastdfs/fdfs_define.h:15:27: fatal error: common_define.h: No such file or directory解决方案:
修改fastdfs-nginx-module-1.20/src/config文件,然后重新第7步开始
ngx_module_incs="/usr/include/fastdfs /usr/include/fastcommon/"
CORE_INCS="$CORE_INCS /usr/include/fastdfs /usr/include/fastcommon/"
配置fastdfs-nginx-module模块
[root@storage nginx-1.12.0]# cd fastdfs-nginx-module-1.20/src
[root@storage nginx-1.12.0]# cp mod_fastdfs.conf /etc/fdfs/           //移动其配置文件至fdfs目录下

#修改fastdfs-nginx-module模块配置文件mod-fasts.conf
[root@storage nginx-1.12.0]# cd /etc/fdfs
[root@storage fdfs]# vim mod_fastdfs.conf
#检查一下配置
base_path=/opt/fastdfs         //存放数据文件、日志的路径
tracker_server=192.168.142.66:22122    //tracker端的地址(重点!!!)
url_have_group_name = true  //url是否包含group名称
storage_server_port=23000           //需要和storage配置的相同
store_path_count=1              //存储路径个数,需要和store_path个数匹配
store_path0=/opt/fastdfs               //文件存储的位置
修改nginx配置文件
[root@storage fdfs]# vim /usr/local/nginx/conf/nginx.conf
#空行处添加
location ~/M00 {
                root /opt/fastdfs/data;
                ngx_fastdfs_module;
}
拷贝fastdfs解压目录中的http.conf和mime.types
#不做这步可能会导致报错
[root@storage fdfs]# cd /opt/fastdfs-5.11/conf/
[root@storage conf]# cp mime.types http.conf /etc/fdfs/修改配置文件
[root@storage ~]# vim /etc/fdfs/client.conf
#检查以下配置
base_path=/opt/fastdfs     //tracker服务器文件路径
tracker_server=192.168.142.66:22122            //tracker服务器IP地址和端口号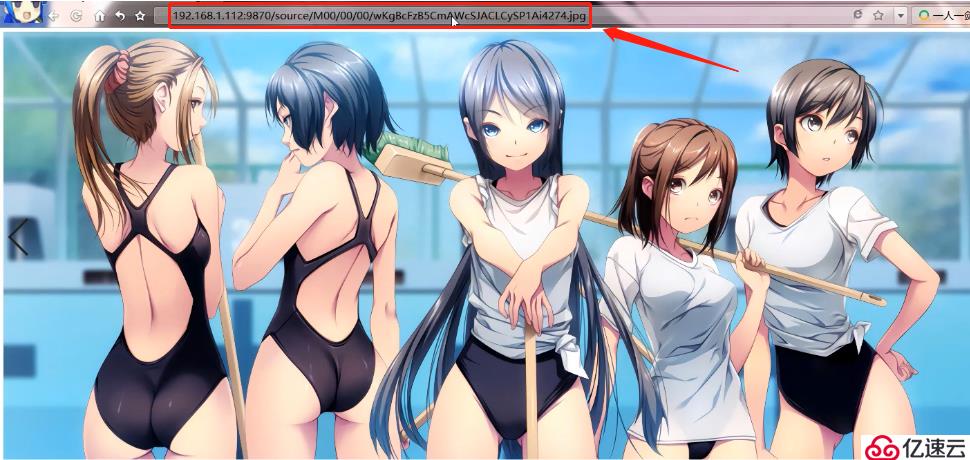
http.tracker_server_port=8080 // tracker服务器的http端口号,必须和tracker的设置对应起来上传测试文件
命令:
/usr/bin/fdfs_upload_file <config_file> <local_filename>
实例:
/usr/bin/fdfs_upload_file /etc/fdfs/client.conf test.jpg
效果如下
下载文件
命令:
/usr/bin/fdfs_download_file <config_file> <file_id> [local_filename]
实例:
/usr/bin/fdfs_download_file /etc/fdfs/client.conf group1/M00/00/00/wKiOTV354W2AIf7GAAAAEh4TEws726.jpg test2.jpg
删除文件
命令:
/usr/bin/fdfs_delete_file <config_file> <file_id>
实例:
fdfs_delete_file /etc/fdfs/client.conf group1/M00/00/00/wKiOTV354W2AIf7GAAAAEh4TEws726.jpg
免责声明:本站发布的内容(图片、视频和文字)以原创、转载和分享为主,文章观点不代表本网站立场,如果涉及侵权请联系站长邮箱:is@yisu.com进行举报,并提供相关证据,一经查实,将立刻删除涉嫌侵权内容。


