小编这次要用代码详解Pytorch的环境搭建与基本语法,文章内容丰富,感兴趣的小伙伴可以来了解一下,希望大家阅读完这篇文章之后能够有所收获。
基本思路选择
以前我用过Caffe,用过tensorflow,最近一直在用pytorch感觉特别好用。所以打算写点我学习的过程跟经验,如果你是一个pytorch的高手自然可以忽略,如果你也打算学习pytorch框架,那就跟我一起学习吧,所谓独学而无友,孤陋而寡闻!
pytorch安装
01
演示系统环境
CPU版本
install pytorch torchvision cpuonly -c pytorch
GPU版本
install pytorch torchvision cudatoolkit=10.0 -c pytorch
测试安装是否正常, CUDA支持正常
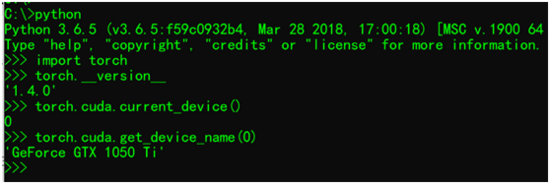
测试结果一切正常!
安装的时候你还可以更直接点
pip install pytorch torchvision
就好啦!我知道很多人喜欢用各种python的工具跟IDE做开发,那些都是个人爱好,喜欢就好,但是千万别强迫别人跟你一样!有IDE强迫症!我从开始学习python就一直用pycharm!千万别问我好用不好用,方便不方便!觉得适合自己即可。
Pytorch基本语法演示
02
演示了pytorch中基本常量、变量、矩阵操作、CUDA调用,numpy与tensor转化,维度转化,自动梯度等基本知识。代码如下:
from __future__ import print_function
import torch
import numpy as np

print(torch.__version__)

# 定义矩阵
x = torch.empty(2, 2)
print(x)

# 定义随机初始化矩阵
x = torch.randn(2, 2)
print(x)

# 定义初始化为零
x = torch.zeros(3, 3)
print(x)

# 定义数据为tensor
x = torch.tensor([5.1, 2., 3., 1.])
print(x)

# 操作
a = torch.tensor([1.,2.,3.,4.,5.,6.,7.,8.])
b = torch.tensor([11.,12.,13.,14.,15.,16.,17.,18.])
c = a.add(b)
print(c)

# 维度变换 2x4
a = a.view(-1, 4)
b = b.view(-1, 4)
c = torch.add(a, b)
print(c, a.size(), b.size())

# torch to numpy and visa
na = a.numpy()
nb = b.numpy()
print("\na =",na,"\nb =", nb)

# 操作
d = np.array([21.,22.,23.,24.,25.,26.,27.,28.], dtype=np.float32)
print(d.reshape(2, 4))
d = torch.from_numpy(d.reshape(2, 4))
sum = torch.sub(c, d)
print(sum, "\n sum = ", sum.size())

# using CUDA
if torch.cuda.is_available():
 result = d.cuda() + c.cuda()
 print("\n result = ", result)

# 自动梯度
x = torch.randn(1, 5, requires_grad=True)
y = torch.randn(5, 3, requires_grad=True)
z = torch.randn(3, 1, requires_grad=True)
print("\nx=",x, "\ny=",y, "\nz=",z)
xy = torch.matmul(x, y)
xyz = torch.matmul(xy, z)
xyz.backward()
print(x.grad, y.grad, z.grad)
运行输出结果:
1.4.0
tensor([[0., 0.],
[0., 0.]])
tensor([[-0.4624, -1.1495],
[ 1.9408, -0.1796]])
tensor([[0., 0., 0.],
[0., 0., 0.],
[0., 0., 0.]])
tensor([5.1000, 2.0000, 3.0000, 1.0000])
tensor([12., 14., 16., 18., 20., 22., 24., 26.])
tensor([[12., 14., 16., 18.],
[20., 22., 24., 26.]]) torch.Size([2, 4]) torch.Size([2, 4])a = [[1. 2. 3. 4.]
[5. 6. 7. 8.]]
b = [[11. 12. 13. 14.]
[15. 16. 17. 18.]]
[[21. 22. 23. 24.]
[25. 26. 27. 28.]]
tensor([[-9., -8., -7., -6.],
[-5., -4., -3., -2.]])
sum = torch.Size([2, 4])result = tensor([[33., 36., 39., 42.],
[45., 48., 51., 54.]], device='cuda:0')x= tensor([[ 0.3029, -0.4030, -0.9148, -0.9237, 0.7549]], requires_grad=True)
y= tensor([[-0.9032, -0.4092, -0.0682],
[ 0.3689, -0.9655, -0.1346],
[ 1.5101, 1.4418, 0.1058],
[ 1.0259, -1.6011, 0.4881],
[-0.3989, 0.9156, -1.6290]], requires_grad=True)
z= tensor([[ 1.4343],
[ 2.2974],
[-0.0864]], requires_grad=True)
tensor([[-2.2298, -1.6776, 5.4691, -2.2492, 1.6721]]) tensor([[ 0.4344, 0.6959, -0.0262],
[-0.5781, -0.9260, 0.0348],
[-1.3121, -2.1017, 0.0790],
[-1.3249, -2.1222, 0.0798],
[ 1.0827, 1.7342, -0.0652]]) tensor([[-3.0524],
[ 1.1164],
[-1.7437]])
看完这篇关于用代码详解Pytorch的环境搭建与基本语法的文章,如果觉得文章内容写得不错的话,可以把它分享出去给更多人看到。
免责声明:本站发布的内容(图片、视频和文字)以原创、转载和分享为主,文章观点不代表本网站立场,如果涉及侵权请联系站长邮箱:is@yisu.com进行举报,并提供相关证据,一经查实,将立刻删除涉嫌侵权内容。


