怎么在PyQt中使用socket远程操作服务器?针对这个问题,这篇文章详细介绍了相对应的分析和解答,希望可以帮助更多想解决这个问题的小伙伴找到更简单易行的方法。
需求设计
1、开发界面,方便用户输入IP、用户名、密码以及执行的命令。
2、IP、用户名、密码和命令输入提供默认值。特别是用户名和密码,对于测试服务器来说,通常都是固定的。
3、IP、命令行输入框可以自动补全用户输入。自动补全常用IP、命令行可以提高操作效率。
4、可以自动保存用户执行成功的IP、命令行。用于完善自动补全命令(本文代码未实现)。
需求设计
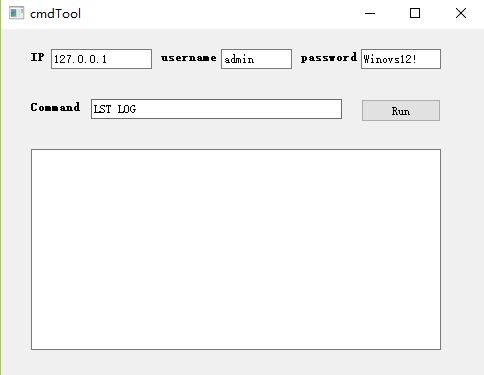
1、使用Qt Designer实现界面开发。开发后界面参考如下:
2、使用socket程序登录服务器并执行命令,并将结果显示在界面文本框中。
代码实现(程序可以直接复制运行)
1、使用Qt Designer实现界面开发。拖动4个label+4个输入框+1个按钮+1个textBrowser到主界面。开发后界面同需求设计中的截图。
2、使用pyuic5 -o commandtools.py commandtools.ui指令将.ui文件转换成.py文件。
# -*- coding: utf-8 -*-

# Form implementation generated from reading ui file 'commandTools.ui'
#
# Created by: PyQt5 UI code generator 5.11.3
#
# WARNING! All changes made in this file will be lost!

from PyQt5 import QtCore, QtGui, QtWidgets

class Ui_Form(object):
  def setupUi(self, Form):
    Form.setObjectName("Form")
    Form.resize(483, 347)
    self.ip_label = QtWidgets.QLabel(Form)
    self.ip_label.setGeometry(QtCore.QRect(30, 20, 16, 16))
    font = QtGui.QFont()
    font.setBold(True)
    font.setWeight(75)
    self.ip_label.setFont(font)
    self.ip_label.setObjectName("ip_label")
    self.ip_lineEdit = QtWidgets.QLineEdit(Form)
    self.ip_lineEdit.setGeometry(QtCore.QRect(50, 20, 101, 20))
    self.ip_lineEdit.setObjectName("ip_lineEdit")
    self.username_label = QtWidgets.QLabel(Form)
    self.username_label.setGeometry(QtCore.QRect(160, 20, 61, 16))
    font = QtGui.QFont()
    font.setBold(True)
    font.setWeight(75)
    self.username_label.setFont(font)
    self.username_label.setObjectName("username_label")
    self.username_lineEdit = QtWidgets.QLineEdit(Form)
    self.username_lineEdit.setGeometry(QtCore.QRect(220, 20, 71, 20))
    self.username_lineEdit.setObjectName("username_lineEdit")
    self.password_label = QtWidgets.QLabel(Form)
    self.password_label.setGeometry(QtCore.QRect(300, 20, 61, 16))
    font = QtGui.QFont()
    font.setBold(True)
    font.setWeight(75)
    self.password_label.setFont(font)
    self.password_label.setObjectName("password_label")
    self.password_lineEdit = QtWidgets.QLineEdit(Form)
    self.password_lineEdit.setGeometry(QtCore.QRect(360, 20, 80, 20))
    self.password_lineEdit.setObjectName("password_lineEdit")
    self.command_label = QtWidgets.QLabel(Form)
    self.command_label.setGeometry(QtCore.QRect(30, 70, 51, 16))
    font = QtGui.QFont()
    font.setBold(True)
    font.setWeight(75)
    self.command_label.setFont(font)
    self.command_label.setObjectName("command_label")
    self.command_lineEdit = QtWidgets.QLineEdit(Form)
    self.command_lineEdit.setGeometry(QtCore.QRect(90, 70, 251, 20))
    self.command_lineEdit.setObjectName("command_lineEdit")
    self.result_textBrowser = QtWidgets.QTextBrowser(Form)
    self.result_textBrowser.setGeometry(QtCore.QRect(30, 120, 410, 201))
    self.result_textBrowser.setObjectName("result_textBrowser")
    self.run_Button = QtWidgets.QPushButton(Form)
    self.run_Button.setGeometry(QtCore.QRect(360, 70, 80, 23))
    self.run_Button.setObjectName("run_Button")

    self.retranslateUi(Form)
    QtCore.QMetaObject.connectSlotsByName(Form)

  def retranslateUi(self, Form):
    _translate = QtCore.QCoreApplication.translate
    Form.setWindowTitle(_translate("Form", "cmdTool"))
    self.ip_label.setText(_translate("Form", "IP"))
    self.ip_lineEdit.setText(_translate("Form", "127.0.0.1"))
    self.username_label.setText(_translate("Form", "username"))
    self.username_lineEdit.setText(_translate("Form", "admin"))
    self.password_label.setText(_translate("Form", "password"))
    self.password_lineEdit.setText(_translate("Form", "Winovs12!"))
    self.command_label.setText(_translate("Form", "Command"))
    self.command_lineEdit.setText(_translate("Form", "LST LOG"))
    self.run_Button.setText(_translate("Form", "Run"))
3、实现主程序callcommand.py调用(业务与逻辑分离)。代码如下:
# -*- coding: utf-8 -*-

import sys
import time
import socket
from PyQt5.QtWidgets import QApplication, QMainWindow,QCompleter
from PyQt5.QtCore import Qt,QThread,pyqtSignal
from commandTools import Ui_Form


class MyMainForm(QMainWindow, Ui_Form):
  def __init__(self, parent=None):
    """
    构造函数
    """
    super(MyMainForm, self).__init__(parent)
    self.setupUi(self)
    self.run_Button.clicked.connect(self.execte_command)
    self.ip_init_lst = ['121.1.1.1', '192.168.1.1', '172.16.1.1']
    self.init_lineedit(self.ip_lineEdit,self.ip_init_lst)
    self.cmd_init_lst = ['LST LOG', 'LST PARA','MOD PARA']
    self.init_lineedit(self.command_lineEdit,self.cmd_init_lst)

  def init_lineedit(self, lineedit, item_list):
    """
    用户初始化控件自动补全功能
    """
    # 增加自动补全
    self.completer = QCompleter(item_list)
    # 设置匹配模式 有三种: Qt.MatchStartsWith 开头匹配(默认) Qt.MatchContains 内容匹配 Qt.MatchEndsWith 结尾匹配
    self.completer.setFilterMode(Qt.MatchContains)
    # 设置补全模式 有三种: QCompleter.PopupCompletion(默认) QCompleter.InlineCompletion  QCompleter.UnfilteredPopupCompletion
    self.completer.setCompletionMode(QCompleter.PopupCompletion)
    # 给lineedit设置补全器
    lineedit.setCompleter(self.completer)

  def execte_command(self):
    """
    登录服务器,并执行命令
    """
    ip, username, password, command = self.get_input_para()
    print(type(ip))
    sockethandle = socket.socket(socket.AF_INET,socket.SOCK_STREAM)
    sockethandle.connect((str(ip), 6000))
    send_cmd = "username: %s, admin: %s, command: %s" % (username, password, command)
    print(send_cmd)
    sockethandle.sendall(send_cmd.encode('utf-8'))
    time.sleep(0.5)
    recdata = sockethandle.recv(65535)
    tran_recdata = recdata.decode('utf-8')
    self.result_textBrowser.setText(tran_recdata)

  def get_input_para(self):
    """
    获取用户界面输入
    """
    ip = self.ip_lineEdit.text()
    username = self.username_lineEdit.text()
    password = self.password_lineEdit.text()
    command = self.command_lineEdit.text()
    return ip, username, password, command


if __name__ == "__main__":
  app = QApplication(sys.argv)
  myWin = MyMainForm()
  myWin.show()
  sys.exit(app.exec_())
4、使用pyinstaller转换成可执行的.exe文件。命令: pyinstaller -F callcommand.py -w


执行成功,生成的文件在d:\temp\dist\dist\callcommand.exe
5、运行callcommand.exe,点击run运行

关键代码
1、输入框自动补全功能函数。同样适用于下拉框控件。
  def init_lineedit(self, lineedit, item_list):
    """
    用户初始化控件自动补全功能
    """
    # 增加自动补全
    self.completer = QCompleter(item_list)
    # 设置匹配模式 有三种: Qt.MatchStartsWith 开头匹配(默认) Qt.MatchContains 内容匹配 Qt.MatchEndsWith 结尾匹配
    self.completer.setFilterMode(Qt.MatchContains)
    # 设置补全模式 有三种: QCompleter.PopupCompletion(默认) QCompleter.InlineCompletion  QCompleter.UnfilteredPopupCompletion
    self.completer.setCompletionMode(QCompleter.PopupCompletion)
    # 给lineedit设置补全器
    lineedit.setCompleter(self.completer)
2、socket中sendall函数要将命令使用utf-8编码,否则会导致界面卡住:
sockethandle.sendall(send_cmd.encode('utf-8'))3、需要将命令返回的内容解码再写入文本框,否则会导致界面卡住。
 recdata = sockethandle.recv(65535)
 tran_recdata = recdata.decode('utf-8')
 self.result_textBrowser.setText(tran_recdata)
附录
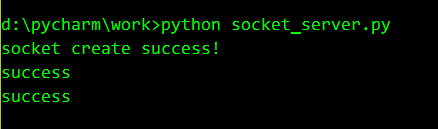
由于本地没有服务器用于调试程序。所以使用socket搭建1个建议服务器。服务器功能实现将接收的命令原样返回。就是接收什么命令就给客户端返回什么内容。服务器IP为本地IP127.0.0.1,绑定端口为6000。代码如下:
#!/usr/bin/env python3
# -*- coding: utf-8 -*-

import socket
import sys

s = socket.socket(socket.AF_INET,socket.SOCK_STREAM)
print("socket create success!")
try:
  s.bind(('127.0.0.1',6000))
except socket.error as msg:
  print(msg)
  sys.exit(1)
s.listen(10)

while True:
  conn, addr = s.accept()
  print("success")
  data = conn.recv(65535)
  conn.sendall(data.decode('utf-8'))
conn.close()
s.close()
启动服务器:
关于怎么在PyQt中使用socket远程操作服务器问题的解答就分享到这里了,希望以上内容可以对大家有一定的帮助,如果你还有很多疑惑没有解开,可以关注亿速云行业资讯频道了解更多相关知识。
免责声明:本站发布的内容(图片、视频和文字)以原创、转载和分享为主,文章观点不代表本网站立场,如果涉及侵权请联系站长邮箱:is@yisu.com进行举报,并提供相关证据,一经查实,将立刻删除涉嫌侵权内容。


