一、准备工作:
1、演示环境:
IP | 操作系统 | 主机名 | 部署软件包 |
192.168.0.120 | CentOS 7.7 x86_64 | zabbix-server | Nginx(nginx-1.16.1.tar.gz) CMake(cmake-3.15.3.tar.gz) Boost Library(boost_1_59_0.tar.gz) MySQL(mysql-5.7.27.tar.gz) Libzip(libzip-1.5.2.tar.xz) PHP(php-7.3.9.tar.xz) JDK(jdk-8u221-linux-x64.tar.gz) Zabbix(zabbix-4.2.6.tar.gz) |
2、关闭SELinux和firewalld
3、配置epel源
4、配置虚机时间同步
5、配置主机名
6、配置/etc/hosts文件:
# vim /etc/hosts --> 192.168.0.120 zabbix-server
7、下载所需软件包:
(1)Nginx:http://nginx.org/en/download.html
(2)CMake:https://cmake.org/download/
(3)Boost Library:http://www.boost.org/
(4)MySQL:https://dev.mysql.com/downloads/mysql/
(5)Libzip:https://libzip.org/download/
(6)PHP:https://www.php.net/downloads.php
(7)JDK:https://www.oracle.com/technetwork/java/javase/downloads/index.html
(8)Zabbix:https://www.zabbix.com/download/
二、搭建LNMP环境:
1、部署Nginx:
(1)安装开发环境:# yum -y groupinstall "Development Tools"
(2)安装依赖软件包:# yum -y install pcre-devel zlib-devel openssl-devel libxslt-devel gd-devel perl-devel perl-ExtUtils-Embed geoip-devel
(3)创建nginx用户和组:
# groupadd -r nginx
# useradd -g nginx -r -s /sbin/nologin nginx
# id nginx
(4)编译安装Nginx:
# tar -xf nginx-1.16.1.tar.gz -C /usr/src
# cd /usr/src/nginx-1.16.1
# ./configure --prefix=/usr/local/nginx --user=nginx --group=nginx --with-threads --with-file-aio --with-http_ssl_module --with-http_v2_module --with-http_realip_module --with-http_addition_module --with-http_xslt_module --with-http_image_filter_module --with-http_geoip_module --with-http_sub_module --with-http_dav_module --with-http_flv_module --with-http_mp4_module --with-http_gunzip_module --with-http_gzip_static_module --with-http_auth_request_module --with-http_random_index_module --with-http_secure_link_module --with-http_degradation_module --with-http_slice_module --with-http_stub_status_module --with-http_perl_module --with-mail --with-mail_ssl_module --with-stream --with-stream_ssl_module --with-stream_realip_module --with-stream_geoip_module --with-stream_ssl_preread_module --with-compat --with-pcre

# make && make install
(5)配置Nginx环境变量:
# vim /etc/profile.d/nginx.sh
export PATH=/usr/local/nginx/sbin:$PATH
# . /etc/profile.d/nginx.sh
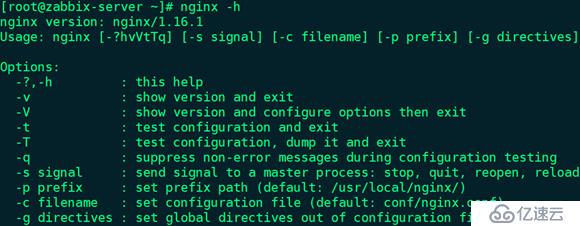
# nginx -v

# nginx -h
(6)启动Nginx:
# nginx -t
# nginx
# ps aux | grep nginx
# ss -tunlp | grep -w :80
(7)配置Nginx开机自启:
# vim /etc/rc.d/rc.local
/usr/local/nginx/sbin/nginx
# chmod +x /etc/rc.d/rc.local
(8)浏览器访问http://192.168.0.120

2、部署MySQL:
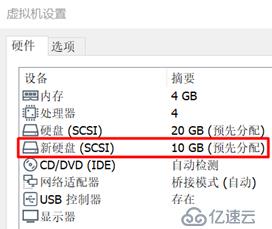
(1)关闭虚机,添加一块10G的新硬盘,用于存放MySQL数据:
(2)开启虚机,创建LVM逻辑卷,方便日后扩容:
a、磁盘分区:
# fdisk -l | grep /dev/sdb

# fdisk /dev/sdb --> n --> p --> 回车 --> 回车 --> 回车 --> t --> 8e --> p --> w
# partx -a /dev/sdb
备注:忽略错误提示“partx: /dev/sdb: error adding partition 1”
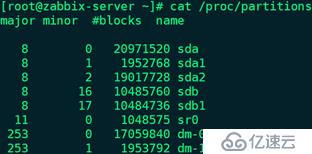
# cat /proc/partitions
b、创建PV:# pvcreate /dev/sdb1 # pvs
c、创建VG:# vgcreate mysqlvg /dev/sdb1 # vgs
d、创建LV:# lvcreate -l +100%FREE mysqlvg -n mysqldata # lvs
e、格式化LVM分区:# mke2fs -t ext4 /dev/mysqlvg/mysqldata
f、创建挂载点:# mkdir -pv /data
g、开机自动挂载:
# vim /etc/fstab --> /dev/mysqlvg/mysqldata /data ext4 defaults 0 0
h、挂载分区:# mount -a
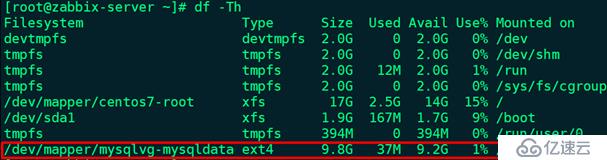
i、查看分区信息:
# mount | grep mysqldata

# df -Th
(3)安装依赖软件包:
# yum -y install gcc gcc-c++ make libxml2-devel ncurses-devel openssl openssl-devel zlib-devel bison-devel
(4)创建mysql用户和组:
# groupadd -r mysql
# useradd -g mysql -r -s /sbin/nologin mysql
# id mysql
(5)创建MySQL安装目录:# mkdir -pv /usr/local/mysql
(6)修改安装目录权限:# chown -R mysql.mysql /usr/local/mysql
(7)创建用于存放MySQL数据目录:# mkdir -pv /data/mysql
(8)修改数据目录权限:
# chown -R mysql.mysql /data/mysql
# chmod -R o-rx /data/mysql
(9)删除CentOS 7.7内置的MariaDB相关组件:
# rpm -qa | grep -i mariadb --> mariadb-libs-5.5.64-1.el7.x86_64
# rpm -e --nodeps mariadb-libs-5.5.64-1.el7.x86_64
如果之前安装过MySQL,先删除:# rpm -qa | grep -i mysql
如果存在/etc/my.cnf配置文件,先删除:# rm -rf /etc/my.cnf
(10)编译安装CMake:
# which cmake
# cmake --version
# tar -xf cmake-3.15.3.tar.gz -C /usr/src
# cd /usr/src/cmake-3.15.3
# ./bootstrap
# gmake && gmake install
# which cmake --> /usr/local/bin/cmake
# cmake --version

备注:MySQL 5.5版本之后,不再使用./configure,而是使用CMake
(11)解压Boost库:
# tar -xf boost_1_59_0.tar.gz -C /usr/local
# cd /usr/local
# mv boost_1_59_0 boost
备注:MySQL 5.7版本编译安装时需要Boost库支持,且建议Boost库版本为1.59.0
(12)编译安装MySQL:
# tar -xf mysql-5.7.27.tar.gz -C /usr/src
# cd /usr/src/mysql-5.7.27
# cmake . -DCMAKE_INSTALL_PREFIX=/usr/local/mysql \
-DMYSQL_DATADIR=/data/mysql \
-DMYSQL_UNIX_ADDR=/usr/local/mysql/mysql.sock \
-DMYSQL_TCP_PORT=3306 \
-DSYSCONFDIR=/etc \
-DDEFAULT_CHARSET=utf8 \
-DEXTRA_CHARSETS=all \
-DDEFAULT_COLLATION=utf8_general_ci \
-DWITH_ARCHIVE_STORAGE_ENGINE=1 \
-DWITH_MYISAM_STORAGE_ENGINE=1 \
-DWITH_INNOBASE_STORAGE_ENGINE=1 \
-DWITH_PARTITION_STORAGE_ENGINE=1 \
-DWITH_BLACKHOLE_STORAGE_ENGINE=1 \
-DWITH_PERFSCHEMA_STORAGE_ENGINE=1 \
-DWITH_LIBWRAP=0 \
-DENABLED_LOCAL_INFILE=1 \
-DWITH_DEBUG=0 \
-DWITH_BOOST=/usr/local/boost
# make && make install
备注:编译安装需要很长时间
(13)创建MySQL配置文件:
# vim /etc/my.cnf
[mysqld]
port=3306
socket=/usr/local/mysql/mysql.sock
datadir=/data/mysql
basedir=/usr/local/mysql
lower_case_table_names=1
character_set_server=utf8mb4
collation_server=utf8mb4_general_ci
innodb_file_per_table=1
skip_name_resolve=1
slow_query_log=1
slow_query_log_file=mysql-slow.log
symbolic-links=0
explicit_defaults_for_timestamp=1
server_id=1
sync_binlog=1
innodb_flush_log_at_trx_commit=1
log_bin=mysql-bin
log_bin_index=mysql-bin.index
binlog_format=mixed
[mysqld_safe]
log-error=/var/log/mysql.log
pid-file=/var/run/mysql.pid
(14)初始化MySQL数据库:
# /usr/local/mysql/bin/mysqld --defaults-file=/etc/my.cnf --initialize --user=mysql --basedir=/usr/local/mysql --datadir=/data/mysql
备注:
a、初始化前确保/data/mysql目录为空
b、MySQL 5.7版本初始化数据库时不再使用mysql_install_db,而是使用mysqld --initialize
c、参数--defaults-file=/etc/my.cnf要放在所有参数的第一位
d、会显示root@localhost用户的初始密码
(15)配置MySQL环境变量:
# vim /etc/profile.d/mysql.sh
export PATH=/usr/local/mysql/bin:$PATH
# . /etc/profile.d/mysql.sh
# mysql -V

# mysql --help | less
(16)通过mysql.server管理服务进程:
# cp /usr/local/mysql/support-files/mysql.server /etc/init.d/mysqld
# chmod +x /etc/init.d/mysqld
(17)配置MySQL开机自启:
# chkconfig --add mysqld
# chkconfig mysqld on
(18)启动MySQL:
# systemctl start mysqld.service
# systemctl status mysqld.service
# ps aux | grep mysqld
# ss -tunlp | grep -w :3306
# tail -100 /var/log/mysql.log
(19)配置MySQL安全向导:# mysql_secure_installation
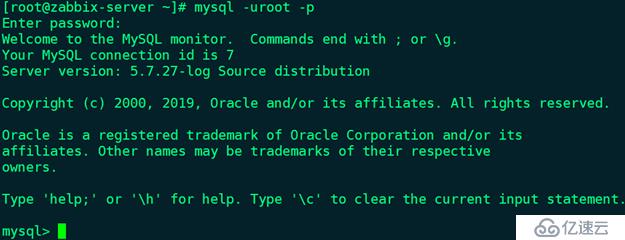
(20)登录MySQL,创建并授权'root'@'192.168.0.%'用户远程管理:
# mysql -uroot -p
mysql> create user 'root'@'192.168.0.%' identified by '123456';
mysql> grant all on *.* to 'root'@'192.168.0.%';
mysql> flush privileges;
3、部署PHP:
(1)安装依赖软件包:
# yum -y install gcc gcc-c++ make pcre-devel zlib-devel openssl openssl-devel libxml2-devel libjpeg-devel libpng-devel freetype-devel libmcrypt-devel expat-devel bzip2-devel curl-devel gmp-devel libc-client-devel recode-devel net-snmp-devel libtidy-devel readline-devel libxslt-devel libicu-devel
(2)创建www用户和组:
# groupadd -r www
# useradd -g www -r -s /sbin/nologin www
# id www
(3)编译安装Libzip:
# tar -xf libzip-1.5.2.tar.xz -C /usr/src
# cd /usr/src/libzip-1.5.2
# mkdir build
# cd build
# cmake ..
# make && make install
备注:
a、不编译安装Libzip,会提示“configure: error: Please reinstall the libzip distribution”
b、需要先编译安装CMake,之前编译安装MySQL时已经安装过
(4)修改ld.so.conf配置文件:
# vim /etc/ld.so.conf,新增如下代码:
/usr/local/lib64
/usr/local/lib
/usr/lib
/usr/lib64
# ldconfig -v
备注:不执行此步骤,在编译安装PHP时会提示“configure: error: off_t undefined; check your library configuration”
(5)编译安装PHP:
# tar -xf php-7.3.9.tar.xz -C /usr/src
# cd /usr/src/php-7.3.9
# ./configure --prefix=/usr/local/php --disable-rpath --enable-fpm --with-fpm-user=www --with-fpm-group=www --with-litespeed --enable-phpdbg --enable-phpdbg-webhelper --with-config-file-path=/usr/local/php/etc --with-config-file-scan-dir=/usr/local/php/etc/php.d --enable-sigchild --enable-libgcc --disable-ipv6 --enable-dtrace --with-libxml-dir --with-openssl --with-kerberos --with-pcre-regex --with-zlib --with-zlib-dir --enable-bcmath --with-bz2 --enable-calendar --with-curl --enable-exif --disable-fileinfo --with-pcre-dir --enable-ftp --with-openssl-dir --with-gd --with-jpeg-dir --with-png-dir --with-freetype-dir --with-gettext --with-mhash --enable-intl --enable-mbstring --enable-mbregex --with-mysqli=mysqlnd --with-mysql-sock=/usr/local/mysql/mysql.sock --enable-pcntl -with-pdo-mysql=mysqlnd --with-readline --with-recode --enable-shmop --with-snmp --enable-soap --enable-sockets --enable-sysvmsg --enable-sysvsem --enable-sysvshm --with-tidy --enable-wddx --with-xmlrpc --with-iconv-dir --with-xsl --enable-zip --with-libzip --enable-mysqlnd --with-pear
# make && make install
备注:编译安装需要很长时间
(6)创建php.ini配置文件:# cp /usr/src/php-7.3.9/php.ini-production /usr/local/php/etc/php.ini
(7)创建php-fpm.conf配置文件:# cp /usr/local/php/etc/php-fpm.conf.default /usr/local/php/etc/php-fpm.conf
备注:php-fpm,PHP FastCGI Process Manager,PHP FastCGI进程管理器,通过FastCGI方式,将PHP作为独立的服务运行
(8)创建并修改www.conf配置文件:
# cd /usr/local/php/etc/php-fpm.d
# cp www.conf.default www.conf
# vim www.conf
修改前 | 修改后 |
listen = 127.0.0.1:9000 | listen = 192.168.0.120:9000 |
(9)配置PHP环境变量:
# vim /etc/profile.d/php.sh
export PATH=/usr/local/php/sbin:/usr/local/php/bin:$PATH
# . /etc/profile.d/php.sh
# php -v

# php -h | less
# php-fpm -h
(10)通过php-fpm.service管理服务进程:# cp /usr/src/php-7.3.9/sapi/fpm/php-fpm.service /usr/lib/systemd/system/
(11)启动php-fpm:
# php-fpm -t
# systemctl start php-fpm.service
# systemctl status php-fpm.service
# ps aux | grep php-fpm
# ss -tunlp | grep 9000
# tail -100 /usr/local/php/var/log/php-fpm.log
(12)配置PHP开机自启:# systemctl enable php-fpm.service
4、Nginx整合PHP:
(1)修改nginx.conf配置文件:
# cd /usr/local/nginx/conf
# vim nginx.conf
worker_processes auto;
location / {
root html;
index index.php index.html index.htm;
}
location ~ \.php$ {
root html;
fastcgi_pass 192.168.0.120:9000;
fastcgi_index index.php;
fastcgi_param SCRIPT_FILENAME $document_root$fastcgi_script_name;
include fastcgi_params;
}
# nginx -t
# nginx -s reload
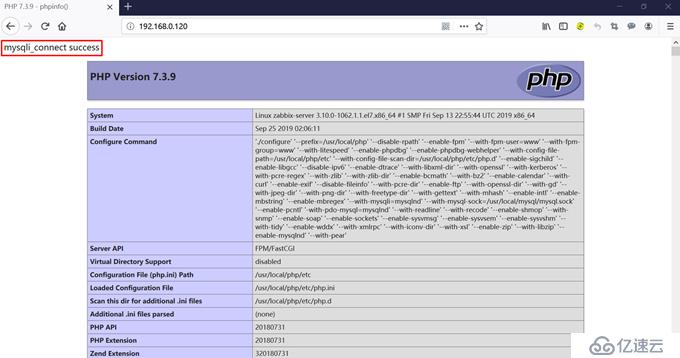
(2)创建测试页:
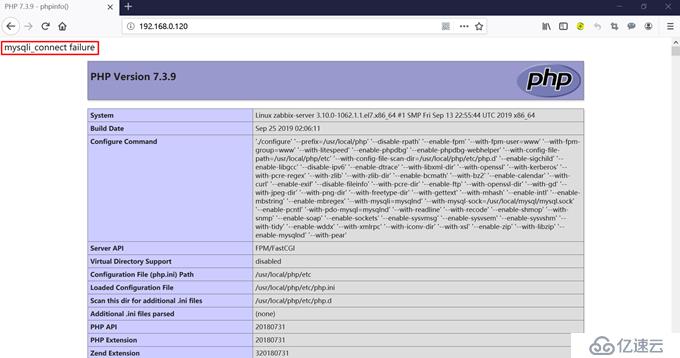
# vim /usr/local/nginx/html/index.php
<?php
$conn=mysqli_connect("192.168.0.120","root","123456");
if ($conn)
echo "mysqli_connect success";
else
echo "mysqli_connect failure";
mysqli_close();
phpinfo();
?>
备注:如果在新版本PHP中使用旧版本PHP的mysql_connect()函数连接MySQL,会提示“undefined function mysql_connect()”。从PHP 5.5版本开始,MySQL就不推荐使用mysql_connect()函数,属于废弃函数,PHP 7中已经彻底不支持,增加了mysqli_connect()函数。从某种意义上说,mysqli是mysql系统函数的增强版,更稳定、更高效、更安全,属于面向对象,用对象的方式操作驱动MySQL数据库。
(3)浏览器访问http://192.168.0.120
停止MySQL:# systemctl stop mysqld.service
刷新页面:
三、搭建Zabbix:
1、部署Zabbix:
(1)安装依赖软件包:
# yum -y install gcc gcc-c++ make net-snmp-devel libxml2-devel libcurl-devel libevent-devel zlib-devel openssl openssl-devel fping
(2)创建zabbix用户和组:
# groupadd -r zabbix
# useradd -g zabbix -r -s /sbin/nologin zabbix
# id zabbix
(3)解压JDK:
# java -version
# tar -xf jdk-8u221-linux-x64.tar.gz -C /usr/local
# cd /usr/local
# ln -sv jdk1.8.0_221 jdk
备注:编译安装Zabbix 4.2.6时如果启用--enable-java选项,需要配置JDK
(4)配置JDK环境变量:
# vim /etc/profile.d/jdk.sh
export JAVA_HOME=/usr/local/jdk
export CLASSPATH=.:$JAVA_HOME/lib/dt.jar:$JAVA_HOME/lib/tools.jar
export PATH=$JAVA_HOME/bin:$PATH
# . /etc/profile.d/jdk.sh
# echo $JAVA_HOME

# java -version

(5)查找mysql_config路径:# find / -name mysql_config --> /usr/local/mysql/bin/mysql_config
(6)编译安装Zabbix:
# tar -xf zabbix-4.2.6.tar.gz -C /usr/src
# cd /usr/src/zabbix-4.2.6
# ./configure --prefix=/usr/local/zabbix --enable-server --enable-proxy --enable-agent --enable-java --with-mysql=/usr/local/mysql/bin/mysql_config --with-libxml2 --with-net-snmp --with-zlib --with-libevent --with-openssl --with-libcurl
# make && make install
(7)配置Zabbix环境变量:
# vim /etc/profile.d/zabbix.sh
export PATH=/usr/local/zabbix/sbin:/usr/local/zabbix/bin:$PATH
# . /etc/profile.d/zabbix.sh
# ln -sv /usr/local/mysql/lib/libmysqlclient.so.20 /usr/lib64/libmysqlclient.so.20
备注:不执行此步骤,在执行# zabbix_server --version命令时会提示“zabbix_server: error while loading shared libraries: libmysqlclient.so.20: cannot open shared object file: No such file or directory”
# zabbix_server --version
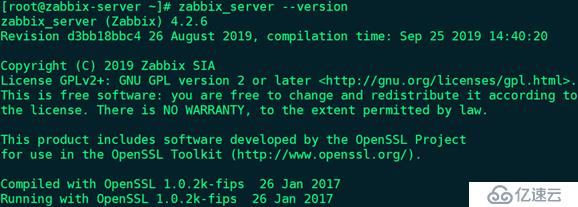
# zabbix_server -h | less
2、配置Zabbix:
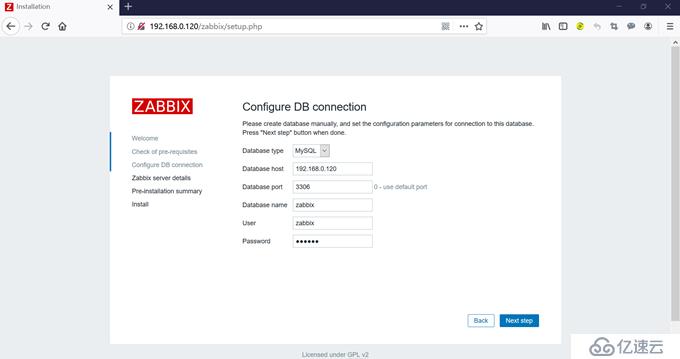
(1)登录MySQL,创建zabbix数据库和'zabbix'@'192.168.0.%'用户,并授权'zabbix'@'192.168.0.%'用户远程管理:
# mysql -uroot -p
mysql> create database zabbix character set utf8 collate utf8_bin;
mysql> create user 'zabbix'@'192.168.0.%' identified by '123456';
mysql> grant all on zabbix.* to 'zabbix'@'192.168.0.%';
mysql> flush privileges;
(2)初始化zabbix数据库:
mysql> use zabbix;
mysql> source /usr/src/zabbix-4.2.6/database/mysql/schema.sql
mysql> source /usr/src/zabbix-4.2.6/database/mysql/images.sql
mysql> source /usr/src/zabbix-4.2.6/database/mysql/data.sql
备注:SQL语句的导入顺序不能改变
(3)修改zabbix_server.conf配置文件:
# cd /usr/local/zabbix/etc
# cp zabbix_server.conf zabbix_server.conf.bak
# vim zabbix_server.conf
修改前 | 修改后 |
# ListenPort=10051 | ListenPort=10051 |
LogFile=/tmp/zabbix_server.log | LogFile=/usr/local/zabbix/zabbix_server.log |
# DBHost=localhost | DBHost=192.168.0.120 |
DBName=zabbix | 保持默认 |
DBUser=zabbix | 保持默认 |
# DBPassword= | DBPassword=123456 |
# DBSocket= | DBSocket=/usr/local/mysql/mysql.sock |
# DBPort= | DBPort=3306 |
# ListenIP=127.0.0.1 | ListenIP=192.168.0.120 |
# AlertScriptsPath=${datadir}/zabbix/alertscripts | AlertScriptsPath=/usr/local/zabbix/share/zabbix/alertscripts |
# ExternalScripts=${datadir}/zabbix/externalscripts | ExternalScripts=/usr/local/zabbix/share/zabbix/externalscripts |
# FpingLocation=/usr/sbin/fping | FpingLocation=/usr/sbin/fping |
# AllowRoot=0 | AllowRoot=0 |
# User=zabbix | User=zabbix |
(4)修改安装目录权限:# chown -R zabbix.zabbix /usr/local/zabbix
(5)启动zabbix_server:
# zabbix_server
# ps aux | grep zabbix_server
# ss -tunlp | grep 10051
# tail -100 /usr/local/zabbix/zabbix_server.log
(6)配置zabbix_server开机自启:
# vim /etc/rc.d/rc.local
/usr/local/zabbix/sbin/zabbix_server
# chmod +x /etc/rc.d/rc.local
(7)创建Zabbix网页存放目录:# mkdir -pv /usr/local/nginx/html/zabbix
(8)复制PHP文件至Zabbix网页存放目录:
# cp -a /usr/src/zabbix-4.2.6/frontends/php/* /usr/local/nginx/html/zabbix/
(9)修改Zabbix网页存放目录权限:# chown -R nginx.nginx /usr/local/nginx
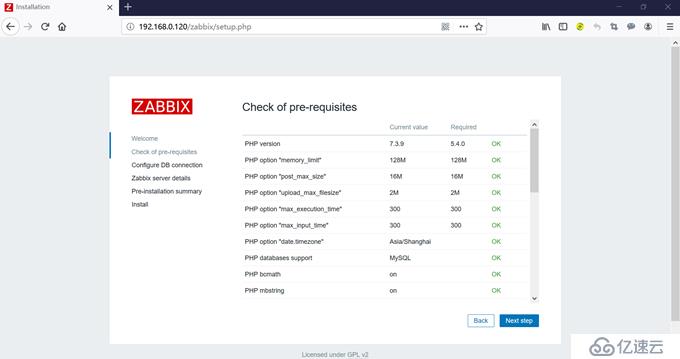
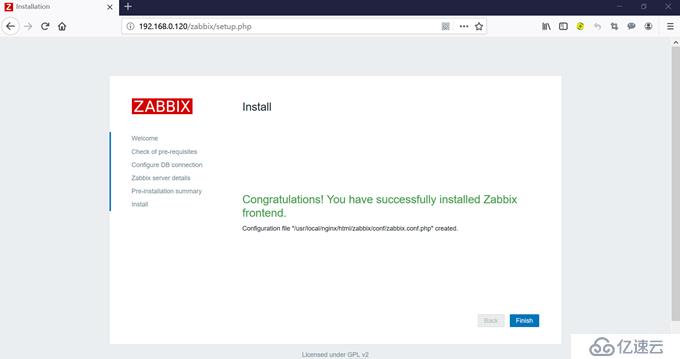
(10)浏览器访问http://192.168.0.120/zabbix

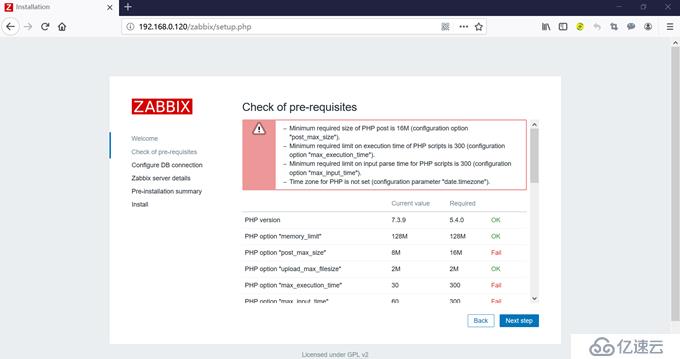
(11)修改php.ini配置文件:
# vim /usr/local/php/etc/php.ini
修改前 | 修改后 |
post_max_size = 8M | post_max_size = 16M |
max_execution_time = 30 | max_execution_time = 300 |
max_input_time = 60 | max_input_time = 300 |
;date.timezone = | date.timezone = Asia/Shanghai |
# systemctl restart php-fpm.service
(12)浏览器刷新页面,继续访问http://192.168.0.120/zabbix


备注:zabbix用户没有权限在nginx目录中创建文件
(13)按提示下载zabbix.conf.php文件
(14)将下载的zabbix.conf.php文件上传至/usr/local/nginx/html/zabbix/conf/目录
(15)修改zabbix.conf.php文件权限:# chown nginx.nginx /usr/local/nginx/html/zabbix/conf/zabbix.conf.php
(16)浏览器刷新页面,继续访问http://192.168.0.120/zabbix
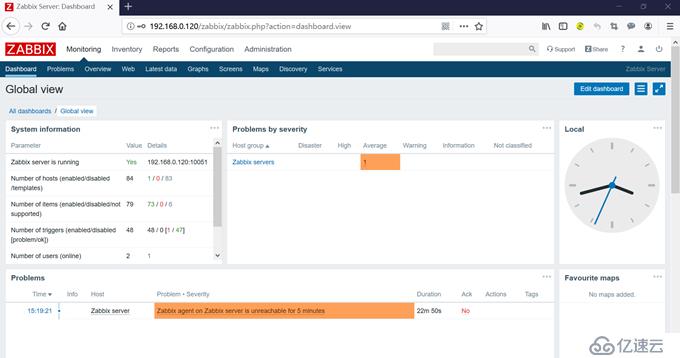
(17) 登录Zabbix,用户名Admin,密码zabbix:

(18)修改Admin用户默认密码:
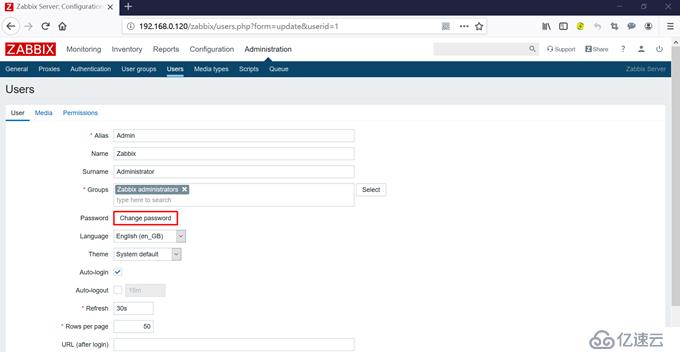
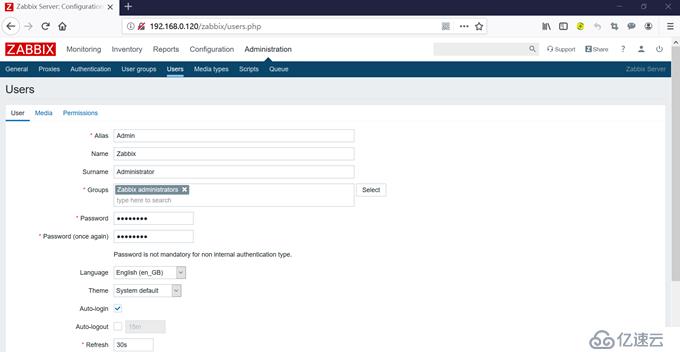
Administration --> Users --> Admin --> Change password --> 输入2次新密码root@123 --> Update
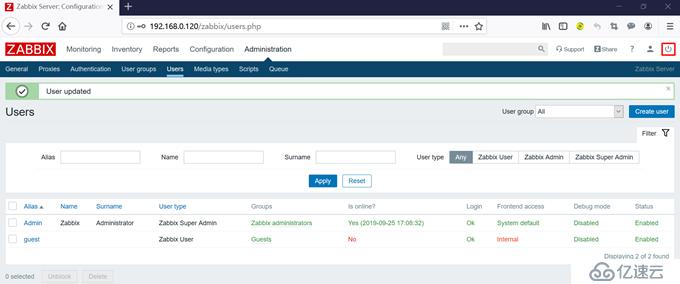
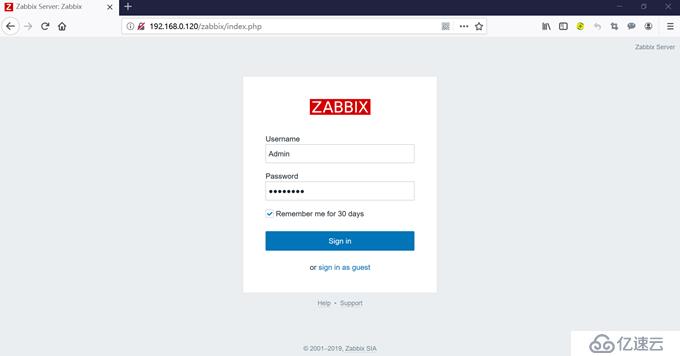
退出重新登录:
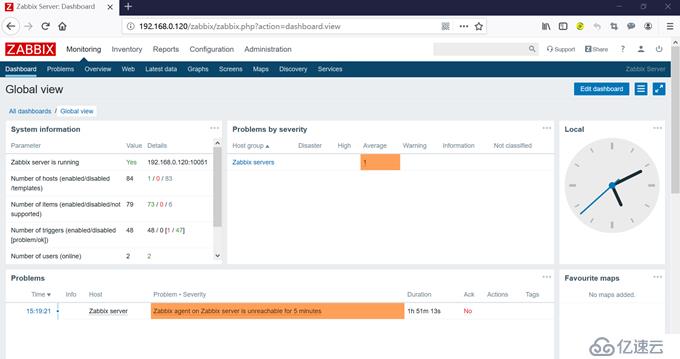
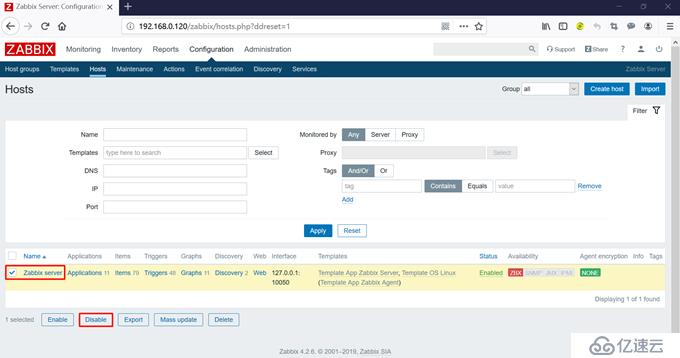
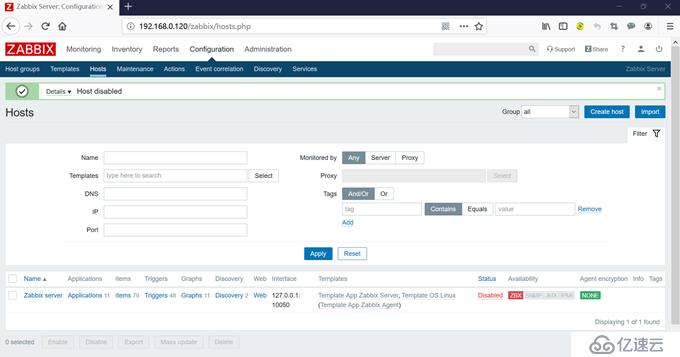
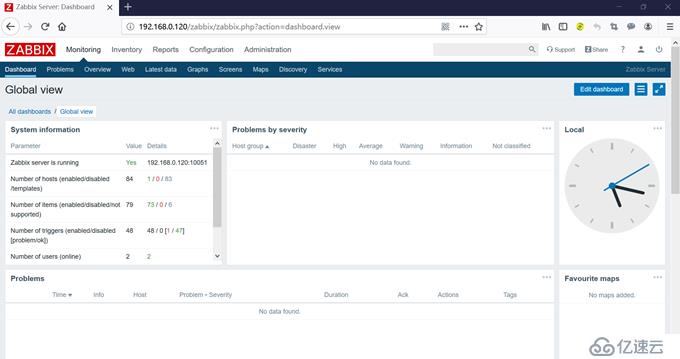
(19) Zabbix Server暂时停止对自身服务器状态监控:
Configuration --> Hosts --> 勾选Zabbix server --> Disable
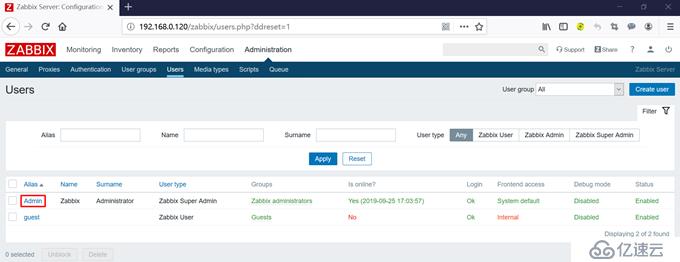
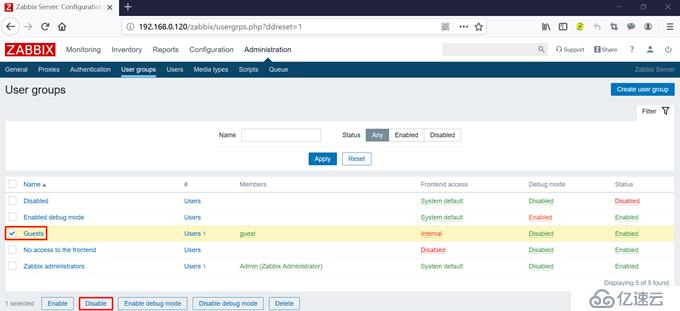
(20)禁用guest用户:
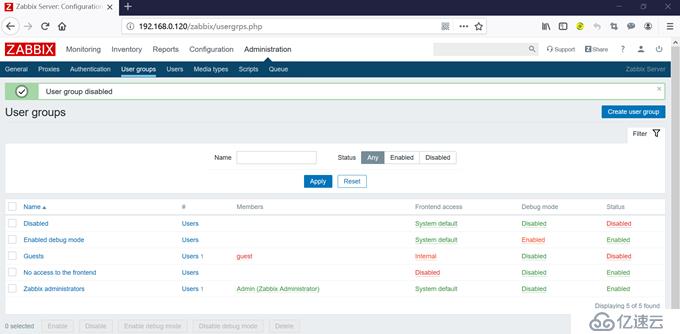
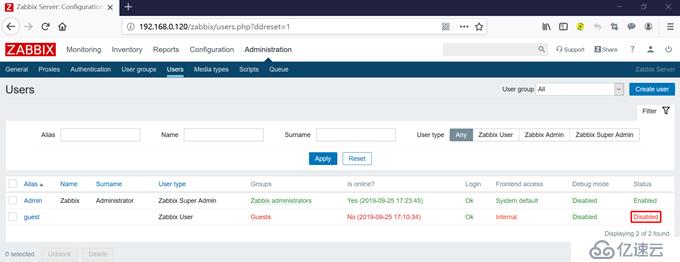
Administration --> User groups --> 勾选Guests组 --> Disable
Administration --> Users --> guest用户的状态已变为Disabled
免责声明:本站发布的内容(图片、视频和文字)以原创、转载和分享为主,文章观点不代表本网站立场,如果涉及侵权请联系站长邮箱:is@yisu.com进行举报,并提供相关证据,一经查实,将立刻删除涉嫌侵权内容。


