下文内容主要给大家带来ProxySQL亮点、安装、配置及测试等解析,这里所讲到的知识,与书籍略有不同,都是亿速云专业技术人员在与用户接触过程中,总结出来的,具有一定的经验分享价值,希望给广大读者带来帮助。
mysql_query_rules表中依据digest,match_pattern,client_addr等维度控制哪类语句可以缓存
rpm包下载地址
https://github.com/sysown/proxysql/releases 推荐rpm形式安装
Installing from source
Make sure you have installed the equivalent for each of these packages for your operating system:
automake
bzip2
cmake
make
gcc    #>4.4版本
gcc-c++
git
openssl
openssl-devel
patch
git clone https://github.com/sysown/proxysql.git
Go to the directory where you cloned the repo (or unpacked the tarball) and run:
make
sudo make install
Compilation time should be around a couple of minutes for the first time around. The configuration file will be found at /etc/proxysql.cnf afterwards.
在make这一步遇到了错误:
g++ -fPIC -c -o obj/ProxySQL_GloVars.oo ProxySQL_GloVars.cpp -std=c++11 -I../include -I../deps/jemalloc/jemalloc/include/jemalloc -I../deps/mariadb-client-library/mariadb_client/include -I../deps/libconfig/libconfig-1.4.9/lib -I../deps/re2/re2 -I../deps/sqlite3/sqlite3 -O2 -ggdb  -Wall
cc1plus: 错误:无法识别的命令行选项“-std=c++11”
make[1]: *** [obj/ProxySQL_GloVars.oo] 错误 1
make[1]: Leaving directory `/usr/local/src/proxysql-master/lib'
make: *** [build_lib] 错误 2
网查是由于gcc版本低导致,centos 6的yum源(以及epel源)都只能获取到4.4.7版本
包 gcc-4.4.7-17.el6.x86_64 已安装并且是最新版本
包 gcc-c++-4.4.7-17.el6.x86_64 已安装并且是最新版本
而centos7上为4.8版本换到centos7上,将上述软件安装/更新之后,make步骤完成,但是make install步骤又出了问题:
install -m 0755 src/proxysql /usr/local/bin
install -m 0600 etc/proxysql.cnf /etc
install -m 0755 etc/init.d/proxysql /etc/init.d
if [ ! -d /var/lib/proxysql ]; then mkdir /var/lib/proxysql ; fi
update-rc.d proxysql defaults
make: update-rc.d:命令未找到
make: *** [install] 错误 127
update-rc.d是ubuntu的自启动脚本管理软件,未成功安装不影响使用。
安装完成后,自动在/etc/init.d/proxysql增加服务管理脚本(需要把/usr/local/bin/加入\$PATH或者软链至 \$PATH目录下,脚本中直接用到proxysql命令)
配置文件/etc/proxysql.cnf和配置数据库文件/var/lib/proxysql/proxysql.db,如果存在 “proxysql.db”文件,则启动过程不解析proxysql.cnf文件;配置文件只在第一次启动的时候读取
官方推荐用admin interface方式
登陆admin interface:
mysql -uadmin -padmin -P6032 -h227.0.0.1
登陆成功后,可通过对main库(默认登陆后即在此库)的global_variables表中的
    admin-admin_credentials
    admin-mysql_ifaces
两个变量进行更改来修改登录认证
注意:admin interface对配置的存储是基于SQLite的,SQLite支持标准的SQL语法,与mysql也基本兼容。但是无法用use语句切换数据库,作者对use语句做了兼容(不报错),但是却没有实际效果。
两种方式,区别在于:
    1. 一种是在往mysql_servers表中添加server时就为其划分好hostgroup_id(例如0表示写组,1表示读组)
    2. 另一种往mysql_servers表中添加server时不区分hostgroup_id(例如全部设为0),然后通过mysql_replication_hostgroups表中的值,根据proxysql检测到的各server的read_only变量值来自动为后端server设置hostgroup_id

    这里强烈推荐用第一种方式:
因为第一种是完全由我们控制的;而第二种假如我们误将读server的read_only属性设置为0,则proxysql会将其重新分配到写组,这绝对是不期望的。MySQL [(none)]> select * from mysql_servers;
+--------------+--------------+------+--------+--------+-------------+-----------------+---------------------+---------+----------------+---------+
| hostgroup_id | hostname | port | status | weight | compression | max_connections | max_replication_lag | use_ssl | max_latency_ms | comment |
+--------------+--------------+------+--------+--------+-------------+-----------------+---------------------+---------+----------------+---------+
| 0 | 192.168.1.21 | 3307 | ONLINE | 1 | 0 | 1000 | 0 | 0 | 0 | |
| 1 | 192.168.1.10 | 3306 | ONLINE | 1 | 0 | 1000 | 0 | 0 | 0 | |
| 1 | 192.168.1.4 | 3306 | ONLINE | 1 | 0 | 1000 | 0 | 0 | 0 | |
+--------------+--------------+------+--------+--------+-------------+-----------------+---------------------+---------+----------------+---------+
#proxysql server的IP为:192.168.1.34配置好一主(db1,hostgroup0)两从(db2和db3,hostgroup1) ,并且在'mysql_query_rules'表中增加一条路由规则
insert into mysql_query_rules (rule_id,active,match_digest,destination_hostgroup,apply) values (10,1,'^SELECT',1,1)意为所有以select开头的语句路由到hostgroup1,其余语句路由到hostgroup0
在两台server的mysql-client分别连接至proxysql的6033端口,执行'select @@hostname'观察其分配到的后端server
以mysql -e的形式执行该命令则能够看到请求在两台读server之间变换
[root@db1 ~]#  mysql -udm -p'dm' -h292.168.1.34 -P6033 -e "select @@hostname" -s -N.
db1
[root@db1 ~]#  mysql -udm -p'dm' -h292.168.1.34 -P6033 -e "select @@hostname" -s -N
db5
[root@db1 ~]#  mysql -udm -p'dm' -h292.168.1.34 -P6033 -e "select @@hostname" -s -N
db5
[root@db1 ~]#  mysql -udm -p'dm' -h292.168.1.34 -P6033 -e "select @@hostname" -s -N
db1
[root@db1 ~]#  mysql -udm -p'dm' -h292.168.1.34 -P6033 -e "select @@hostname" -s -N
db1
[root@db1 ~]#  mysql -udm -p'dm' -h292.168.1.34 -P6033 -e "select @@hostname" -s -N
db5
再实验下mysql -e跟多条语句会如何
[root@db1 ~]# mysql -udm -p'dm' -P6033 -h292.168.1.34 -e "select @@hostname;select @@hostname;select @@hostname" -s -N
dm-web5
dm-web5
dm-web5由以上结果可能会猜想并可印证:在一个client的一个链接周期内,所有query路由到同一台后端。
但是:这只是个假象(是因为正好用到了select @ 语句。按作者所说: sends a query that implicitly disables multiplexing. For example, if you run "SELECT @a" , ProxySQL will disable multiplexing for that client and will always use the same backend connection.),proxysql的负载方式目前仅为加权轮询一种(经过作者确认的),并无其他机制。
对上述架构用sysbench做只读测试,过程中关闭(service mysqld stop)某一台server (测试均在mysql-monitor_enabled=false的前提下)
测试命令
alias sysbench_test='sysbench --test=/usr/share/doc/sysbench/tests/db/oltp.lua\
--mysql-user=dm --mysql-password='dm' --mysql-port=6033\
--mysql-host=192.168.1.34 --oltp-tables-count=16\
--num-threads=8 run --oltp-skip-trx=on --oltp-read-only=on'
结果如下
[root@db3 ~]# sysbench_test
sysbench 0.5:  multi-threaded system evaluation benchmark

Running the test with following options:
Number of threads: 8
Random number generator seed is 0 and will be ignored

Threads started!

ALERT: mysql_drv_query() for query 'SELECT c FROM sbtest16 WHERE id=4964' failed: 2013 Lost connection to MySQL server during query
ALERT: mysql_drv_query() for query 'SELECT c FROM sbtest12 WHERE id=4954' failed: 2013 Lost connection to MySQL server during query
ALERT: mysql_drv_query() for query 'SELECT c FROM sbtest7 WHERE id BETWEEN 4645 AND 4645+99' failed: 2013 Lost connection to MySQL server during query
不是说好的自动重连/重执行吗?为毛报错了呢(atlas有同样问题)
但是两者通过上述的sysbench命令所抛出的错误经过多次比较,有不同:
proxysql报错就一种
    failed: 2013 Lost connection to MySQL server during query
atlas报错则是两种
    failed: 2013 Lost connection to MySQL server during
    failed: 1317 Query execution was interrupted
是不是说明re-execute有效呢?(no,其实这个思路就不对)测试方法错了:其实关闭后端mysql服务来测试“reconnect”特性应该说从本质上就是不对的,mysql正常关闭会kill掉其上的所有processlist,我们可以用mysql-client来做一些验证
mysql> select @@hostname;
+------------+
| @@hostname |
+------------+
| db1        |
+------------+
1 row in set (0.00 sec)
**通过别的tty重启该mysql**
mysql> select @@hostname;
ERROR 2006 (HY000): MySQL server has gone away
No connection. Trying to reconnect...
Connection id:    4
Current database: *** NONE ***
+------------+
| @@hostname |
+------------+
| db1        |
+------------+
1 row in set (0.00 sec)
可以看到mysql-client是具有重连(reconnect)功能的,然后我们来做一个kill掉mysql-client线程(也就是mysql在关闭时会kill掉所有线程)的操作
mysql> select @@hostname;
+------------+
| @@hostname |
+------------+
| db1        |
+------------+
1 row in set (0.00 sec)
**在mysql服务端查询并kill掉这个链接**
mysql> select @@hostname;
ERROR 2013 (HY000): Lost connection to MySQL server during query
mysql> 我们看到了之前sysbenche测试过程中关闭一台从库时的报错。也就是说这个场景下这个报错不是proxysql的‘reconnect’机制的问题,倒更像是‘re-execute’机制的问题。而kill操作应该理解为是mysql“主动”的动作,而非“异常”,所以这就不符合proxysql 的"re-execute"特性了,故而会报错。
应该换一种方式来进行这个测试:
模拟网络层无法通信的异常
我们在两台slave上通过iptables阻断peoxysql到本机的3306端口来模拟无法链接和链接中断异常
在sysbench开始之后再重启iptables已经建立的链接会被保留,所以新规则要放到第一条的位置
-A INPUT -s 192.168.1.34 -p tcp -m tcp --dport 3306 -j DROP
首先 :启动sysbench只读测试
然后 :在测试结束前,修改db1的iptables,禁止来自proxysql的请求进入
然后 :观察sysbench的输出和proxysql.log的输出
结果 :sysbench等待很长时间,依然无法完成,同时,proxysql也不会把db1标记为SHUNNED
proxysql.log输出:
2016-09-02 11:37:54 MySQL_Session.cpp:49:kill_query_thread(): [WARNING] KILL QUERY 133 on 192.168.1.4:3306
2016-09-02 11:37:54 MySQL_Session.cpp:49:kill_query_thread(): [WARNING] KILL QUERY 136 on 192.168.1.4:3306
2016-09-02 11:37:54 MySQL_Session.cpp:49:kill_query_thread(): [WARNING] KILL QUERY 135 on 192.168.1.4:3306
2016-09-02 11:37:54 MySQL_Session.cpp:49:kill_query_thread(): [WARNING] KILL QUERY 137 on 192.168.1.4:3306
2016-09-02 11:37:54 MySQL_Session.cpp:49:kill_query_thread(): [WARNING] KILL QUERY 138 on 192.168.1.4:3306
2016-09-02 11:37:54 MySQL_Session.cpp:49:kill_query_thread(): [WARNING] KILL QUERY 134 on 192.168.1.4:3306
可以看到在mysql-default_query_timeout=30000,30s之后proxysql确实kill了超时的语句。
30s这个时间可以通过执行‘service iptables restart’的时间和proxysql.log里日志的时间来判定,这个设置30s是有效的
然后,直接对后端node(db1)进行同样的测试,发现结果是一样的,sysbench等待很长时间依然无法完成也无报错。
从这一点似乎可以判定在这个测试方法下,未达到预期结果的原因可能不在proxysql,而在sysbench本身。
通过对重启iptables之后的通信进行抓包(分别对针对proxysql和mysql在这个测试场景下进行抓包),命令如下:
~]# date; service iptables restart; tcpdump -i em2 host 192.168.1.35 and port 3306 and host not 192.168.1.10 -w /tmp/sysbench-proxysql-network-issue.pacp
~]# date; service iptables restart; tcpdump -i em2 host 192.168.1.34 and port 3306 and host not 192.168.1.10 -w /tmp/sysbench-proxysql-network-issue.pacp
发现,sysbench“一直”在重传由于iptables新规则而无法返回的几个请求,所以就成了“无穷尽等待的样子” (atlas 在这个场景下有同样问题)
照理说,proxysql kill掉了一些查询,会返回给sysbench错误,但为什么sysbench并未将错误展示出来呢(可能是因为re-execute机制)
最后,通过跟作者沟通,发现是由于没开启monitor模块,导致proxysql无法检测到后端出了什么类型的错误,也就无法执行对应各种后端错误的一些操作(之前我是特意关掉了monitor模块)
prepare语句的支持好多框架用prepare语句来避免SQL注入等安全问题,同时能在MySQL解析查询方面降低一些开销,所以对于prepare语句支持与否也很重要
首先要从MySQL协议层面了解prepare语句,分为两种(参考)
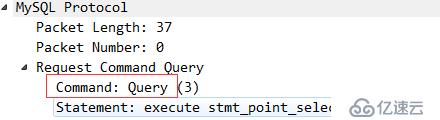
- Prepared Statements in Application Programs
或者称为BINARY protocol
抓包分析一次prepare,set,execute过程,可以观察到,客户端发送的是COM_STMT_PREPARE


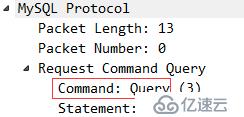
- Prepared Statements in SQL Scripts
或者称为TEXT protocol
抓包分析一次prepare,set,execute过程,可观察到客户端发送的是COM_QUERY 
关于prepare语句,作者给出的回复和计划如下:
这是我在实验1.2.1版本时跟作者的沟通。现在已经发布1.3.5了,从1.3版本开始,两种协议都支持了。但是在设置字符集方面,对于binary protocol 的prepare set names xxx和普通query(set names 'utf8' collate 'utf8_general_ci')(注意加了校对规则,不加校对规则可以)语句还无法正确处理(例如,php的laravel框架默认就是以第一种形式设置字符集)。
修正:经测试1.3.7版本,以上两prepare语句的小bug都已解决
MySQL supports two type of prepared statements:
using API
using SQL Further details here
SQL support currently not supported either, because PREPARE doesn't disable multiplexing, so it is possible that ProxySQL sends PREPARE in a connection, and EXECUTE into another.SQL support will be fixed in v1.2.3 , see #684 .
API support is planned in ProxySQL 1.3 .
首先来精确理解一下这两个词,依作者回复
They are very related to each other
Connection poolis a cache of connections that can be reused.Multiplexingis a technique to reuse these connections.
后期逐渐了解到了proxysql的multiplexing。连接池是一个共享的池子里面有跟后端创建好的一些连接,一个服务端脚本的执行过程中可能有多次sql请求:
很显然,对于连接池的使用效率上来说,理论上多数情况下proxysql的方式会更加高效并且与DB间维护的链接数量会更少
测试场景:
10条`select * from test.test_table`,10条`select @@hostname`;
ProxySQL/Atlas IP 192.168.1.35;两个读节点IP分别为192.168.1.37和192.168.1.38;
每次测试完之前重启ProxySQL/Atlas;
分两次测试,第一次测试脚本如下(每条命令一次连接)
!#/bin/sh
for i  in {1..10};do
    mysql -uuser -p'passwd' -P6033 -h292.168.1.35 -e "select @@hostname;"    #select @xxx,会禁用multiplexing
done
for i  in {1..10};do
    mysql -uuser -p'passwd' -P6033 -h292.168.1.35 -e "select id from test.test_table;"    #普通查询
done
第二次测脚本如下(一次连接,执行所有命令)
for i in {1..10};do
    query1 += 'select @@hostname;'    #select @xxx,会禁用multiplexing
    query2 += 'select id from test.test_table;'    #普通查询
done
echo $query1$query2 | mysql -uuser -p'passwd' -P6033 -h292.168.1.35
对ProxySQL进行测试分析
通过tcpdump抓包wireshark分析,通过ProxySQL对20条查询的路由情况及其和后端MySQL之间的建立连接情况(通过ProxySQL上的原端口号)来分析连接池和禁用multiplexing的情况。结果汇总如下
第一次测试(每条命令一次连接)
select @xxx          #会禁用multiplexing
                     1.35源端口
    1.35---->1.37    42094 42096 42097 42099 42102    (转发5次)
    1.35---->1.38    37971 37974 37976 37977 37979    (转发5次)

普通查询
                     1.35源端口
    1.35---->1.37    42105    (转发3次)
    1.35---->1.38    37980    (转发7次)
第二次测试(一次连接,执行所有命令)
select @xxx          #会禁用multiplexing
                     1.35源端口
    1.35---->1.37             (转发0次)
    1.35---->1.38    37817    (转发10次)

普通查询
                     1.35源端口
    1.35---->1.37             (转发0次)
    1.35---->1.38    37817    (转发10次)
对比来看Atlas的分时分析
第一次测试(每条命令一次连接)
select @xxx
                     1.35源端口
    1.35---->1.37                                     (转发0次)
    1.35---->1.38    38405 38407 38409 38411 38413    (转发10次)
                     38415 38417 38419 38421 38423
普通查询
                     1.35源端口
    1.35---->1.37                                     (转发0次)
    1.35---->1.38    38385 38387 38389 38391 38393    (转发10次)
                     38395 38397 38399 38401 38403
第二次测脚本如下(一次连接,执行所有命令)
select @xxx
                     1.35源端口
    1.35---->1.37    42435    (转发5次)
    1.35---->1.38    38312    (转发5次)

普通查询
                     1.35源端口
    1.35---->1.37    42435    (转发5次)
    1.35---->1.38    38312    (转发5次)
由上面测试分析结果可以明显的看到
ProxySQL的负载均衡策略是基于权重的轮询,但并不是严格的逐条轮询。而且可以看到在一次连接之内:由于某些语句(select @xx 或者prepare语句)导致ProxySQL自动关闭multiplexing之后,在本次链接之后的所有语句都会被路由到同一台MySQL

atlas做的仅仅是轮询转发,他不会去区分查询类型(例如有些查询是要路由到后端唯一的MySQL)
而且,在`第一次测试(每条命令一次连接)`中,atlas将所有的20条请求都路由到了1.38这台MySQL,并且每次都要新建连接(并没有用到其连接池)可以主动
来看一下其相关参数:
| mysql-monitor_enabled                  | true                            |
| mysql-monitor_history                  | 600000                          |
| mysql-monitor_connect_interval         | 120000                          |
| mysql-monitor_connect_timeout          | 200                             |
| mysql-monitor_ping_interval            | 60000                           |
| mysql-monitor_ping_max_failures        | 3                               |
| mysql-monitor_ping_timeout             | 100                             |
这两种检测的区别,据作者回复和抓包分析,总结如下:
Ping is done using mysql_ping()
    通过抓包分析,是通过现有的链接(连接池中)发送一个Request Ping语句
Connect is done using mysql_real_connect()
    这是一个客户端到云服务器建立链接,登录,退出登录,关闭链接的完整过程
这两个函数的返回值不同,可以帮助proxysql理解与后端链接除了哪些问题。
模拟场景,验证以上各设置并加深理解其故障检测机制:
两个前提
修改web1 MySQL配置文件中max_connections = 3;重启web1 MySQL,在其他tty打开几个MySQL链接以确保proxysql无法链接该MySQL。同时在proxysql server上打开抓包功能tcpdump -i em2 host 192.168.1.4 and port 3306 -w /tmp/web_shun.pcap,然后通过wireshark对比上面各值进行分析。
附件:数据包文件
通过分析可验以以下设置的有效性
mysql-monitor_connect_interval
mysql-monitor_ping_interval
mysql-monitor_ping_max_failures
mysql-shun_recovery_time_sec
mysql-ping_interval_server_msec
可以被动
被动就是将全局变量‘mysql-monitor_enabled’置为false,这种情况下,后端server故障后,proxysql不会主动探知,而是在有请求被“正常”路由到该server之后才会在runtime层更改该server状态为‘SHUNNED’ 或者重新变为‘ONLINE’。这个过程,应用无感知(表现为mysql-client命令和sysbench均无报错)
相关变量为
| mysql-shun_on_failures                 | 5                               |
| mysql-shun_recovery_time_sec           | 60                              |
| mysql-query_retries_on_failure         | 1                               |
| mysql-connect_retries_on_failure       | 5                               |
| mysql-connect_retries_delay            | 1                               |
| mysql-connection_max_age_ms            | 0                               |
| mysql-connect_timeout_server           | 1000                            |
| mysql-connect_timeout_server_max | 10000 |###七、关于proxysql和mysql中的最大连接数
首先明确下MySQL中的最大连接数由max_connections变量控制,proxysql中的最大连接数有两个方面的设置mysql_users.max_connections和mysql_servers.max_connections
下面就直接说下我的结论 摘自我github上的issue
- if the
mysql_servers.max_connectionsis reached, some of the connections will wait until themysql-connect_timeout_server_maxis reached. then proxysql will return error messageSQLSTATE[HY000]: General error: 9001 Max connect timeout reached while reaching hostgroup 1 after 10000ms.- if the
mysql_users.max_connectionsis reached, then the client will see the error message1040: Too many connections- If backend's global variable 'max_connections' is reached and proxysql has no
ConnFreewith the backend, then client can accomplish the connection with proxysql but all queries will returnERROR 1040 (#HY00): Too many connections, and the monitor will consider this backend isshunand will be loged to the proxysql.log
###八、据我所知的bug和不足
bug:
SQLSTATE[HY000]: General error: 2057 A stored procedure returning result sets of different size was called. This is not supported by libmysqlset names xxx语句还不能有效处理set names xxx collate xxxx还不能有效处理###总结
稳定性方面:目前我们已经部分业务切换到了ProxySQL上,运行一直稳定,未遇到cpu负载高或者占用内存多等情况。
运维/DBA友好:借助于ProxySQL的错误日志,我们发现了之前没注意到的一些SQL问题(如主键重复类的问题等)。还通过stats库里的相关表定位了一些问题。
性能方面:也强于atlas(参见文章)
个人觉得,解决掉上述几点bug和不足的话(且不说可能会出现的其他feature),ProxySQL就会更加强大和完美。
对于以上关于ProxySQL亮点、安装、配置及测试等解析,如果大家还有更多需要了解的可以持续关注我们亿速云的行业推新,如需获取专业解答,可在官网联系售前售后的,希望该文章可给大家带来一定的知识更新。
免责声明:本站发布的内容(图片、视频和文字)以原创、转载和分享为主,文章观点不代表本网站立场,如果涉及侵权请联系站长邮箱:is@yisu.com进行举报,并提供相关证据,一经查实,将立刻删除涉嫌侵权内容。


