小编给大家分享一下canvas小画板之平滑曲线的实现案例,相信大部分人都还不怎么了解,因此分享这篇文章给大家参考一下,希望大家阅读完这篇文章后大有收获,下面让我们一起去了解一下吧!
功能需求
项目需求:需要实现一个可以自由书写的小画板
简单实现
对于熟悉canvas的同学来说,这个需求很简单,大致逻辑如下:
1)监听事件pointerdown,pointermove,pointerup
2)标记是否拖拽画线模式变量 isDrawing,在down事件时置为true,up的时候置为false
3)使用canvas的api,设置线条样式,调用绘制线条接口lineTo方法
短短几十行代码就能实现:
<!doctype html>
<html>

<head>
    <meta charset=utf-8>
    <style>
        canvas {
            border: 1px solid #ccc
        }

        body {
            margin: 0;
        }
    </style>
</head>

<body style="overflow: hidden;background-color: rgb(250, 250, 250);touch-action: none;">
    <canvas id="c" width="1920" height="1080"></canvas>
    <script>
        var el = document.getElementById('c');
        var ctx = el.getContext('2d');
        //设置绘制线条样式
        ctx.strokeStyle = 'red';
        ctx.lineWidth = 1;
        ctx.lineJoin = 'round';
        ctx.lineCap = 'round';
        var isDrawing;//标记是否要绘制
        //存储坐标点
        let lastX, lastY;
        document.body.onpointerdown = function (e) {
            console.log('pointerdown');
            isDrawing = true;
            lastX = e.clientX;
            lastY = e.clientY;
        };
        document.body.onpointermove = function (e) {
            console.log('pointermove');
            if (isDrawing) {
                draw(e.clientX, e.clientY, lastX, lastY);
            }
            lastX = e.clientX, lastY = e.clientY;
        };
        document.body.onpointerup = function (e) {
            if (isDrawing) {
                draw(e.clientX, e.clientY, lastX, lastY);
            }
            lastX = e.clientX, lastY = e.clientY;
            isDrawing = false;
        };

        function draw(x, y, lastX, lastY) {
            ctx.beginPath();
            ctx.moveTo(lastX, lastY);
            ctx.lineTo(x, y);
            ctx.stroke();
        }
    </script>
</body>
</html>
实现效果如下图:
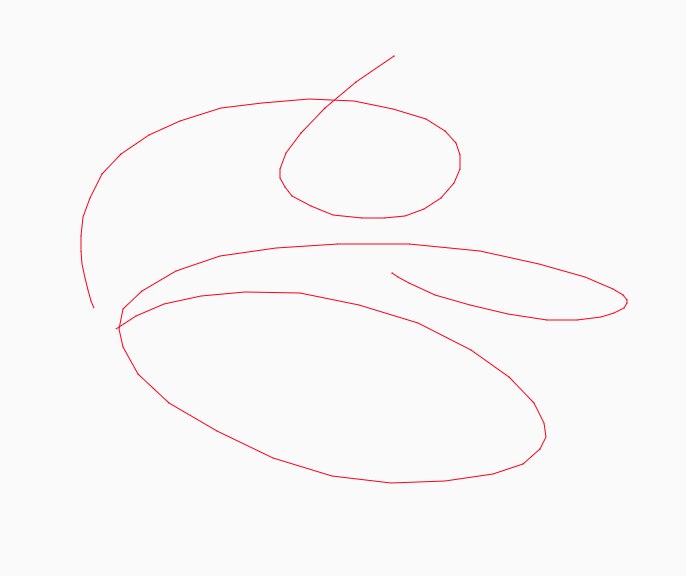
以上就简单的实现了画板功能,如果要求不高的用户可以使用,但一旦遇到有点要求的用户就无法交付这种产品,仔细看是线条折线感太强。
为什么会有折线感呢?
主要原因:
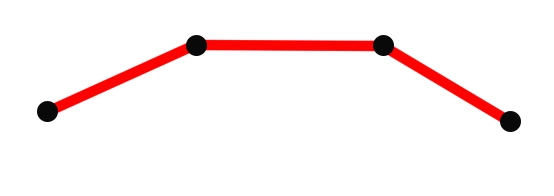
我们调用的api方法lineTo是两点连线也就是直线
浏览器对鼠标事件mousemove的采集是有采集频率的,并不是每个鼠标移动经过的每一个像素点都会触发事件。
当鼠标移动的越快,那么两点之间的间隔就越远,那么折线感就更明显。
如何能绘制平滑的曲线?
canvas提供的api中是有现成接口的,贝塞尔系列的接口就能满足我们的要求,接下来我们讲一下使用二次贝塞尔曲线绘制平滑曲线。
quadraticCurveTo(cpx,cpy,x,y)
二次贝塞尔曲线接口需要四个参数,cpx,cpy是曲线的控制点,x,y是曲线终点。
有人问那曲线的起点在哪里?其实曲线的起点取决于上一操作状态,可以是moveTo的位置,或者是lineTo的位置,或者是贝塞尔的终点。
那么怎么调用quadraticCurveTo,参数怎么传呢?
我们需要找出关键位置,直接用例子告诉大家吧
1)假如我们用鼠标采集到ABCDEF六个点
2)取前面三个点ABC计算,BC的中点B1,以A为起点,B为控制点,B1为终点,那么利用quadraticCurveTo可以绘制出这样一条贝塞尔曲线

3)接下来计算CD的中点C1,以B1为起点,C为控制点,C1为终点,那么利用quadraticCurveTo可以绘制出这样一条贝塞尔曲线
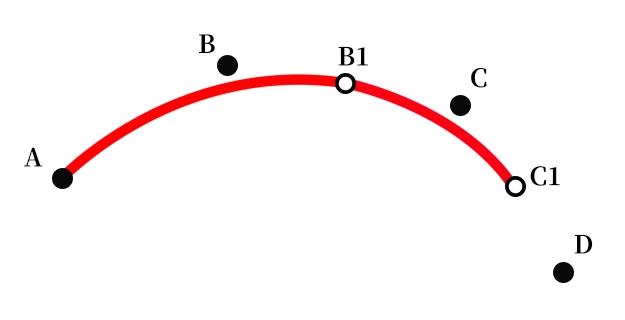
4)以此类推,当到了最后一个点时以D1为起点,E为控制点,F为终点,结束贝塞尔绘制。

根据算法进行代码改造
OK我们介绍了具体算法的影响,那用该算法对我们前面的代码进行改造:
<!doctype html>
<html>
<head>
<meta charset=utf-8>
<style>
canvas {
border: 1px solid #ccc
}
body {
margin: 0;
}
</style>
</head>
<body style="overflow: hidden;background-color: rgb(250, 250, 250);touch-action: none;">
<canvas id="c" width="1920" height="1080"></canvas>
<script>
var el = document.getElementById('c');
var ctx = el.getContext('2d');
//设置绘制线条样式
ctx.strokeStyle = 'red';
ctx.lineWidth = 1;
ctx.lineJoin = 'round';
ctx.lineCap = 'round';
var isDrawing;//标记是否要绘制
//存储坐标点
let points = [];
document.body.onpointerdown = function (e) {
console.log('pointerdown');
isDrawing = true;
points.push({ x: e.clientX, y: e.clientY });
};
document.body.onpointermove = function (e) {
console.log('pointermove');
if (isDrawing) {
draw(e.clientX, e.clientY);
}
};
document.body.onpointerup = function (e) {
if (isDrawing) {
draw(e.clientX, e.clientY);
}
points = [];
isDrawing = false;
};
function draw(mousex, mousey) {
points.push({ x: mousex, y: mousey });
ctx.beginPath();
let x = (points[points.length - 2].x + points[points.length - 1].x) / 2,
y = (points[points.length - 2].y + points[points.length - 1].y) / 2;
if (points.length == 2) {
ctx.moveTo(points[points.length - 2].x, points[points.length - 2].y);
ctx.lineTo(x, y);
} else {
let lastX = (points[points.length - 3].x + points[points.length - 2].x) / 2,
lastY = (points[points.length - 3].y + points[points.length - 2].y) / 2;
ctx.moveTo(lastX, lastY);
ctx.quadraticCurveTo(points[points.length - 2].x, points[points.length - 2].y, x, y);
}
ctx.stroke();
points.slice(0, 1);
}
</script>
</body>
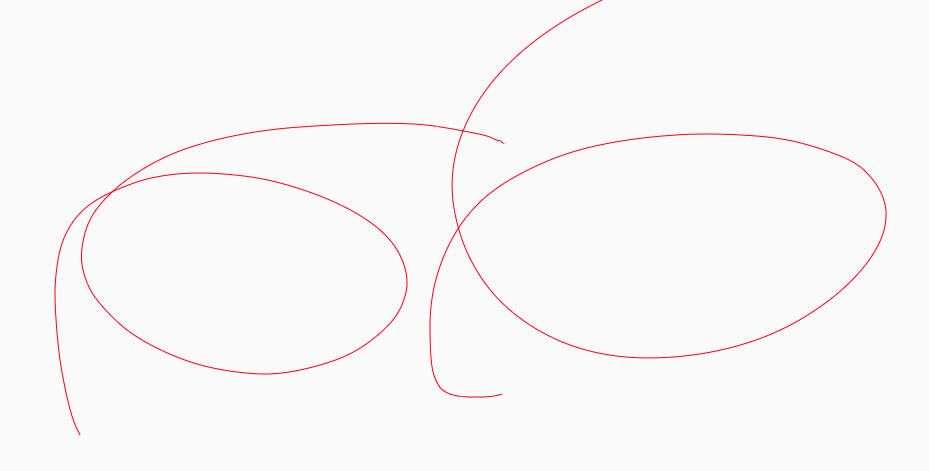
</html>在原有基础上我们用了一个数组points保存鼠标经过的点,根据算法可知绘制贝塞尔曲线至少要用三个点,绘制过程中维护points数组。
实现效果如下,可见平滑了很多!
以上是“canvas小画板之平滑曲线的实现案例”这篇文章的所有内容,感谢各位的阅读!相信大家都有了一定的了解,希望分享的内容对大家有所帮助,如果还想学习更多知识,欢迎关注亿速云行业资讯频道!
免责声明:本站发布的内容(图片、视频和文字)以原创、转载和分享为主,文章观点不代表本网站立场,如果涉及侵权请联系站长邮箱:is@yisu.com进行举报,并提供相关证据,一经查实,将立刻删除涉嫌侵权内容。


