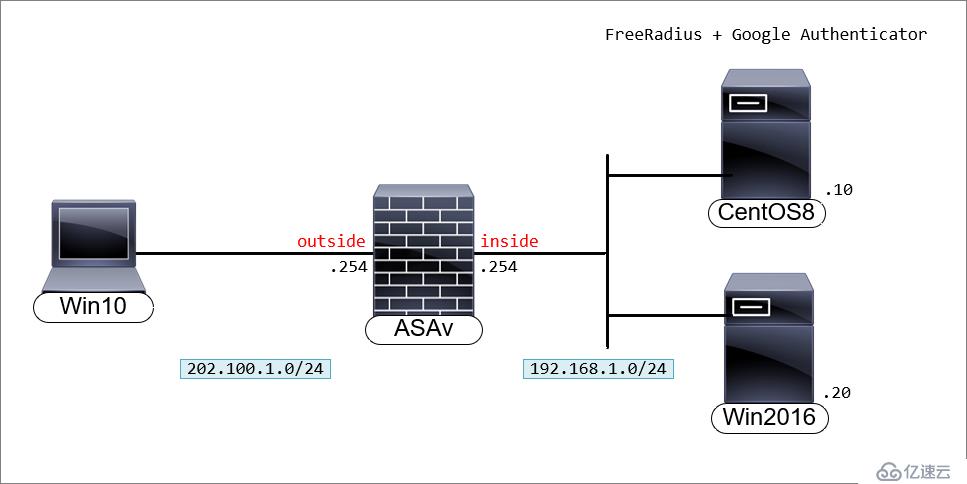
实验目的:用户使用Cisco AnyConnect拨号时,输入AD账号密码和Google动态码后通过认证,获得授权。Cisco ASA指向FreeRADIUS做认证,FreeRADIUS联动AD和google_authenticator。
系统更新
[root@centos8 ~]# yum update修改时区
[root@centos8 /]# ln -sf /usr/share/zoneinfo/Asia/Shanghai /etc/localtime查看时间是否正确
[root@centos8 /]#ll /etc/localtime关闭SElinux,临时关闭和永久关闭。
[root@centos8 ~]# setenforce 0
[root@centos8 ~]# sed -i 's/=enforcing/=permissive/g' /etc/selinux/config
查看SElinux状态。
[root@centos8 ~]# getenforce
Permissive[root@centos8 ~]# systemctl stop firewalld.service
[root@centos8 ~]# systemctl disable firewalld.service安装FreeRADIUS
[root@centos8 ~]# yum install freeradius freeradius-utils启动radius服务
[root@centos8 ~]# systemctl enable --now radiusd.service[root@centos8 ~]# firewall-cmd --add-service=radius --permanent
[root@centos8 ~]# firewall-cmd --reload[root@centos8 ~]# vi /etc/raddb/radiusd.conf
#user = radiusd
#group = radiusd
user = root
group = rootpam的注释,radius激活PAM(Pluggable Authentication Modules)可动态加载验证模块。[root@centos8 ~]# vi /etc/raddb/sites-enabled/default
pam[root@centos8 ~]# ln -s /etc/raddb/mods-available/pam /etc/raddb/mods-enabled/pam/etc/raddb/clients.conf配置文件,接受来Cisco ASAv的radius认证请求。在行末添加防火墙的与共享密钥和ip地址。[root@centos8 ~]# vi /etc/raddb/clients.conf
client 192.168.1.254 {
secret = cisco
shortname = CiscoASA
nastype = cisco
}[root@centos8 ~]# groupadd radius-disabled/etc/raddb/users将创建的“radius-disabled”组添加到“拒绝用户组”部分。[root@centos8 ~]# vi /etc/raddb/users
#DEFAULT Group == "disabled", Auth-Type := Reject
# Reply-Message = "Your account has been disabled."
DEFAULT Group == "radius-disabled", Auth-Type := Reject
Reply-Message = "Your account has been disabled."
DEFAULT Auth-Type := PAM[root@centos8 ~]# useradd radlocal
[root@centos8 ~]# passwd radlocal
更改用户 radlocal 的密码 。
新的 密码:radpassword
重新输入新的 密码:radpassword
passwd:所有的身份验证令牌已经成功更新。[root@centos8 ~]# radiusd -XReceived Access-Accept表示认证通过。[root@centos8 ~]# radtest radlocal radpassword localhost 18120 testing123
Sent Access-Request Id 9 from 0.0.0.0:41546 to 127.0.0.1:1812 length 78
User-Name = "radlocal"
User-Password = "radpassword"
NAS-IP-Address = 172.20.29.110
NAS-Port = 18120
Message-Authenticator = 0x00
Cleartext-Password = "radpassword"
Received Access-Accept Id 9 from 127.0.0.1:1812 to 127.0.0.1:41546 length 20radius -X窗口显示的输出作为参考。Listening on auth address 127.0.0.1 port 18120 bound to server inner-tunnel
Listening on proxy address * port 43164
Listening on proxy address :: port 40551
Ready to process requests
(0) Received Access-Request Id 9 from 127.0.0.1:41546 to 127.0.0.1:1812 length 78
(0) User-Name = "radlocal"
(0) User-Password = "radpassword"
(0) NAS-IP-Address = 172.20.29.110
(0) NAS-Port = 18120
(0) Message-Authenticator = 0xeba37c10c860860bd3dcc7bff2c5edf0
(0) # Executing section authorize from file /etc/raddb/sites-enabled/default
(0) authorize {
(0) policy filter_username {
(0) if (&User-Name) {
(0) if (&User-Name) -> TRUE
(0) if (&User-Name) {
(0) if (&User-Name =~ / /) {
(0) if (&User-Name =~ / /) -> FALSE
(0) if (&User-Name =~ /@[^@]*@/ ) {
(0) if (&User-Name =~ /@[^@]*@/ ) -> FALSE
(0) if (&User-Name =~ /\.\./ ) {
(0) if (&User-Name =~ /\.\./ ) -> FALSE
(0) if ((&User-Name =~ /@/) && (&User-Name !~ /@(.+)\.(.+)$/)) {
(0) if ((&User-Name =~ /@/) && (&User-Name !~ /@(.+)\.(.+)$/)) -> FALSE
(0) if (&User-Name =~ /\.$/) {
(0) if (&User-Name =~ /\.$/) -> FALSE
(0) if (&User-Name =~ /@\./) {
(0) if (&User-Name =~ /@\./) -> FALSE
(0) } # if (&User-Name) = notfound
(0) } # policy filter_username = notfound
(0) [preprocess] = ok
(0) [chap] = noop
(0) [mschap] = noop
(0) [digest] = noop
(0) suffix: Checking for suffix after "@"
(0) suffix: No '@' in User-Name = "radlocal", looking up realm NULL
(0) suffix: No such realm "NULL"
(0) [suffix] = noop
(0) eap: No EAP-Message, not doing EAP
(0) [eap] = noop
(0) files: users: Matched entry DEFAULT at line 69
(0) [files] = ok
(0) [expiration] = noop
(0) [logintime] = noop
(0) pap: WARNING: No "known good" password found for the user. Not setting Auth-Type
(0) pap: WARNING: Authentication will fail unless a "known good" password is available
(0) [pap] = noop
(0) } # authorize = ok
(0) Found Auth-Type = pam
(0) # Executing group from file /etc/raddb/sites-enabled/default
(0) authenticate {
(0) pam: Using pamauth string "radiusd" for pam.conf lookup
(0) pam: Authentication succeeded
(0) [pam] = ok
(0) } # authenticate = ok
(0) # Executing section post-auth from file /etc/raddb/sites-enabled/default
(0) post-auth {
(0) update {
(0) No attributes updated
(0) } # update = noop
(0) [exec] = noop
(0) policy remove_reply_message_if_eap {
(0) if (&reply:EAP-Message && &reply:Reply-Message) {
(0) if (&reply:EAP-Message && &reply:Reply-Message) -> FALSE
(0) else {
(0) [noop] = noop
(0) } # else = noop
(0) } # policy remove_reply_message_if_eap = noop
(0) } # post-auth = noop
(0) Sent Access-Accept Id 9 from 127.0.0.1:1812 to 127.0.0.1:41546 length 0
(0) Finished request
Waking up in 4.9 seconds.
(0) Cleaning up request packet ID 9 with +50
Ready to process requests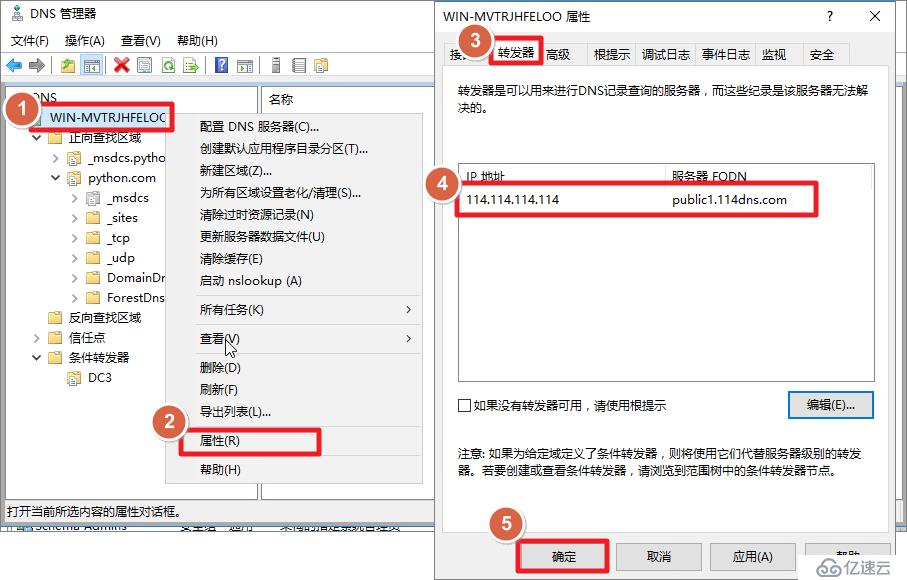
[root@centos8 ~]# yum install sssd realmd adcli
[root@centos8 ~]# yum install oddjob oddjob-mkhomedir sssd samba-commontools[root@centos8 ~]# vi /etc/resolv.conf
nameserver 192.168.1.20[root@centos8 ~]# ping python.com
PING python.com (192.168.1.20) 56(84) bytes of data.
64 bytes from 192.168.1.20 (192.168.1.20): icmp_seq=1 ttl=128 time=0.205 ms[root@centos8 ~]# nslookup
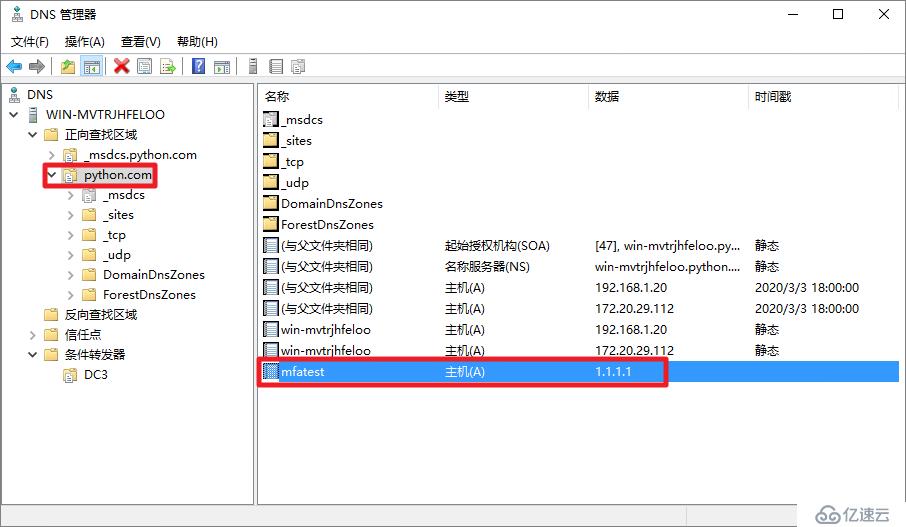
> mfatest.python.com
Server: 192.168.1.20
Address: 192.168.1.20#53
Name: mfatest.python.com
Address: 1.1.1.1[root@centos8 ~]# realm join python.com
Administrator 的密码:[root@centos8 ~]# realm list
python.com
type: kerberos
realm-name: PYTHON.COM
domain-name: python.com
configured: kerberos-member
server-software: active-directory
client-software: sssd
required-package: oddjob
required-package: oddjob-mkhomedir
required-package: sssd
required-package: adcli
required-package: samba-common-tools
login-formats: %U@python.com
login-policy: allow-permitted-logins
permitted-logins:
permitted-groups: ***users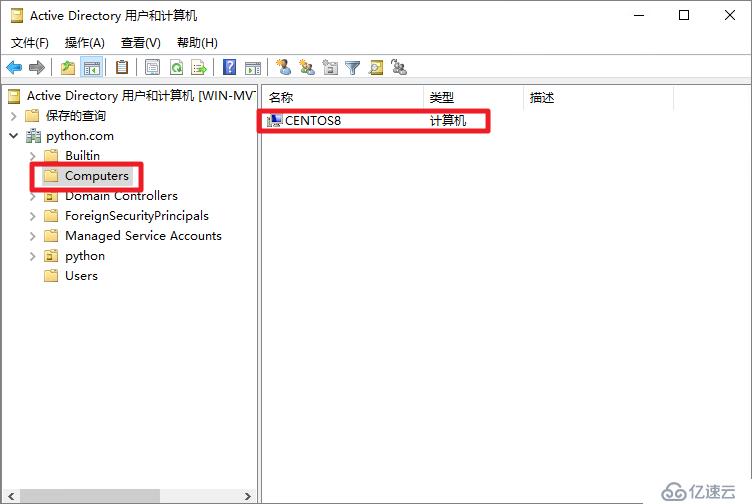
[root@centos8 ~]# ssh -l wintest@python.com localhost
The authenticity of host 'localhost (::1)' can't be established.
ECDSA key fingerprint is SHA256:JNzSM2I5llmwVPjZAmZa0n1TS9dAZJYTgB2Odpq5IWA.
Are you sure you want to continue connecting (yes/no/[fingerprint])? yes
Warning: Permanently added 'localhost' (ECDSA) to the list of known hosts.
wintest@python.com@localhost's password:
Activate the web console with: systemctl enable --now cockpit.socket

[wintest@python.com@centos8 ~]$ exit
注销
CentOS放行允许***users这个组的用户在这台机器上认证。这条命令允许所有域账号认证:realm permit -all。这里放行的认证,不只放行了radius,还放行了ssh的认证,生产环境应该禁止这个组用户登
录ssh。
[root@centos8 ~]# realm permit -g ***users开启radius调试模式
[root@centos8 ~]#radius -X[root@centos8 ~]# radtest ***user@python.com Cisc0123 localhost 18120 testing123
Sent Access-Request Id 16 from 0.0.0.0:38424 to 127.0.0.1:1812 length 88
User-Name = "***user@python.com"
User-Password = "Cisc0123"
NAS-IP-Address = 172.20.29.110
NAS-Port = 18120
Message-Authenticator = 0x00
Cleartext-Password = "Cisc0123"
Received Access-Accept Id 16 from 127.0.0.1:1812 to 127.0.0.1:38424 length 20(2) Received Access-Request Id 16 from 127.0.0.1:38424 to 127.0.0.1:1812 length 88
(2) User-Name = "***user@python.com"
(2) User-Password = "Cisc0123"
(2) NAS-IP-Address = 172.20.29.110
(2) NAS-Port = 18120
(2) Message-Authenticator = 0xd2adbf7920450d47617cc1c7128e437e
(2) # Executing section authorize from file /etc/raddb/sites-enabled/default
(2) authorize {
(2) policy filter_username {
(2) if (&User-Name) {
(2) if (&User-Name) -> TRUE
(2) if (&User-Name) {
(2) if (&User-Name =~ / /) {
(2) if (&User-Name =~ / /) -> FALSE
(2) if (&User-Name =~ /@[^@]*@/ ) {
(2) if (&User-Name =~ /@[^@]*@/ ) -> FALSE
(2) if (&User-Name =~ /\.\./ ) {
(2) if (&User-Name =~ /\.\./ ) -> FALSE
(2) if ((&User-Name =~ /@/) && (&User-Name !~ /@(.+)\.(.+)$/)) {
(2) if ((&User-Name =~ /@/) && (&User-Name !~ /@(.+)\.(.+)$/)) -> FALSE
(2) if (&User-Name =~ /\.$/) {
(2) if (&User-Name =~ /\.$/) -> FALSE
(2) if (&User-Name =~ /@\./) {
(2) if (&User-Name =~ /@\./) -> FALSE
(2) } # if (&User-Name) = notfound
(2) } # policy filter_username = notfound
(2) [preprocess] = ok
(2) [chap] = noop
(2) [mschap] = noop
(2) [digest] = noop
(2) suffix: Checking for suffix after "@"
(2) suffix: Looking up realm "python.com" for User-Name = "***user@python.com"
(2) suffix: No such realm "python.com"
(2) [suffix] = noop
(2) eap: No EAP-Message, not doing EAP
(2) [eap] = noop
(2) files: users: Matched entry DEFAULT at line 69
(2) [files] = ok
(2) [expiration] = noop
(2) [logintime] = noop
(2) pap: WARNING: No "known good" password found for the user. Not setting Auth-Type
(2) pap: WARNING: Authentication will fail unless a "known good" password is available
(2) [pap] = noop
(2) } # authorize = ok
(2) Found Auth-Type = pam
(2) # Executing group from file /etc/raddb/sites-enabled/default
(2) authenticate {
(2) pam: Using pamauth string "radiusd" for pam.conf lookup
(2) pam: Authentication succeeded
(2) [pam] = ok
(2) } # authenticate = ok
(2) # Executing section post-auth from file /etc/raddb/sites-enabled/default
(2) post-auth {
(2) update {
(2) No attributes updated
(2) } # update = noop
(2) [exec] = noop
(2) policy remove_reply_message_if_eap {
(2) if (&reply:EAP-Message && &reply:Reply-Message) {
(2) if (&reply:EAP-Message && &reply:Reply-Message) -> FALSE
(2) else {
(2) [noop] = noop
(2) } # else = noop
(2) } # policy remove_reply_message_if_eap = noop
(2) } # post-auth = noop
(2) Sent Access-Accept Id 16 from 127.0.0.1:1812 to 127.0.0.1:38424 length 0
(2) Finished request
Waking up in 4.9 seconds.
(2) Cleaning up request packet ID 16 with timestamp +6169
Ready to process requests[root@centos8 ~]# vi /etc/sssd/sssd.conf
use_fully_qualified_names = False[root@centos8 ~]# systemctl restart sssd
[root@centos8 ~]# realm list
python.com
type: kerberos
realm-name: PYTHON.COM
domain-name: python.com
configured: kerberos-member
server-software: active-directory
client-software: sssd
required-package: oddjob
required-package: oddjob-mkhomedir
required-package: sssd
required-package: adcli
required-package: samba-common-tools
login-formats: %U
login-policy: allow-permitted-logins
permitted-logins:
permitted-groups: ***users[root@centos8 ~]# id ***user
uid=363201109(***user) gid=363200513(domain users) 组=363200513(domain users),363201108(***users)[root@centos8 ~]# yum install pam-devel make gcc-c++ git
[root@centos8 ~]# yum install automake autoconf libtool~[root@centos8 ~]# git clone https://github.com/google/google-authenticator-libpam[root@centos8 ~]# cd google-authenticator-libpam/
[root@centos8 google-authenticator-libpam]# ./bootstrap.sh
[root@centos8 google-authenticator-libpam]# ./configure
[root@centos8 google-authenticator-libpam]# make
[root@centos8 google-authenticator-libpam]# make install[root@centos8 ~]# su - ***user@python.com[***user@python.com@centos8 ~]$ google-authenticator
Do you want authentication tokens to be time-based (y/n) y
Warning: pasting the following URL into your browser exposes the OTP secret to Google:
https://www.google.com/chart?chs=200x200&chld=M|0&cht=qr&chl=otpauth://totp/***user@python.com@centos8%3Fsecret%3DOF2GUT37EUSG7Y2TYX57HKYRUY%26issuer%3Dcentos8
Failed to use libqrencode to show QR code visually for scanning.
如果安装了`libqrencode`,屏幕会出现一个二维码如果你的终端终端不支持显示二维码,可以手动打开这个网页链接(墙)来查看二维码或者手动输入后面的密钥(secret key)来代替扫描二维码,下面有5个紧
急救助码(emergency scratch code),
紧急救助码就是当你无法获取认证码时(比如手机丢了),可以当做认证码来用,每用一个少一个,但其实可以手动添加的,建议如果 root 账户使用 Google Authenticator 的话一定要把紧急救助码另外保存一
份。
Consider typing the OTP secret into your app manually.
Your new secret key is: OF2GUT37EUSG7Y2TYX57HKYRUY
Enter code from app (-1 to skip): 198586
Code confirmed
Your emergency scratch codes are:
82763900
77203549
34651872
82841984
93446389
Do you want me to update your "/home/***user@python.com/.google_authenticator" file? (y/n) y
是否更新用户的 Google Authenticator 配置文件,选择 y 才能使上面操作对当前用户生效,其实就是在对应用户的 Home 目录下生成了一个 .google_authenticator 文件,
如果你想停用这个用户的 Google Authenticator 验证,只需要删除这个用户 Home 目录下的 .google_authenticator 文件就可以了。
Do you want to disallow multiple uses of the same authentication
token? This restricts you to one login about every 30s, but it increases
your chances to notice or even prevent man-in-the-middle attacks (y/n) y
每次生成的认证码是否同时只允许一个人使用?这里选择 y。
By default, a new token is generated every 30 seconds by the mobile app.
In order to compensate for possible time-skew between the client and the server,
we allow an extra token before and after the current time. This allows for a
time skew of up to 30 seconds between authentication server and client. If you
experience problems with poor time synchronization, you can increase the window
from its default size of 3 permitted codes (one previous code, the current
code, the next code) to 17 permitted codes (the 8 previous codes, the current
code, and the 8 next codes). This will permit for a time skew of up to 4 minutes
between client and server.
Do you want to do so? (y/n) y
是否增加时间误差?这里选择 n或者y都行。
If the computer that you are logging into isn't hardened against brute-force
login attempts, you can enable rate-limiting for the authentication module.
By default, this limits attackers to no more than 3 login attempts every 30s.
Do you want to enable rate-limiting? (y/n) y
是否启用次数限制?[***user@python.com@centos8 ~]$google-authenticator -h
google-authenticator [<options>]
-h, --help Print this message
-c, --counter-based Set up counter-based (HOTP) verification
-C, --no-confirm Don't confirm code. For non-interactive setups
-t, --time-based Set up time-based (TOTP) verification
-d, --disallow-reuse Disallow reuse of previously used TOTP tokens
-D, --allow-reuse Allow reuse of previously used TOTP tokens
-f, --force Write file without first confirming with user
-l, --label=<label> Override the default label in "otpauth://" URL
-i, --issuer=<issuer> Override the default issuer in "otpauth://" URL
-q, --quiet Quiet mode
-Q, --qr-mode={NONE,ANSI,UTF8} QRCode output mode
-r, --rate-limit=N Limit logins to N per every M seconds
-R, --rate-time=M Limit logins to N per every M seconds
-u, --no-rate-limit Disable rate-limiting
-s, --secret=<file> Specify a non-standard file location
-S, --step-size=S Set interval between token refreshes
-w, --window-size=W Set window of concurrently valid codes
-W, --minimal-window Disable window of concurrently valid codes
-e, --emergency-codes=N Number of emergency codes to generate[***user@python.com@centos8 ~]$ google-authenticator -t -f -d -l ***user@centos8 -i Cisco_*** -r 3 -R 30 -W
Warning: pasting the following URL into your browser exposes the OTP secret to Google:
https://www.google.com/chart?chs=200x200&chld=M|0&cht=qr&chl=otpauth://totp/lql@centos8%3Fsecret%3DJQ355PSUBG52KJBUMDJVBSMDLU%26issuer%3DLQL.MEpam_google_authenticator.so所在目录[root@centos8 ~]# find / -name pam_google_authenticator.so
/usr/local/lib/security/pam_google_authenticator.so/etc/pam.d/radiusd,告诉FreeRadius使用本地Unix密码和Google Authenticator代码对用户进行身份验证。[root@centos8 ~]# vi /etc/pam.d/radiusd
#%PAM-1.0
#auth include password-auth
#account required pam_nologin.so
#account include password-auth
#password include password-auth
#session include password-auth
auth requisite /usr/local/lib/security/pam_google_authenticator.so forward_pass
auth required pam_sss.so use_first_pass
account required pam_nologin.so
account include password-auth
session include password-auth开启radius调试模式
[root@centos8 ~]#radius -X[root@centos8 ~]# radtest ***user@python.com Cisc0123072009 localhost 18120 testing123
Sent Access-Request Id 119 from 0.0.0.0:49063 to 127.0.0.1:1812 length 88
User-Name = "***user@python.com"
User-Password = "Cisc0123072009"
NAS-IP-Address = 172.20.29.110
NAS-Port = 18120
Message-Authenticator = 0x00
Cleartext-Password = "Cisc0123072009"
Received Access-Accept Id 119 from 127.0.0.1:1812 to 127.0.0.1:49063 length 20(3) Received Access-Request Id 119 from 127.0.0.1:49063 to 127.0.0.1:1812 length 88
(3) User-Name = "***user@python.com"
(3) User-Password = "Cisc0123072009"
(3) NAS-IP-Address = 172.20.29.110
(3) NAS-Port = 18120
(3) Message-Authenticator = 0x457cc852a7cb00f054b1cc168f75998e
(3) # Executing section authorize from file /etc/raddb/sites-enabled/default
(3) authorize {
(3) policy filter_username {
(3) if (&User-Name) {
(3) if (&User-Name) -> TRUE
(3) if (&User-Name) {
(3) if (&User-Name =~ / /) {
(3) if (&User-Name =~ / /) -> FALSE
(3) if (&User-Name =~ /@[^@]*@/ ) {
(3) if (&User-Name =~ /@[^@]*@/ ) -> FALSE
(3) if (&User-Name =~ /\.\./ ) {
(3) if (&User-Name =~ /\.\./ ) -> FALSE
(3) if ((&User-Name =~ /@/) && (&User-Name !~ /@(.+)\.(.+)$/)) {
(3) if ((&User-Name =~ /@/) && (&User-Name !~ /@(.+)\.(.+)$/)) -> FALSE
(3) if (&User-Name =~ /\.$/) {
(3) if (&User-Name =~ /\.$/) -> FALSE
(3) if (&User-Name =~ /@\./) {
(3) if (&User-Name =~ /@\./) -> FALSE
(3) } # if (&User-Name) = notfound
(3) } # policy filter_username = notfound
(3) [preprocess] = ok
(3) [chap] = noop
(3) [mschap] = noop
(3) [digest] = noop
(3) suffix: Checking for suffix after "@"
(3) suffix: Looking up realm "python.com" for User-Name = "***user@python.com"
(3) suffix: No such realm "python.com"
(3) [suffix] = noop
(3) eap: No EAP-Message, not doing EAP
(3) [eap] = noop
(3) files: users: Matched entry DEFAULT at line 69
(3) [files] = ok
(3) [expiration] = noop
(3) [logintime] = noop
(3) pap: WARNING: No "known good" password found for the user. Not setting Auth-Type
(3) pap: WARNING: Authentication will fail unless a "known good" password is available
(3) [pap] = noop
(3) } # authorize = ok
(3) Found Auth-Type = pam
(3) # Executing group from file /etc/raddb/sites-enabled/default
(3) authenticate {
(3) pam: Using pamauth string "radiusd" for pam.conf lookup
(3) pam: Authentication succeeded
(3) [pam] = ok
(3) } # authenticate = ok
(3) # Executing section post-auth from file /etc/raddb/sites-enabled/default
(3) post-auth {
(3) update {
(3) No attributes updated
(3) } # update = noop
(3) [exec] = noop
(3) policy remove_reply_message_if_eap {
(3) if (&reply:EAP-Message && &reply:Reply-Message) {
(3) if (&reply:EAP-Message && &reply:Reply-Message) -> FALSE
(3) else {
(3) [noop] = noop
(3) } # else = noop
(3) } # policy remove_reply_message_if_eap = noop
(3) } # post-auth = noop
(3) Sent Access-Accept Id 119 from 127.0.0.1:1812 to 127.0.0.1:49063 length 0
(3) Finished request
Waking up in 4.9 seconds.
(3) Cleaning up request packet ID 119 with timestamp +6972
Ready to process requestsinterface Management0/0
nameif mgmt
security-level 0
ip address 192.168.100.100 255.255.255.0
ssh 0.0.0.0 0.0.0.0 mgmt
interface GigabitEthernet0/0
nameif outside
security-level 0
ip address 202.100.1.254 255.255.255.0
!
interface GigabitEthernet0/1
nameif inside
security-level 100
ip address 192.168.1.254 255.255.255.0http server enable 8000
http 0 0 mgmt
aaa authentication http console LOCAL
username admin password cisco privilege 15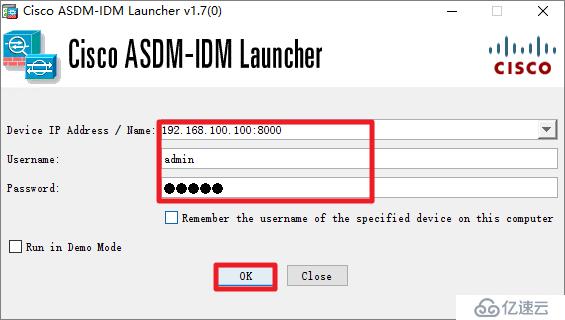

MFA-ASAv# dir
Directory of disk0:/
94 -rwx 41077110 08:07:22 Mar 05 2020 anyconnect-win-4.6.00362-webdeploy-k9.pkgusername ssluser password cisco
web***
enable outside
anyconnect image disk0:/anyconnect-win-4.6.00362-webdeploy-k9.pkg 1
anyconnect enableaccess-list anyconnect_split standard permit 192.168.1.0 255.255.255.0
access-list anyconnect_filter_acl extended permit ip any 192.168.1.0 255.255.255.0
ip local pool ssl***_pool 192.168.50.100-192.168.50.200
group-policy anyconnect_group_policy internal
group-policy anyconnect_group_policy attributes
***-filter value anyconnect_filter_acl
***-tunnel-protocol ssl-client ssl-clientless
split-tunnel-policy tunnelspecified
split-tunnel-network-list value anyconnect_split
address-pools value ssl***_pool
web***
anyconnect profiles value anyconnect_profile type user
username ssluser attributes
***-group-policy anyconnect_group_policy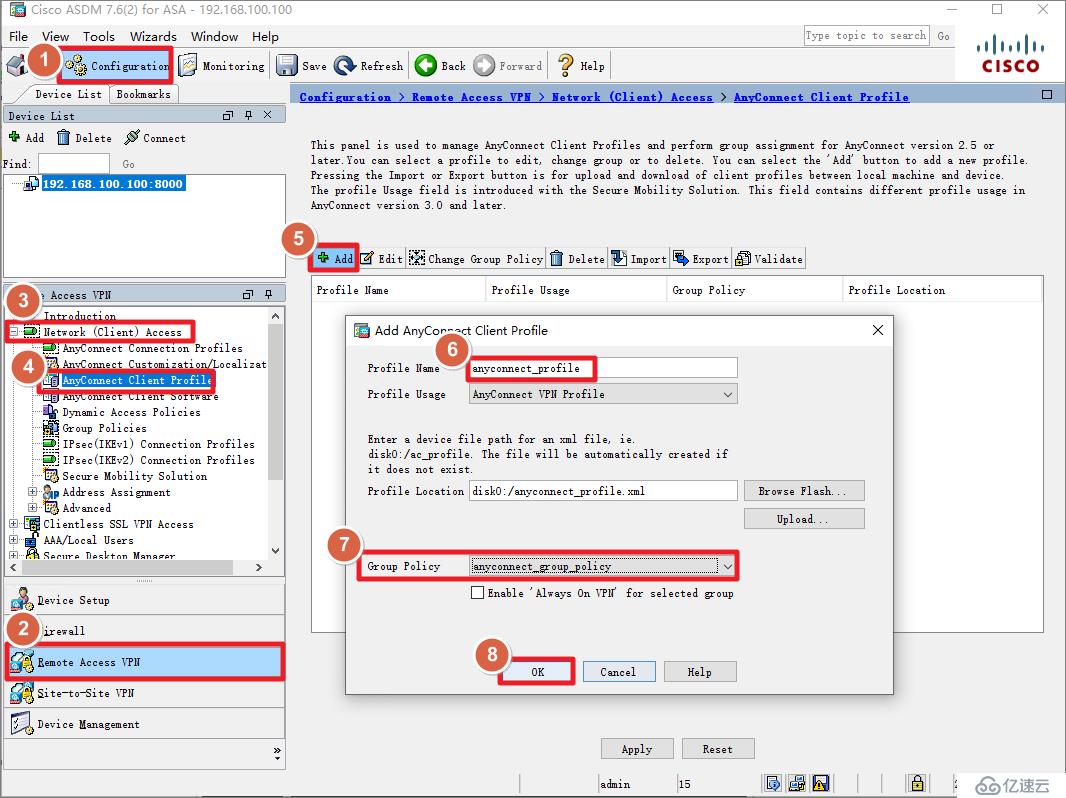

group-policy anyconnect_group_policy attributes
 web***
  anyconnect profiles value anyconnect_profile type user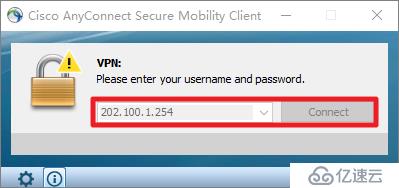

aaa-server freeradius protocol radius
aaa-server freeradius (inside) host 192.168.1.10
 key cisco
 authentication-port 1812

tunnel-group DefaultWEB***Group general-attributes
 authentication-server-group freeradius
default-group-policy anyconnect_group_policypython.com域名都可以。MFA-ASAv# test aaa-server authentication freeradius host 192.168.1.10 username ***user password Cisc0123187977
INFO: Attempting Authentication test to IP address <192.168.1.10> (timeout: 12 seconds)
INFO: Authentication SuccessfulListening on acct address :: port 1813 bound to server default
Listening on auth address 127.0.0.1 port 18120 bound to server inner-tunnel
Listening on proxy address * port 54915
Listening on proxy address :: port 45190
Ready to process requests
(0) Received Access-Request Id 4 from 192.168.1.254:30861 to 192.168.1.10:1812 length 86
(0) User-Name = "***user"
(0) User-Password = "Cisc0123187977"
(0) NAS-IP-Address = 192.168.1.254
(0) NAS-Port = 4
(0) NAS-Port-Type = Virtual
(0) Cisco-AVPair = "coa-push=true"
(0) # Executing section authorize from file /etc/raddb/sites-enabled/default
(0) authorize {
(0) policy filter_username {
(0) if (&User-Name) {
(0) if (&User-Name) -> TRUE
(0) if (&User-Name) {
(0) if (&User-Name =~ / /) {
(0) if (&User-Name =~ / /) -> FALSE
(0) if (&User-Name =~ /@[^@]*@/ ) {
(0) if (&User-Name =~ /@[^@]*@/ ) -> FALSE
(0) if (&User-Name =~ /\.\./ ) {
(0) if (&User-Name =~ /\.\./ ) -> FALSE
(0) if ((&User-Name =~ /@/) && (&User-Name !~ /@(.+)\.(.+)$/)) {
(0) if ((&User-Name =~ /@/) && (&User-Name !~ /@(.+)\.(.+)$/)) -> FALSE
(0) if (&User-Name =~ /\.$/) {
(0) if (&User-Name =~ /\.$/) -> FALSE
(0) if (&User-Name =~ /@\./) {
(0) if (&User-Name =~ /@\./) -> FALSE
(0) } # if (&User-Name) = notfound
(0) } # policy filter_username = notfound
(0) [preprocess] = ok
(0) [chap] = noop
(0) [mschap] = noop
(0) [digest] = noop
(0) suffix: Checking for suffix after "@"
(0) suffix: No '@' in User-Name = "***user", looking up realm NULL
(0) suffix: No such realm "NULL"
(0) [suffix] = noop
(0) eap: No EAP-Message, not doing EAP
(0) [eap] = noop
(0) files: users: Matched entry DEFAULT at line 69
(0) [files] = ok
(0) [expiration] = noop
(0) [logintime] = noop
(0) pap: WARNING: No "known good" password found for the user. Not setting Auth-Type
(0) pap: WARNING: Authentication will fail unless a "known good" password is available
(0) [pap] = noop
(0) } # authorize = ok
(0) Found Auth-Type = pam
(0) # Executing group from file /etc/raddb/sites-enabled/default
(0) authenticate {
(0) pam: Using pamauth string "radiusd" for pam.conf lookup
(0) pam: Authentication succeeded
(0) [pam] = ok
(0) } # authenticate = ok
(0) # Executing section post-auth from file /etc/raddb/sites-enabled/default
(0) post-auth {
(0) update {
(0) No attributes updated
(0) } # update = noop
(0) [exec] = noop
(0) policy remove_reply_message_if_eap {
(0) if (&reply:EAP-Message && &reply:Reply-Message) {
(0) if (&reply:EAP-Message && &reply:Reply-Message) -> FALSE
(0) else {
(0) [noop] = noop
(0) } # else = noop
(0) } # policy remove_reply_message_if_eap = noop
(0) } # post-auth = noop
(0) Sent Access-Accept Id 4 from 192.168.1.10:1812 to 192.168.1.254:30861 length 0
(0) Finished request
Waking up in 4.9 seconds.
(0) Cleaning up request packet ID 4 with timestamp +11
Ready to process requestsFailed binding to auth address * port 1812 bound to server default: Address already in use
/etc/raddb/sites-enabled/default[59]: Error binding to port for 0.0.0.0 port 1812[root@centos8 ~]# ss -ulnp
State Recv-Q Send-Q Local Address:Port Peer Address:Port
UNCONN 0 0 127.0.0.1:18120 0.0.0.0:* users:(("radiusd",pid=15068,fd=14))
UNCONN 0 0 0.0.0.0:1812 0.0.0.0:* users:(("radiusd",pid=15068,fd=10))
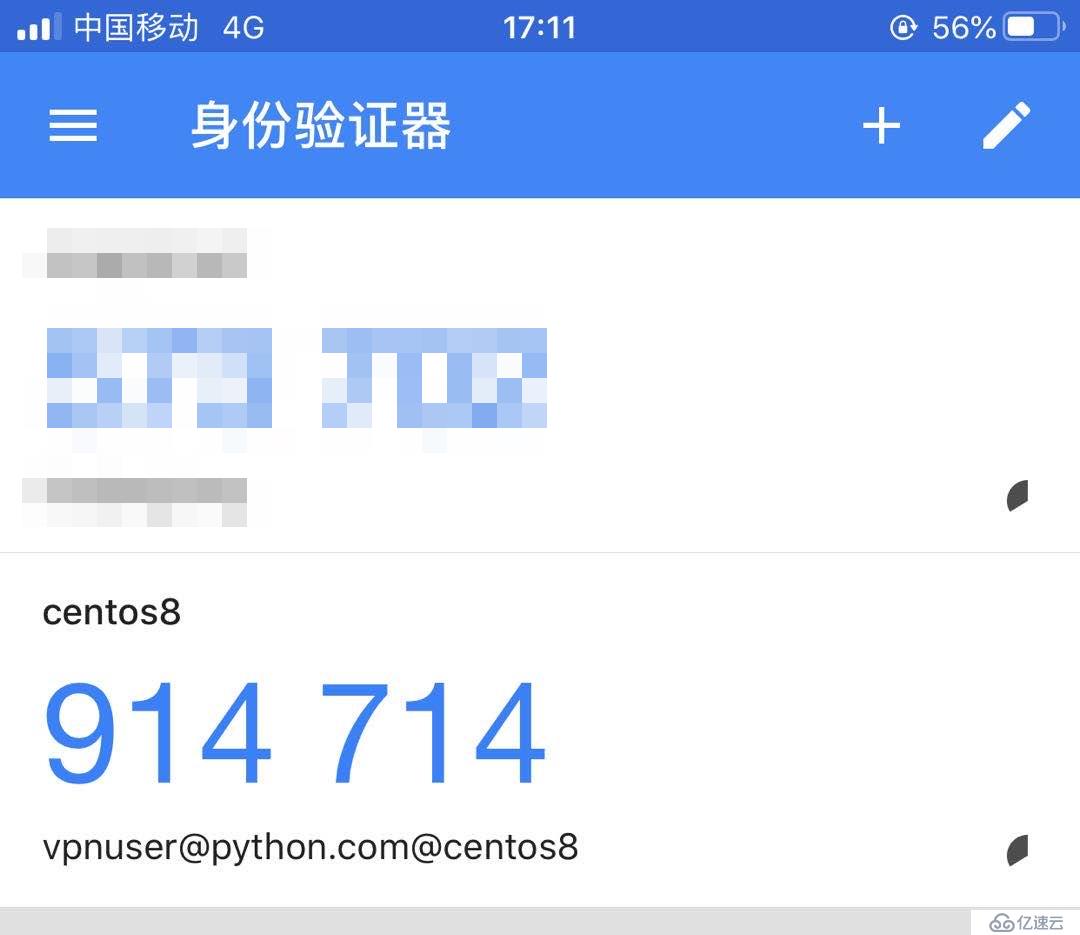
UNCONN 0 0 0.0.0.0:1813 0.0.0.0:* users:(("radiusd",pid=15068,fd=11))pkill命令结束radius所有进程。[root@centos8 ~]# pkill radiusdCisc0123,动态码是914714,那么密码框应该输入Cisc0123914714。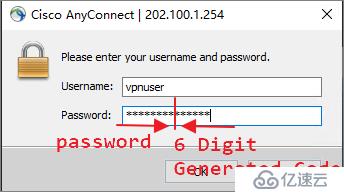
(4) Received Access-Request Id 8 from 192.168.1.254:30861 to 192.168.1.10:1812 length 666
(4)   User-Name = "***user"
(4)   User-Password = "Cisc0123914714"
(4)   NAS-Port = 32768
(4)   Called-Station-Id = "202.100.1.254"
(4)   Calling-Station-Id = "202.100.1.10"
(4)   NAS-Port-Type = Virtual
(4)   Tunnel-Client-Endpoint:0 = "202.100.1.10"
(4)   Cisco-AVPair = "mdm-tlv=device-platform=win"
(4)   Cisco-AVPair = "mdm-tlv=device-mac=00-50-56-8e-14-a9"
(4)   Cisco-AVPair = "mdm-tlv=device-mac=00-50-56-8e-8a-ac"
(4)   Cisco-AVPair = "mdm-tlv=device-mac=00-50-56-8e-93-54"
(4)   Cisco-AVPair = "mdm-tlv=device-type=VMware, Inc. VMware7,1"
(4)   Cisco-AVPair = "mdm-tlv=device-platform-version=10.0.18362 "
(4)   Cisco-AVPair = "mdm-tlv=ac-user-agent=AnyConnect Windows 4.6.00362"
(4)   Cisco-AVPair = "mdm-tlv=device-uid=D7237D73128E45F4F2706858D0F4AC09129E5131839298ACB03D3999125B5FC1"
(4)   NAS-IP-Address = 192.168.1.254
(4)   Cisco-AVPair = "audit-session-id=c0a801fe000080005e60c235"
(4)   Cisco-AVPair = "ip:source-ip=202.100.1.10"
(4)   ASA-TunnelGroupName = "DefaultWEB***Group"
(4)   ASA-ClientType = AnyConnect-Client-SSL-***
(4)   Cisco-AVPair = "coa-push=true"
(4) # Executing section authorize from file /etc/raddb/sites-enabled/default
(4)   authorize {
(4)     policy filter_username {
(4)       if (&User-Name) {
(4)       if (&User-Name)  -> TRUE
(4)       if (&User-Name)  {
(4)         if (&User-Name =~ / /) {
(4)         if (&User-Name =~ / /)  -> FALSE
(4)         if (&User-Name =~ /@[^@]*@/ ) {
(4)         if (&User-Name =~ /@[^@]*@/ )  -> FALSE
(4)         if (&User-Name =~ /\.\./ ) {
(4)         if (&User-Name =~ /\.\./ )  -> FALSE
(4)         if ((&User-Name =~ /@/) && (&User-Name !~ /@(.+)\.(.+)$/))  {
(4)         if ((&User-Name =~ /@/) && (&User-Name !~ /@(.+)\.(.+)$/))   -> FALSE
(4)         if (&User-Name =~ /\.$/)  {
(4)         if (&User-Name =~ /\.$/)   -> FALSE
(4)         if (&User-Name =~ /@\./)  {
(4)         if (&User-Name =~ /@\./)   -> FALSE
(4)       } # if (&User-Name)  = notfound
(4)     } # policy filter_username = notfound
(4)     [preprocess] = ok
(4)     [chap] = noop
(4)     [mschap] = noop
(4)     [digest] = noop
(4) suffix: Checking for suffix after "@"
(4) suffix: No '@' in User-Name = "***user", looking up realm NULL
(4) suffix: No such realm "NULL"
(4)     [suffix] = noop
(4) eap: No EAP-Message, not doing EAP
(4)     [eap] = noop
(4) files: users: Matched entry DEFAULT at line 69
(4)     [files] = ok
(4)     [expiration] = noop
(4)     [logintime] = noop
(4) pap: WARNING: No "known good" password found for the user.  Not setting Auth-Type
(4) pap: WARNING: Authentication will fail unless a "known good" password is available
(4)     [pap] = noop
(4)   } # authorize = ok
(4) Found Auth-Type = pam
(4) # Executing group from file /etc/raddb/sites-enabled/default
(4)   authenticate {
(4) pam: Using pamauth string "radiusd" for pam.conf lookup
(4) pam: Authentication succeeded
(4)     [pam] = ok
(4)   } # authenticate = ok
(4) # Executing section post-auth from file /etc/raddb/sites-enabled/default
(4)   post-auth {
(4)     update {
(4)       No attributes updated
(4)     } # update = noop
(4)     [exec] = noop
(4)     policy remove_reply_message_if_eap {
(4)       if (&reply:EAP-Message && &reply:Reply-Message) {
(4)       if (&reply:EAP-Message && &reply:Reply-Message)  -> FALSE
(4)       else {
(4)         [noop] = noop
(4)       } # else = noop
(4)     } # policy remove_reply_message_if_eap = noop
(4)   } # post-auth = noop
(4) Sent Access-Accept Id 8 from 192.168.1.10:1812 to 192.168.1.254:30861 length 0
(4) Finished request
Waking up in 4.9 seconds.
(4) Cleaning up request packet ID 8 with timestamp +608
Ready to process requests
免责声明:本站发布的内容(图片、视频和文字)以原创、转载和分享为主,文章观点不代表本网站立场,如果涉及侵权请联系站长邮箱:is@yisu.com进行举报,并提供相关证据,一经查实,将立刻删除涉嫌侵权内容。


