[TOC]
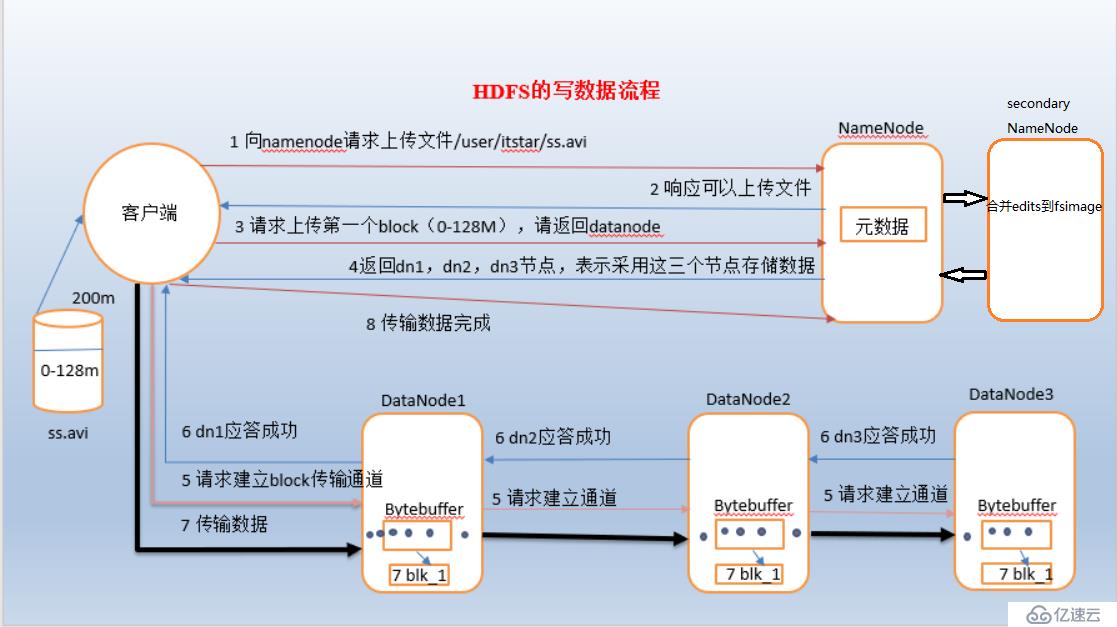
1)客户端通过本地通过RPC与namenode建立rpc通信,然后请求上传文件
2)namenode收到请求后,会检查是否能创建该文件(比如校验用户是否有该权限,文件是否已经存在等)。如果检查通过,namenode就会开始记录该新文件的元信息(先写入到edits文件,然后更新内存中的metadata),并响应client可以开始上传。
3)client 在本地将文件进行切块(按照指定的block大小)。然后请求namemode上传第一个block。
4)namenode根据策略以及每个datanode的情况,返回3个datanode地址给client(这里默认3副本)。
5)client与请求namenode返回的3个datanode建立pipeline,即 client请求dn1,dn1请求dn2,dn2请求dn3,这样一个串行通道。
6)3个datanode逐级响应,最终响应给client。表示可以传输数据
7)client会将每个block还会分割成一个个packet,然后放入 data queue中,等待上传。每传输一个packet,就会将packet加入到另外一个 ack queue中,等到pipeline中的datanode响应传输完成后,就会讲相应的packet从ack queue中移除。
8)后面就是重复上面的流程,直到client关闭通道,并将所有的queue中的packet刷写到pipeline中之后,datanode就会标记文件已完成。
注意:client完成写入之后,此时block 才是可见的,正在写的block是不可见的。当调用sync方法时(将缓冲区数据刷写到磁盘中),client才确认写入已经完成。client关闭流时调用 的close方法,底层就会调用sync。是否需要手动调用取决你根据程序需 要在数据健壮性和吞吐率之间的权衡。
问题:传输过程中,某个datanode发生错误,hdfs是怎么解决?
1)pipeline关闭掉
2)为了防止丢包,ack queue中的packet会同步到data queue中。重新进行下一次传输。
3)把产生错误的datanode上当前在写,但未完成的block删除掉
4)剩下的block写到剩余两个正常的datanode中。
5)namenode会自动寻找另外合适的一个datanode复制另外两个datanode中刷写的block,完成3副本的写入。当然,这个操作namenode的内部机制,对client来说是无感知的。
namenode使用两种文件保存元数据,fsimag和edits文件。
fsimage:元数据镜像文件,存储某一时间段内的namenode的内存元数据信息
edits:操作日志文件。
fstime:保存最近一次checkpoint的时间。
更详细的 fsimage和edits文件讲解,请看 “hdfs体系架构”
namenode所有的元数据信息从启动时就已经全部加载到内存中(为了提高查询性能),用于处理读请求的查询操作。到有写操作时,namenode会先向edits文件中写入操作日志,完成后才会修改内存中的metadata,这个主要是保证元数据已经存储到磁盘中不丢失。
hdfs内部维护的fsimage文件其实就是内存中的metadata的镜像,但是两者并不是实时一致的。fsimage的更新是通过合并edits来实现的。而这个合并操作是 secondaryNameNode完成的,主要流程如下: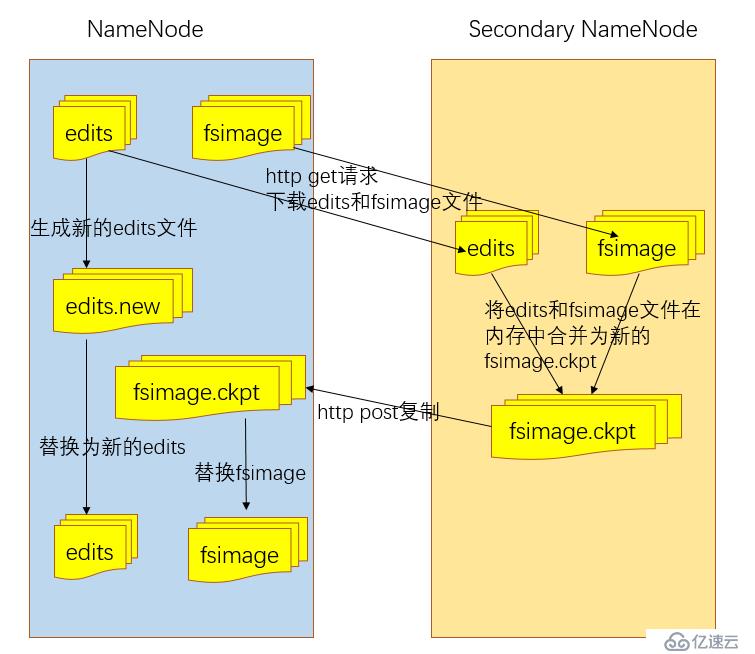
1)首先是 SNN通知 NN切换edits文件,主要是保证合并过程有新的写入操作时能够正常写入edits文件。
2)SNN通过http请求从NN获取 fsimage和edits文件。
3)SNN将fsiamge载入内存,开始合并edits到fsimage,生成新的fsimage
4)SNN将新的fsimage发送给NN
5)NN用新的fsimage,替换旧的fsimage。
写入操作时,默认3副本,那么副本分布在哪些datanode节点上,会影响写入速度。在hdfs的网络拓扑中,有那么四种物理范围,同一节点、同一机架上的不同节点、同一机房中不同节点、不同机房中的不同节点。这4中物理范围表示节点间的距离逐渐增大。这种物理距离越远会影响副本之间所在节点之间的传输效率,即传输效率越低。
上面说到副本的选择的节点的位置会影响写效率,那么hdfs是如何选择节点位置的。
(1)旧版本的方式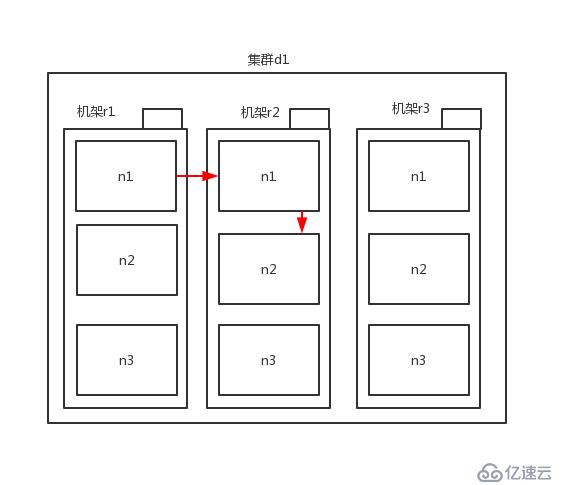
路径是 r1/n1 --> r2/n1 --> r2/n2
(2)新版本方式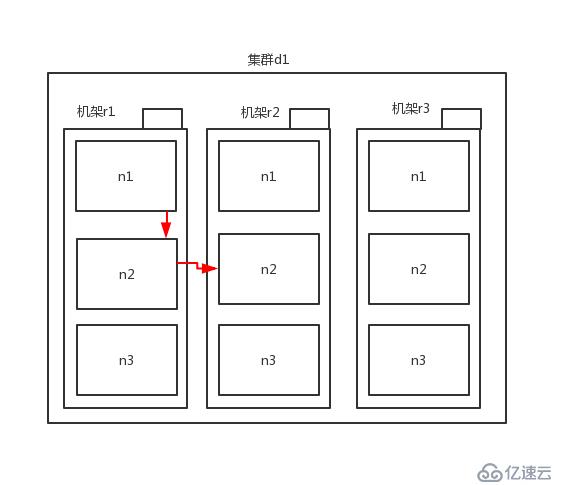
路径是 r1/n1 --> r1/n2 --> r2/n2(后面这个其实任意都行,主要处于不同机架就好)
这种方式比第一种要好,因为这种方式数据经过的总路径更短了,只要一个副本需要跨机架传输,而上面的则有两个副本需要跨机架传输。
下面的分析过程基于 hadoop2.8.4 的源码分析的。
一般来说,会先通过 FileSystem.get() 获取到操作hdfs 的客户端对象,后面所有的操作都通过调用该对象的方法完成的。
FileSystem client = FileSystem.get(new URI("hdfs://bigdata121:9000"), conf);接着我们看看 FileSystem.get() 的实现
public static FileSystem get(URI uri, Configuration conf) throws IOException {
        String scheme = uri.getScheme();
        String authority = uri.getAuthority();
        if (scheme == null && authority == null) {
            return get(conf);
        } else {
            if (scheme != null && authority == null) {
                URI defaultUri = getDefaultUri(conf);
                if (scheme.equals(defaultUri.getScheme()) && defaultUri.getAuthority() != null) {
                    return get(defaultUri, conf);
                }
            }

            String disableCacheName = String.format("fs.%s.impl.disable.cache", scheme);

  /*
  这里是关键代码,表示进入 CACHE.get() 方法
  */
            return conf.getBoolean(disableCacheName, false) ? createFileSystem(uri, conf) : CACHE.get(uri, conf);
        }
    }
CACHE是FileSystem的一个静态内部类Cache 的对象。继续看看 CACHE.get()方法
FileSystem get(URI uri, Configuration conf) throws IOException {
            FileSystem.Cache.Key key = new FileSystem.Cache.Key(uri, conf);
            //进入CACHE对象的 getInternal() 方法
            return this.getInternal(uri, conf, key);
        }
进入CACHE对象的 getInternal() 方法
 private FileSystem getInternal(URI uri, Configuration conf, FileSystem.Cache.Key key) throws IOException {
            FileSystem fs;
            synchronized(this) {
            /*
            获取map中的filesytem对象,表示之前已经初始化了filesystem对象,并存储到map集合中,现在直接从map中获取就好。
            */
                fs = (FileSystem)this.map.get(key);
            }

            if (fs != null) {
                //如果fs存在,就直接返回存在的filesytem实例即可
                return fs;
            } else {
            //如果是初次使用filesystem,就得创建并初始化
                fs = FileSystem.createFileSystem(uri, conf);
                synchronized(this) {
                    FileSystem oldfs = (FileSystem)this.map.get(key);
                    if (oldfs != null) {
                        fs.close();
                        return oldfs;
                    } else {
                        if (this.map.isEmpty() && !ShutdownHookManager.get().isShutdownInProgress()) {
                            ShutdownHookManager.get().addShutdownHook(this.clientFinalizer, 10);
                        }

                        fs.key = key;
                        this.map.put(key, fs);
                        if (conf.getBoolean("fs.automatic.close", true)) {
                            this.toAutoClose.add(key);
                        }

                        return fs;
                    }
                }
            }
        }
我们看到了上面有两种方式,一种是如果filesytem对象已存在,那么直接从map获取并返回对象即可。如果不存在,就调用 FileSystem.createFileSystem() 方法创建,创建完成后返回fs。下面看看这个方法.
private static FileSystem createFileSystem(URI uri, Configuration conf) throws IOException {
        Tracer tracer = FsTracer.get(conf);
        TraceScope scope = tracer.newScope("FileSystem#createFileSystem");
        scope.addKVAnnotation("scheme", uri.getScheme());

        FileSystem var6;
        try {
            Class<?> clazz = getFileSystemClass(uri.getScheme(), conf);
            FileSystem fs = (FileSystem)ReflectionUtils.newInstance(clazz, conf);

            //这是关键性的代码,看名字就知道,对filesytem 进行初始化
            fs.initialize(uri, conf);
            var6 = fs;
        } finally {
            scope.close();
        }

        return var6;
    }
我们要注意,FileSystem这个类是抽象类,它的实现子类是 DistributedFileSystem,所以虽然 fs是FileSystem类型的,但是对象本身是DistributedFileSystem类型的,也就是java 的多态特性。所以fs.initialize() 调用的实际上是 DistributedFileSystem中initialize()方法。下面看看这个方法
/*
DistributedFileSystem.class
*/

public void initialize(URI uri, Configuration conf) throws IOException {
        super.initialize(uri, conf);
        this.setConf(conf);
        String host = uri.getHost();
        if (host == null) {
            throw new IOException("Incomplete HDFS URI, no host: " + uri);
        } else {
            this.homeDirPrefix = conf.get("dfs.user.home.dir.prefix", "/user");

            //这是关键性代码,创建了一个DFSClient对象,顾名思义就是RPC的客户端
            this.dfs = new DFSClient(uri, conf, this.statistics);
            this.uri = URI.create(uri.getScheme() + "://" + uri.getAuthority());
            this.workingDir = this.getHomeDirectory();
            this.storageStatistics = (DFSOpsCountStatistics)GlobalStorageStatistics.INSTANCE.put("DFSOpsCountStatistics", new StorageStatisticsProvider() {
                public StorageStatistics provide() {
                    return new DFSOpsCountStatistics();
                }
            });
        }
    }
看到上面创建了一个 DFSClient() 对象,赋值给了 this.dfs。下面看看这个类的构造方法。
/*
DFSClient.class
*/

public DFSClient(URI nameNodeUri, ClientProtocol rpcNamenode, Configuration conf, Statistics stats) throws IOException {
        .............................
        /*源码比较长,所以截取重要的部分显示*/

        //这是一个关键性变量,其实就是namenode代理对象,只不过还没有创建对象
        ProxyAndInfo<ClientProtocol> proxyInfo = null;
        ...............................

        //下面开始创建namenode代理对象
        if (proxyInfo != null) {
            this.dtService = proxyInfo.getDelegationTokenService();
            this.namenode = (ClientProtocol)proxyInfo.getProxy();
        } else if (rpcNamenode != null) {
            Preconditions.checkArgument(nameNodeUri == null);
            this.namenode = rpcNamenode;
            this.dtService = null;
        } else {
            Preconditions.checkArgument(nameNodeUri != null, "null URI");
            //这里创建代理对象信息
            proxyInfo = NameNodeProxiesClient.createProxyWithClientProtocol(conf, nameNodeUri, nnFallbackToSimpleAuth);
            this.dtService = proxyInfo.getDelegationTokenService();

            //这里可以看到直接通过 proxyInfo.getProxy()获取namenode代理对象,并将引用赋值给 this.namenode。并且类型是 ClientProtocol 类型的。
            this.namenode = (ClientProtocol)proxyInfo.getProxy();
        }

    /*下面省略一堆代码*/

    }
可以看到上面已经通过 this.namenode = (ClientProtocol)proxyInfo.getProxy(); 获取到了 namenode 的代理对象,也就是rpc的客户端对象。下面看看 ClientProtocol 这个是啥东西,因为代理对象是这个类型的。
/*
ClientProtocol.class

这是个接口
*/
public interface ClientProtocol {
    long versionID = 69L;
    /*

    下面主要是定义很多个抽象方法,主要就是用于对hdfs进行操作的接口,比如,open,create等这些常用方法。
    */
}
下面看看 proxyInfo创建代理对象的方法
/*
NameNodeProxiesClient
*/

    public static NameNodeProxiesClient.ProxyAndInfo<ClientProtocol> createProxyWithClientProtocol(Configuration conf, URI nameNodeUri, AtomicBoolean fallbackToSimpleAuth) throws IOException {
        AbstractNNFailoverProxyProvider<ClientProtocol> failoverProxyProvider = createFailoverProxyProvider(conf, nameNodeUri, ClientProtocol.class, true, fallbackToSimpleAuth);
        if (failoverProxyProvider == null) {

        //创建无HA的代理对象
            InetSocketAddress nnAddr = DFSUtilClient.getNNAddress(nameNodeUri);
            Text dtService = SecurityUtil.buildTokenService(nnAddr);
            //创建proxy对象
            ClientProtocol proxy = createNonHAProxyWithClientProtocol(nnAddr, conf, UserGroupInformation.getCurrentUser(), true, fallbackToSimpleAuth);

            //ProxyAndInfo是一个静态内部类,将前面的proxy通过该类封装后返回,可通过该类的 getProxy 方法返回已创建的proxy对象
            return new NameNodeProxiesClient.ProxyAndInfo(proxy, dtService, nnAddr);
        } else {

        //创建有HA的代理对象
            return createHAProxy(conf, nameNodeUri, ClientProtocol.class, failoverProxyProvider);
        }
    }
可以看到上面是已经创建了 proxy对象,并返回,而且我们也可以看到,创建的proxy对象就是clientProtocol类型的。下面看看创建proxy对象的方法 createNonHAProxyWithClientProtocol()
/*
NameNodeProxiesClient
*/

   public static ClientProtocol createNonHAProxyWithClientProtocol(InetSocketAddress address, Configuration conf, UserGroupInformation ugi, boolean withRetries, AtomicBoolean fallbackToSimpleAuth) throws IOException {
        RPC.setProtocolEngine(conf, ClientNamenodeProtocolPB.class, ProtobufRpcEngine.class);
        RetryPolicy defaultPolicy = RetryUtils.getDefaultRetryPolicy(conf, "dfs.client.retry.policy.enabled", false, "dfs.client.retry.policy.spec", "10000,6,60000,10", SafeModeException.class.getName());
        long version = RPC.getProtocolVersion(ClientNamenodeProtocolPB.class);

        //这里是核心代码,可以明显看到调用 RPC 模块中的方法创建proxy对象
        ClientNamenodeProtocolPB proxy = (ClientNamenodeProtocolPB)RPC.getProtocolProxy(ClientNamenodeProtocolPB.class, version, address, ugi, conf, NetUtils.getDefaultSocketFactory(conf), Client.getTimeout(conf), defaultPolicy, fallbackToSimpleAuth).getProxy();
        if (withRetries) {
            Map<String, RetryPolicy> methodNameToPolicyMap = new HashMap();
            ClientProtocol translatorProxy = new ClientNamenodeProtocolTranslatorPB(proxy);
            return (ClientProtocol)RetryProxy.create(ClientProtocol.class, new DefaultFailoverProxyProvider(ClientProtocol.class, translatorProxy), methodNameToPolicyMap, defaultPolicy);
        } else {
            return new ClientNamenodeProtocolTranslatorPB(proxy);
        }
    }
所以至此我们可以发现,客户端和namenode之间通信的方式就是通过RPC实现的。
总结来说,方法的调用时序图如下: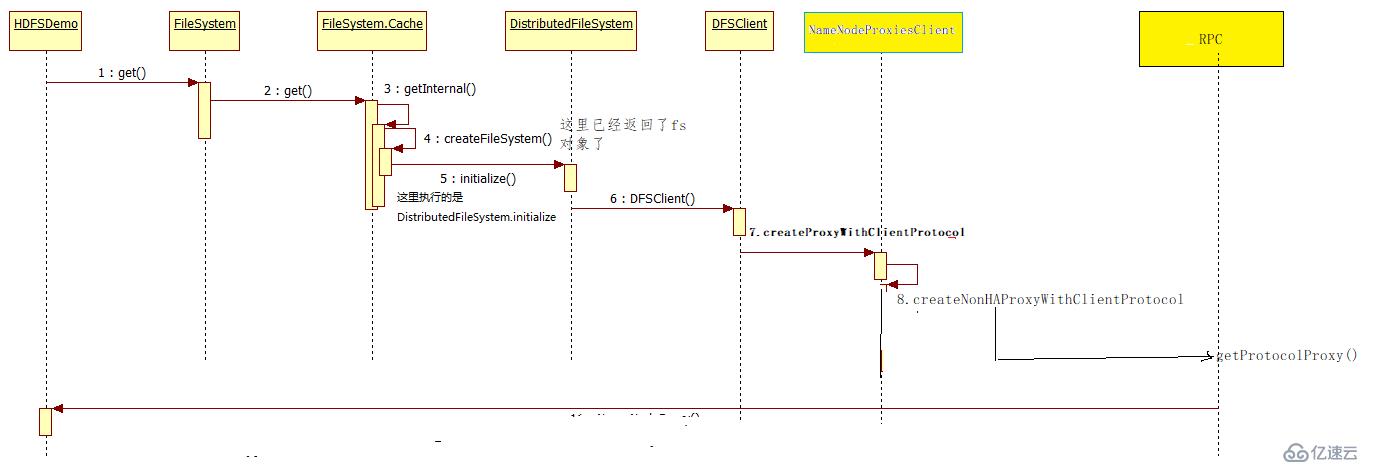
一般来说,上传操作,首先得
OutputStream os = fs.create(new Path("xxxx"));即创建文件,然后再上传文件数据。上传数据的流程和普通的流操作没什么区别。
下面看看这个 create方法。
/*
FileSystem.class
*/

    public abstract FSDataOutputStream create(Path var1, FsPermission var2, boolean var3, int var4, short var5, long var6, Progressable var8) throws IOException;
可以看到这是个抽象方法,前面也说到,它的实现子类是 DistributedFileSystem,这里这里是调用子类的 create方法,继续看
/*
DistributedFileSystem.class
*/

    public FSDataOutputStream create(Path f, final FsPermission permission, final EnumSet<CreateFlag> cflags, final int bufferSize, final short replication, final long blockSize, final Progressable progress, final ChecksumOpt checksumOpt) throws IOException {
        this.statistics.incrementWriteOps(1);
        this.storageStatistics.incrementOpCounter(OpType.CREATE);
        Path absF = this.fixRelativePart(f);
        return (FSDataOutputStream)(new FileSystemLinkResolver<FSDataOutputStream>() {
            public FSDataOutputStream doCall(Path p) throws IOException {

                //这里是核心代码,this.dfs前面说到了就是存储了DFSClient对象的引用的。可以通过该客户端调用很多操作hdfs的方法。这里调用create方法,创建了一个 DFSOutputStream 对象。输出流对象
                DFSOutputStream dfsos = DistributedFileSystem.this.dfs.create(DistributedFileSystem.this.getPathName(p), permission, cflags, replication, blockSize, progress, bufferSize, checksumOpt);

                //这里将上面创建的dfsos进行包装并返回
                return DistributedFileSystem.this.dfs.createWrappedOutputStream(dfsos, DistributedFileSystem.this.statistics);
            }

            public FSDataOutputStream next(FileSystem fs, Path p) throws IOException {
                return fs.create(p, permission, cflags, bufferSize, replication, blockSize, progress, checksumOpt);
            }
        }).resolve(this, absF);
    }
可以看见上面创建返回了 DFSOutputStream 输出流对象。下面看看DFSClient.create方法的实现代码。
/*
DFSClient.class
*/

public DFSOutputStream create(String src, FsPermission permission, EnumSet<CreateFlag> flag, boolean createParent, short replication, long blockSize, Progressable progress, int buffersize, ChecksumOpt checksumOpt, InetSocketAddress[] favoredNodes) throws IOException {
        this.checkOpen();
        FsPermission masked = this.applyUMask(permission);
        LOG.debug("{}: masked={}", src, masked);

        //创建输出流对象
        DFSOutputStream result = DFSOutputStream.newStreamForCreate(this, src, masked, flag, createParent, replication, blockSize, progress, this.dfsClientConf.createChecksum(checksumOpt), this.getFavoredNodesStr(favoredNodes));
        this.beginFileLease(result.getFileId(), result);
        return result;
    }
继续看 DFSOutputStream.newStreamForCreate 这个方法.
/*
DistributedFileSystem.class
*/

static DFSOutputStream newStreamForCreate(DFSClient dfsClient, String src, FsPermission masked, EnumSet<CreateFlag> flag, boolean createParent, short replication, long blockSize, Progressable progress, DataChecksum checksum, String[] favoredNodes) throws IOException {
        TraceScope ignored = dfsClient.newPathTraceScope("newStreamForCreate", src);
        Throwable var12 = null;

        try {
            HdfsFileStatus stat = null;
            boolean shouldRetry = true;
            int retryCount = 10;

            while(true) {
                if (shouldRetry) {
                    shouldRetry = false;

                    try {

                    //这里是核心代码,可以看见是调用 dfsclient.namenode这个代理对象中的create方法创建文件,并返回状态
                        stat = dfsClient.namenode.create(src, masked, dfsClient.clientName, new EnumSetWritable(flag), createParent, replication, blockSize, SUPPORTED_CRYPTO_VERSIONS);
                    } catch (RemoteException var27) {
                        IOException e = var27.unwrapRemoteException(new Class[]{AccessControlException.class, DSQuotaExceededException.class, QuotaByStorageTypeExceededException.class, FileAlreadyExistsException.class, FileNotFoundException.class, ParentNotDirectoryException.class, NSQuotaExceededException.class, RetryStartFileException.class, SafeModeException.class, UnresolvedPathException.class, SnapshotAccessControlException.class, UnknownCryptoProtocolVersionException.class});
                        if (e instanceof RetryStartFileException) {
                            if (retryCount <= 0) {
                                throw new IOException("Too many retries because of encryption zone operations", e);
                            }

                            shouldRetry = true;
                            --retryCount;
                            continue;
                        }

                        throw e;
                    }
                }

                Preconditions.checkNotNull(stat, "HdfsFileStatus should not be null!");

                //这里将上面创建文件的状态传入输出流作为参数
                DFSOutputStream out = new DFSOutputStream(dfsClient, src, stat, flag, progress, checksum, favoredNodes);
                //看见一个神奇的方法
                out.start();
                DFSOutputStream var30 = out;

                //返回输出流
                return var30;
            }
        } catch (Throwable var28) {
            var12 = var28;
            throw var28;
        } finally {
            if (ignored != null) {
                if (var12 != null) {
                    try {
                        ignored.close();
                    } catch (Throwable var26) {
                        var12.addSuppressed(var26);
                    }
                } else {
                    ignored.close();
                }
            }

        }
    }
上面看到 DFSOutputStream 对象居然有一个 start方法,来看看先。
/*
DFSOutputStream.class
*/
   protected synchronized void start() {
        this.getStreamer().start();
    }

// 继续看 this.getStreamer() 这个方法,可以看到这个方法返回的是DataStreamer,继续看这个类
 protected DataStreamer getStreamer() {
        return this.streamer;
    }

/*
DataStreamer.class
*/
//可以看到这个类继承了 Daemon类,而Daemon本身是继承了 Thread类
class DataStreamer extends Daemon {  }
由此可得知,DFSOutputStream 这个类本身并没有继承 Thread类,但是使用DataStreamer这个继承了 Thread类的来新建线程传输数据,不占用当前线程。而在 DataStreamer 这个类中,重写了 Thread标志性的 run 方法。传输数据就是在这里完成的。前面说到的 hdfs的 pipeline 也是这个run方法中实现的,里面是一个while死循环,知道传输完数据为止,或者客户端关闭。代码过长,就不看了。反正看到这里已经成功获取了 client的输出流对象,后面就是传统的输入流和输出流的对接了,这里不细讲了。
方法时序图如下:
1、FileSystem初始化,Client拿到NameNodeRpcServer代理对象,建立与NameNode的RPC通信
2、调用FileSystem的create()方法,由于实现类为DistributedFileSystem,所有是调用该类中的create()方法
3、DistributedFileSystem持有DFSClient的引用,继续调用DFSClient中的create()方法
4、DFSOutputStream提供的静态newStreamForCreate()方法中调用NameNodeRpcServer服务端的create()方法并创建DFSOutputStream输出流对象返回
5、通过hadoop提供的IOUtil工具类将输出流输出到本地
1、基本流程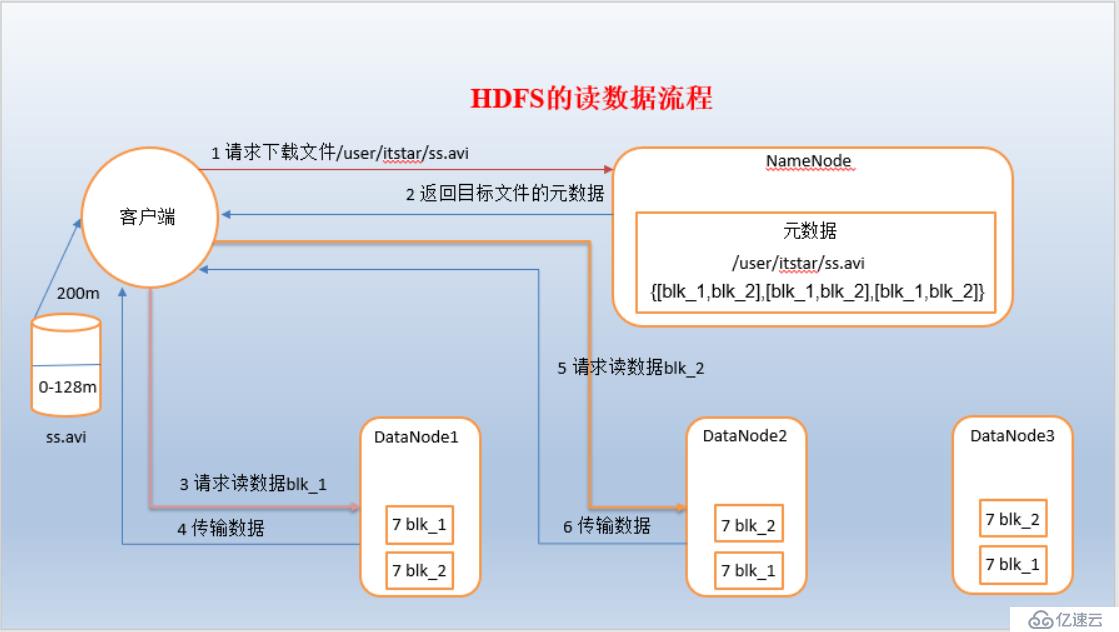
1)客户端向namenode请求下载文件,namenode在内存的metadata查找对应的文件的元数据,如果无则返回无,有则返回对应文件的block位置信息。而且,namenode会根据客户端所在的位置,根据datanode以及client之间的距离大小,将返回的 block 的副本的datanode节点从距离小到大排序,距离最近的datanode则排在第一位。
2)client通过机架感知策略,选择最近的datanode进行block请求读取
3)datanode开始传输数据给client,以packet为单位,并做校验
4)客户端接收packet之后,本地缓存,然后再往本地路径写入该block。
5)第二块,第三块block重复以上过程
注意:
如果在读数据的时候, DFSInputStream和datanode的通讯发生异常,就会尝试正在读的block的排序第二近的datanode,并且会记录哪个 datanode发生错误,剩余的blocks读的时候就会直接跳过该datanode。 DFSInputStream也会检查block数据校验和,如果发现一个坏的block,就会先报告到namenode节点,然后 DFSInputStream在其他的datanode上读该block的镜像。
client的初始化代码是一样的,这里不重复分析了。直接看下载
首先通过 open方法获取目标文件的输入流对象。
FSDataInputStream fis = client.open(getPath);下面看看这个open方法
/*
FileSystem.class
*/

public FSDataInputStream open(Path f) throws IOException {
        return this.open(f, this.getConf().getInt("io.file.buffer.size", 4096));
    }

public abstract FSDataInputStream open(Path var1, int var2) throws IOException;
可以看到,依旧是抽象方法,所以依旧是调用 DistributedFileSystem的open方法。
/*
DistributedFileSystem.class
*/
    public FSDataInputStream open(Path f, final int bufferSize) throws IOException {
        this.statistics.incrementReadOps(1);
        this.storageStatistics.incrementOpCounter(OpType.OPEN);
        Path absF = this.fixRelativePart(f);
        return (FSDataInputStream)(new FileSystemLinkResolver<FSDataInputStream>() {
            public FSDataInputStream doCall(Path p) throws IOException {

            //核心代码,这里调用dfsclient的open方法穿件输入流
                DFSInputStream dfsis = DistributedFileSystem.this.dfs.open(DistributedFileSystem.this.getPathName(p), bufferSize, DistributedFileSystem.this.verifyChecksum);
                return DistributedFileSystem.this.dfs.createWrappedInputStream(dfsis);
            }

            public FSDataInputStream next(FileSystem fs, Path p) throws IOException {
                return fs.open(p, bufferSize);
            }
        }).resolve(this, absF);
    }
熟悉的套路,依旧调用 dfsclient的open方法,创建输入流,下面看看这个open方法
/*
DFSClient.class
*/

public DFSInputStream open(String src, int buffersize, boolean verifyChecksum) throws IOException {
        this.checkOpen();
        TraceScope ignored = this.newPathTraceScope("newDFSInputStream", src);
        Throwable var5 = null;

        DFSInputStream var6;
        try {

         //这里直接创建一个输入流对象,如果按照上面上传文件的套路来说,应该是  dfsclient.namenode.open(xxx)才对的,这里并没有
            var6 = new DFSInputStream(this, src, verifyChecksum, (LocatedBlocks)null);
        } catch (Throwable var15) {
            var5 = var15;
            throw var15;
        } finally {
            if (ignored != null) {
                if (var5 != null) {
                    try {
                        ignored.close();
                    } catch (Throwable var14) {
                        var5.addSuppressed(var14);
                    }
                } else {
                    ignored.close();
                }
            }

        }

        return var6;
    }
上面并没有调用DFSClient.open,而是将DFSClient作为参数传入DFSInputStream。下面看看 DFSInputStream 这个神奇的类。
/*
DFSInputStream.class
*/

DFSInputStream(DFSClient dfsClient, String src, boolean verifyChecksum, LocatedBlocks locatedBlocks) throws IOException {
        //将dfsclinet保存到当前类中
        this.dfsClient = dfsClient;
        this.verifyChecksum = verifyChecksum;
        this.src = src;
        synchronized(this.infoLock) {
            this.cachingStrategy = dfsClient.getDefaultReadCachingStrategy();
        }

        this.locatedBlocks = locatedBlocks;
        //核心方法,开始获取block信息,如有多少个block,以及每个block所在的datanode节点名
        this.openInfo(false);
    }
下面看看 openInfo() 方法
/*
DFSInputStream.class
*/

    void openInfo(boolean refreshLocatedBlocks) throws IOException {
        DfsClientConf conf = this.dfsClient.getConf();
        synchronized(this.infoLock) {

            //获取block的位置信息以及最后一个block的长度(因为最后一个block肯定不是完整的128M的长度)
            this.lastBlockBeingWrittenLength = this.fetchLocatedBlocksAndGetLastBlockLength(refreshLocatedBlocks);

            int retriesForLastBlockLength;
            for(retriesForLastBlockLength = conf.getRetryTimesForGetLastBlockLength(); retriesForLastBlockLength > 0 && this.lastBlockBeingWrittenLength == -1L; --retriesForLastBlockLength) {
                DFSClient.LOG.warn("Last block locations not available. Datanodes might not have reported blocks completely. Will retry for " + retriesForLastBlockLength + " times");
                this.waitFor(conf.getRetryIntervalForGetLastBlockLength());
                this.lastBlockBeingWrittenLength = this.fetchLocatedBlocksAndGetLastBlockLength(true);
            }

            if (this.lastBlockBeingWrittenLength == -1L && retriesForLastBlockLength == 0) {
                throw new IOException("Could not obtain the last block locations.");
            }
        }
    }
下面看看 fetchLocatedBlocksAndGetLastBlockLength 这个获取block信息的方法
/*
DFSInputStream.class
*/

private long fetchLocatedBlocksAndGetLastBlockLength(boolean refresh) throws IOException {
        LocatedBlocks newInfo = this.locatedBlocks;
        if (this.locatedBlocks == null || refresh) {

            //可以看到这里是调用 dfsclient中的方法俩获取block信息
            newInfo = this.dfsClient.getLocatedBlocks(this.src, 0L);
        }

        DFSClient.LOG.debug("newInfo = {}", newInfo);
        if (newInfo == null) {
            throw new IOException("Cannot open filename " + this.src);
        } else {
            if (this.locatedBlocks != null) {
                Iterator<LocatedBlock> oldIter = this.locatedBlocks.getLocatedBlocks().iterator();
                Iterator newIter = newInfo.getLocatedBlocks().iterator();

                while(oldIter.hasNext() && newIter.hasNext()) {
                    if (!((LocatedBlock)oldIter.next()).getBlock().equals(((LocatedBlock)newIter.next()).getBlock())) {
                        throw new IOException("Blocklist for " + this.src + " has changed!");
                    }
                }
            }

            this.locatedBlocks = newInfo;
            long lastBlockBeingWrittenLength = 0L;
            if (!this.locatedBlocks.isLastBlockComplete()) {
                LocatedBlock last = this.locatedBlocks.getLastLocatedBlock();
                if (last != null) {
                    if (last.getLocations().length == 0) {
                        if (last.getBlockSize() == 0L) {
                            return 0L;
                        }

                        return -1L;
                    }

                    long len = this.readBlockLength(last);
                    last.getBlock().setNumBytes(len);
                    lastBlockBeingWrittenLength = len;
                }
            }

            this.fileEncryptionInfo = this.locatedBlocks.getFileEncryptionInfo();
            return lastBlockBeingWrittenLength;
        }
    }
看到上面又回到调用 dfsClient.getLocatedBlocks,看看这个方法
/*
DFSClient.class
*/

public LocatedBlocks getLocatedBlocks(String src, long start) throws IOException {
        return this.getLocatedBlocks(src, start, this.dfsClientConf.getPrefetchSize());
    }

//继续调用下面这个方法
    public LocatedBlocks getLocatedBlocks(String src, long start, long length) throws IOException {
        TraceScope ignored = this.newPathTraceScope("getBlockLocations", src);
        Throwable var7 = null;

        LocatedBlocks var8;
        try {

        //调用这个静态方法获取 block位置信息
            var8 = callGetBlockLocations(this.namenode, src, start, length);
        } catch (Throwable var17) {
            var7 = var17;
            throw var17;
        } finally {
            if (ignored != null) {
                if (var7 != null) {
                    try {
                        ignored.close();
                    } catch (Throwable var16) {
                        var7.addSuppressed(var16);
                    }
                } else {
                    ignored.close();
                }
            }

        }

        return var8;
    }

//继续看
    static LocatedBlocks callGetBlockLocations(ClientProtocol namenode, String src, long start, long length) throws IOException {
        try {

        //熟悉的味道,通过 namenode 的代理对象获取block信息
            return namenode.getBlockLocations(src, start, length);
        } catch (RemoteException var7) {
            throw var7.unwrapRemoteException(new Class[]{AccessControlException.class, FileNotFoundException.class, UnresolvedPathException.class});
        }
    }
上面可以看到,仍旧是通过 namenode代理对象发起操作,下面看看 namenode.getBlockLocations。因为代理对象的类型是 ClientProtocol类型的,是个接口,所以得到实现子类中查看 ,ClientNamenodeProtocolTranslatorPB这个类。
/*
ClientNamenodeProtocolTranslatorPB.class
*/

public LocatedBlocks getBlockLocations(String src, long offset, long length) throws IOException {
        GetBlockLocationsRequestProto req = GetBlockLocationsRequestProto.newBuilder().setSrc(src).setOffset(offset).setLength(length).build();

        try {

            //熟悉的味道,调用 rcpProxy 向namenode server 发起操作。
            GetBlockLocationsResponseProto resp = this.rpcProxy.getBlockLocations((RpcController)null, req);
            return resp.hasLocations() ? PBHelperClient.convert(resp.getLocations()) : null;
        } catch (ServiceException var8) {
            throw ProtobufHelper.getRemoteException(var8);
        }
    }
看到这里,下面就是RPC底层的操作了。
方法时序图如下: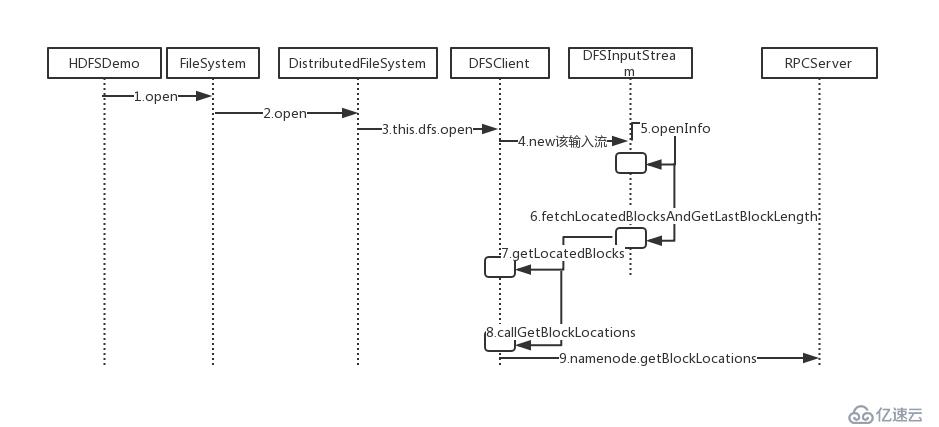 1、FileSystem初始化,Client拿到NameNodeRpcServer代理对象,建立与NameNode的RPC通信(与前面一样)
2、调用FileSystem的open()方法,由于实现类为DistributedFileSystem,所有是调用该类中的open()方法
3、DistributedFileSystem持有DFSClient的引用,继续调用DFSClient中的open()方法
4、实例化DFSInputStream输入流
5、调用openinfo()方法
6、调用fetchLocatedBlocksAndGetLastBlockLength()方法,抓取block信息并获取最后block长度
7、调用DFSClient中的getLocatedBlocks()方法,获取block信息
8、在callGetBlockLocations()方法中通过NameNode代理对象调用NameNodeRpcServer的getBlockLocations()方法
9、将block信息写入输出流,在8中会将 block 位置信息保存到DFSInputStream输入流对象中的成员变量中
10、交给IOUtil,下载文件到本地
免责声明:本站发布的内容(图片、视频和文字)以原创、转载和分享为主,文章观点不代表本网站立场,如果涉及侵权请联系站长邮箱:is@yisu.com进行举报,并提供相关证据,一经查实,将立刻删除涉嫌侵权内容。


