这篇文章主要为大家展示了“Android如何实现页面跳转”,内容简而易懂,条理清晰,希望能够帮助大家解决疑惑,下面让小编带领大家一起研究并学习一下“Android如何实现页面跳转”这篇文章吧。
App功能
在第一个Activity输入消息
点击第一个Activity的发送按钮
发送消息到第二个Activity
第二个Activity显示收到的消息
App结构(2个Activity+2个Layout) :
打开App时,启动CreateMessageActivty
加载activity_create_message.xml作为布局
用户点击按钮启动ReceiveMessageActivty
加载activity _receive_message.xml作为布局
activity_create_message.xml
<?xml version="1.0" encoding="utf-8"?>
<androidx.constraintlayout.widget.ConstraintLayout xmlns:android="http://schemas.android.com/apk/res/android"
    xmlns:app="http://schemas.android.com/apk/res-auto"
    xmlns:tools="http://schemas.android.com/tools"
    android:layout_width="match_parent"
    android:layout_height="match_parent"
    tools:context=".CreateMessageActivity">

    <LinearLayout
        android:layout_width="match_parent"
        android:layout_height="match_parent"
        android:orientation="vertical">

        <EditText
            android:id="@+id/input"
            android:layout_width="match_parent"
            android:layout_height="wrap_content"
            android:ems="10"
            android:hint="@string/hint"
            android:inputType="textPersonName"
            android:textSize="30sp"/>

        <Button
            android:id="@+id/button"
            android:layout_width="match_parent"
            android:layout_height="wrap_content"
            android:onClick="onSendMessage"
            android:text="@string/send"
            android:textSize="30sp"
            />

    </LinearLayout>
</androidx.constraintlayout.widget.ConstraintLayout>
activity _receive_message.xml
<?xml version="1.0" encoding="utf-8"?>
<androidx.constraintlayout.widget.ConstraintLayout xmlns:android="http://schemas.android.com/apk/res/android"
    xmlns:app="http://schemas.android.com/apk/res-auto"
    xmlns:tools="http://schemas.android.com/tools"
    android:layout_width="match_parent"
    android:layout_height="match_parent"
    app:layout_constraintRight_toRightOf="parent"
    tools:context=".ReceiveMessageActivity">

    <TextView
        android:id="@+id/output"
        android:layout_width="wrap_content"
        android:layout_height="wrap_content"
        android:text="2nd Activity"
        android:textSize="34sp"
        app:layout_constraintLeft_toLeftOf="parent"
        app:layout_constraintRight_toRightOf="parent"
        app:layout_constraintTop_toTopOf="parent" />
</androidx.constr
string.xml
<resources>
    <string name="app_name">Messager</string>
    <string name="send">Send Message</string>
    <string name="hint">Enter a message</string>
    <string name="choser">Send Message via ...</string>
</resources>
CreateMessageActivty类:发送消息
public class CreateMessageActivity extends AppCompatActivity {

    //定义常量,作为消息的key
    public static final String MESSAGE_KEY="szst.it.ping.messager";

    @Override
    protected void onCreate(Bundle savedInstanceState) {
        super.onCreate(savedInstanceState);
        setContentView(R.layout.activity_create_message);
    }

    public void onSendMessage(View Button){
        //获得编辑框引用
        EditText editText = findViewById(R.id.input);
        //取出编辑框文字
        String message = editText.getText().toString();

        //Intent是Android中的信使,新建Intent打开,设置收件Activity为ReceiveMessageActivity
        Intent intent = new Intent(this,ReceiveMessageActivity.class) ;
        //在intent中附加消息
        intent.putExtra(MESSAGE_KEY,message);
        //向Android发出请求
        startActivity(intent);

    }
}
ReceiveMessageActivty类:接收消息
public class ReceiveMessageActivity extends AppCompatActivity {

    @Override
    protected void onCreate(Bundle savedInstanceState) {
        super.onCreate(savedInstanceState);
        setContentView(R.layout.activity_receive_message);

        //获得intent的引用
        Intent intent = getIntent();

        //根据key取出value
        String message = intent.getStringExtra(CreateMessageActivity.MESSAGE_KEY);

        //获得文本框内容,设置文字
        TextView textView = findViewById(R.id.output);
        textView.setText(message);
    }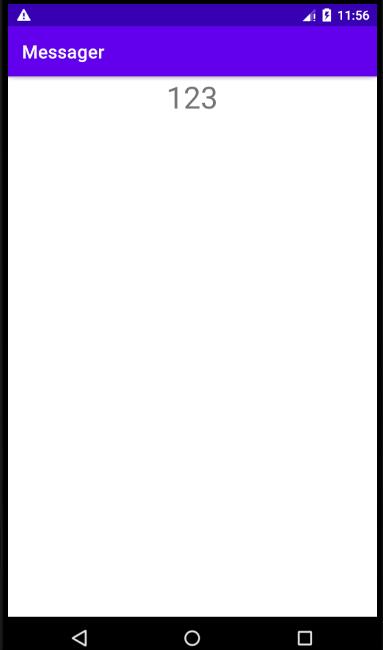
}启动界面
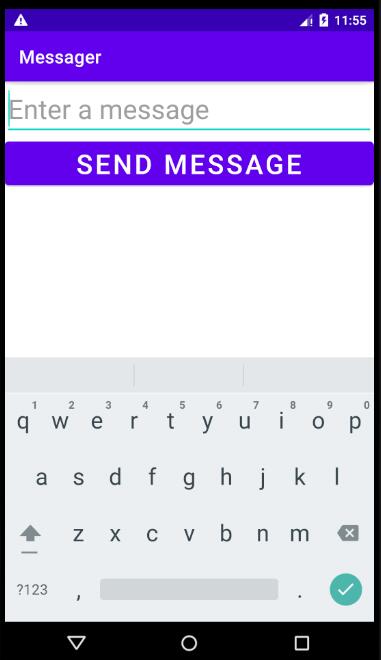
输入消息“123”并点击按钮发送,接收界面如下
App功能
在第一个Activity输入消息
点击第一个Activity的发送按钮
发送消息到其他App
其他App显示收到的消息
App结构(1个Activity+1个Layout) :
打开App时,启动CreateMessageActivty
加载activity_create_message.xml作为布局
用户点击按钮启动选择启动满足条件的App
activity_create_message.xml
同1.2中的activity_create_message.xml
CreateMessageActivty类:发送消息
public class CreateMessageActivity extends AppCompatActivity {

    @Override
    protected void onCreate(Bundle savedInstanceState) {
        super.onCreate(savedInstanceState);
        setContentView(R.layout.activity_create_message);
    }

    public void onSendMessage(View Button){
        //获得编辑框引用
        EditText editText = findViewById(R.id.input);
        //取出编辑框文字
        String message = editText.getText().toString();

        //使用new Intent(Intent.ACTION_SEND)替换new Intent(this, ReceiveMessageActivity.class),不知道其它App中的类名
        Intent intent = new Intent(Intent.ACTION_SEND);
        //设置消息类型为纯文本,系统不会对消息进行处理
        intent.setType("text/plain");
        //向Intent添加附加信息
        intent.putExtra(Intent.EXTRA_TEXT,message);

        //自定义选择对话框
        String chooserTitle = getString(R.string.choser);
        Intent chosenIntent = Intent.createChooser(intent, chooserTitle);

        startActivity(chosenIntent) ;
    }
}启动界面同1.4
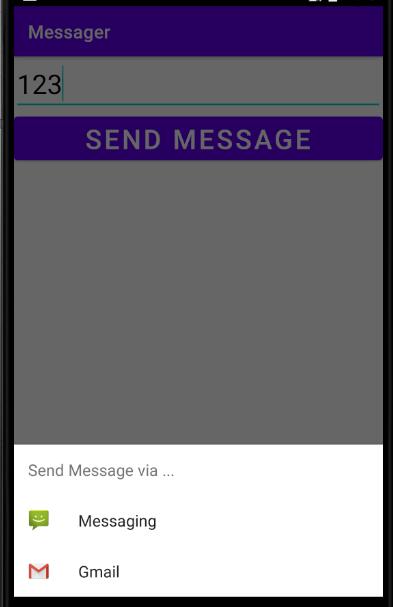
输入消息“123”并点击按钮发送,选择要发送的app(Messaging)
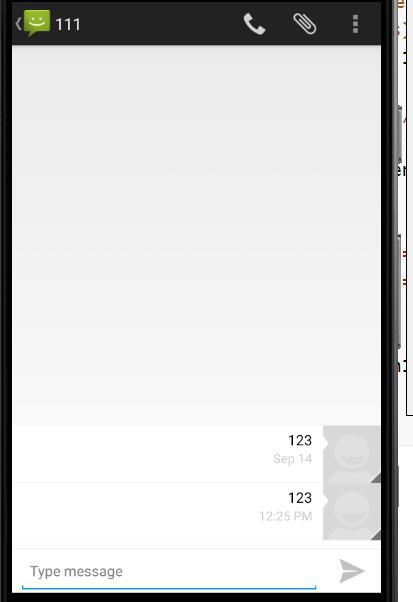
发送附加消息到111

发送成功
以上是“Android如何实现页面跳转”这篇文章的所有内容,感谢各位的阅读!相信大家都有了一定的了解,希望分享的内容对大家有所帮助,如果还想学习更多知识,欢迎关注亿速云行业资讯频道!
免责声明:本站发布的内容(图片、视频和文字)以原创、转载和分享为主,文章观点不代表本网站立场,如果涉及侵权请联系站长邮箱:is@yisu.com进行举报,并提供相关证据,一经查实,将立刻删除涉嫌侵权内容。


