这篇文章主要介绍了C++如何实现截图截屏,具有一定借鉴价值,感兴趣的朋友可以参考下,希望大家阅读完这篇文章之后大有收获,下面让小编带着大家一起了解一下。
如何使用Microsoft Windows操作系统中的Print Screen(打印屏幕)键
(1)Print Screen键
按下之后,截取整个屏幕的画面到剪切板里。可以复制到其他软件里,比如系统的画图工具,Office Word等。
(2)Alt+Print Screen组合键
按下之后,截取当前活动窗口的画面到剪切板里。
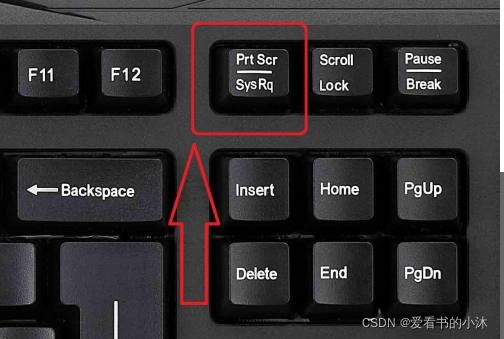

按下该组合键之后,使用鼠标在屏幕上画出想要截取的矩形区域,自动保存到系统剪切板里。

ffmpeg -i “输入视频” -fflags nobuffer -t 60 -ss 0 “输出地址”
说明:代表截取输入视频从0秒到60秒的片段,保存到输出地址。
-ss n : 起始时间为第n秒
-t n : 总共截取的片段时长为n秒
运行后会生成截图: out1.jpg out2.jpg out3.jpg …
ffmpeg -i fight.mp4 -r 1 -t 200 -ss 1 -f image2 out%d.jpg
https://docs.microsoft.com/en-us/windows/win32/gdi/capturing-an-image
int CaptureAnImage(HWND hWnd)
{
    HDC hdcScreen;
    HDC hdcWindow;
    HDC hdcMemDC = NULL;
    HBITMAP hbmScreen = NULL;
    BITMAP bmpScreen;
    DWORD dwBytesWritten = 0;
    DWORD dwSizeofDIB = 0;
    HANDLE hFile = NULL;
    char* lpbitmap = NULL;
    HANDLE hDIB = NULL;
    DWORD dwBmpSize = 0;

    // Retrieve the handle to a display device context for the client
    // area of the window.
    hdcScreen = GetDC(NULL);
    hdcWindow = GetDC(hWnd);

    // Create a compatible DC, which is used in a BitBlt from the window DC.
    hdcMemDC = CreateCompatibleDC(hdcWindow);

    if (!hdcMemDC)
    {
        MessageBox(hWnd, L"CreateCompatibleDC has failed", L"Failed", MB_OK);
        goto done;
    }

    // Get the client area for size calculation.
    RECT rcClient;
    GetClientRect(hWnd, &rcClient);

    // This is the best stretch mode.
    SetStretchBltMode(hdcWindow, HALFTONE);

    // The source DC is the entire screen, and the destination DC is the current window (HWND).
    if (!StretchBlt(hdcWindow,
        0, 0,
        rcClient.right, rcClient.bottom,
        hdcScreen,
        0, 0,
        GetSystemMetrics(SM_CXSCREEN),
        GetSystemMetrics(SM_CYSCREEN),
        SRCCOPY))
    {
        MessageBox(hWnd, L"StretchBlt has failed", L"Failed", MB_OK);
        goto done;
    }

    // Create a compatible bitmap from the Window DC.
    hbmScreen = CreateCompatibleBitmap(hdcWindow, rcClient.right - rcClient.left, rcClient.bottom - rcClient.top);

    if (!hbmScreen)
    {
        MessageBox(hWnd, L"CreateCompatibleBitmap Failed", L"Failed", MB_OK);
        goto done;
    }

    // Select the compatible bitmap into the compatible memory DC.
    SelectObject(hdcMemDC, hbmScreen);

    // Bit block transfer into our compatible memory DC.
    if (!BitBlt(hdcMemDC,
        0, 0,
        rcClient.right - rcClient.left, rcClient.bottom - rcClient.top,
        hdcWindow,
        0, 0,
        SRCCOPY))
    {
        MessageBox(hWnd, L"BitBlt has failed", L"Failed", MB_OK);
        goto done;
    }

    // Get the BITMAP from the HBITMAP.
    GetObject(hbmScreen, sizeof(BITMAP), &bmpScreen);

    BITMAPFILEHEADER   bmfHeader;
    BITMAPINFOHEADER   bi;

    bi.biSize = sizeof(BITMAPINFOHEADER);
    bi.biWidth = bmpScreen.bmWidth;
    bi.biHeight = bmpScreen.bmHeight;
    bi.biPlanes = 1;
    bi.biBitCount = 32;
    bi.biCompression = BI_RGB;
    bi.biSizeImage = 0;
    bi.biXPelsPerMeter = 0;
    bi.biYPelsPerMeter = 0;
    bi.biClrUsed = 0;
    bi.biClrImportant = 0;

    dwBmpSize = ((bmpScreen.bmWidth * bi.biBitCount + 31) / 32) * 4 * bmpScreen.bmHeight;

    // Starting with 32-bit Windows, GlobalAlloc and LocalAlloc are implemented as wrapper functions that
    // call HeapAlloc using a handle to the process's default heap. Therefore, GlobalAlloc and LocalAlloc
    // have greater overhead than HeapAlloc.
    hDIB = GlobalAlloc(GHND, dwBmpSize);
    lpbitmap = (char*)GlobalLock(hDIB);

    // Gets the "bits" from the bitmap, and copies them into a buffer
    // that's pointed to by lpbitmap.
    GetDIBits(hdcWindow, hbmScreen, 0,
        (UINT)bmpScreen.bmHeight,
        lpbitmap,
        (BITMAPINFO*)&bi, DIB_RGB_COLORS);

    // A file is created, this is where we will save the screen capture.
    hFile = CreateFile(L"captureqwsx.bmp",
        GENERIC_WRITE,
        0,
        NULL,
        CREATE_ALWAYS,
        FILE_ATTRIBUTE_NORMAL, NULL);

    // Add the size of the headers to the size of the bitmap to get the total file size.
    dwSizeofDIB = dwBmpSize + sizeof(BITMAPFILEHEADER) + sizeof(BITMAPINFOHEADER);

    // Offset to where the actual bitmap bits start.
    bmfHeader.bfOffBits = (DWORD)sizeof(BITMAPFILEHEADER) + (DWORD)sizeof(BITMAPINFOHEADER);

    // Size of the file.
    bmfHeader.bfSize = dwSizeofDIB;

    // bfType must always be BM for Bitmaps.
    bmfHeader.bfType = 0x4D42; // BM.

    WriteFile(hFile, (LPSTR)&bmfHeader, sizeof(BITMAPFILEHEADER), &dwBytesWritten, NULL);
    WriteFile(hFile, (LPSTR)&bi, sizeof(BITMAPINFOHEADER), &dwBytesWritten, NULL);
    WriteFile(hFile, (LPSTR)lpbitmap, dwBmpSize, &dwBytesWritten, NULL);

    // Unlock and Free the DIB from the heap.
    GlobalUnlock(hDIB);
    GlobalFree(hDIB);

    // Close the handle for the file that was created.
    CloseHandle(hFile);

    // Clean up.
done:
    DeleteObject(hbmScreen);
    DeleteObject(hdcMemDC);
    ReleaseDC(NULL, hdcScreen);
    ReleaseDC(hWnd, hdcWindow);

    return 0;
}HDC hdcSrc = GetDC(NULL); int nBitPerPixel = GetDeviceCaps(hdcSrc, BITSPIXEL); int nWidth = GetDeviceCaps(hdcSrc, HORZRES); int nHeight = GetDeviceCaps(hdcSrc, VERTRES); CImage image; image.Create(nWidth, nHeight, nBitPerPixel); BitBlt(image.GetDC(), 0, 0, nWidth, nHeight, hdcSrc, 0, 0, SRCCOPY); ReleaseDC(NULL, hdcSrc); image.ReleaseDC(); image.Save(s, Gdiplus::ImageFormatPNG);
void CaptureOpenGLWindow(const char* savePath, int w, int h)
{
	GLubyte* pPixelData;
	GLint    PixelDataLength;

	// 分配内存和打开文件
	pPixelData = (GLubyte*)malloc(w*h*3);
	if (pPixelData == 0)
		return;

	glPixelStorei(GL_UNPACK_ALIGNMENT, 4);
	glReadPixels(0, 0, w, h, GL_RGB, GL_UNSIGNED_BYTE, pPixelData);
	stbi_write_png(savePath, w, h, 3, pPixelData, 0);
	free(pPixelData);

	int iw = w, ih = h, n = 3;
	stbi_set_flip_vertically_on_load(true);
	unsigned char *idata = stbi_load(savePath, &iw, &ih, &n, 0);
	stbi_write_png(savePath, w, h, 3, idata, 0);
	stbi_image_free(idata);

}BITMAPINFOHEADER createBitmapHeader(int width, int height)
{
BITMAPINFOHEADER bi;
// create a bitmap
bi.biSize = sizeof(BITMAPINFOHEADER);
bi.biWidth = width;
bi.biHeight = -height; //this is the line that makes it draw upside down or not
bi.biPlanes = 1;
bi.biBitCount = 32;
bi.biCompression = BI_RGB;
bi.biSizeImage = 0;
bi.biXPelsPerMeter = 0;
bi.biYPelsPerMeter = 0;
bi.biClrUsed = 0;
bi.biClrImportant = 0;
return bi;
}
Mat captureScreenMat(HWND hwnd)
{
Mat src;
// get handles to a device context (DC)
HDC hwindowDC = GetDC(hwnd);
HDC hwindowCompatibleDC = CreateCompatibleDC(hwindowDC);
SetStretchBltMode(hwindowCompatibleDC, COLORONCOLOR);
// define scale, height and width
int screenx = GetSystemMetrics(SM_XVIRTUALSCREEN);
int screeny = GetSystemMetrics(SM_YVIRTUALSCREEN);
int width = GetSystemMetrics(SM_CXVIRTUALSCREEN);
int height = GetSystemMetrics(SM_CYVIRTUALSCREEN);
// create mat object
src.create(height, width, CV_8UC4);
// create a bitmap
HBITMAP hbwindow = CreateCompatibleBitmap(hwindowDC, width, height);
BITMAPINFOHEADER bi = createBitmapHeader(width, height);
// use the previously created device context with the bitmap
SelectObject(hwindowCompatibleDC, hbwindow);
// copy from the window device context to the bitmap device context
StretchBlt(hwindowCompatibleDC, 0, 0, width, height, hwindowDC, screenx, screeny, width, height, SRCCOPY); //change SRCCOPY to NOTSRCCOPY for wacky colors !
GetDIBits(hwindowCompatibleDC, hbwindow, 0, height, src.data, (BITMAPINFO*)&bi, DIB_RGB_COLORS); //copy from hwindowCompatibleDC to hbwindow
// avoid memory leak
DeleteObject(hbwindow);
DeleteDC(hwindowCompatibleDC);
ReleaseDC(hwnd, hwindowDC);
return src;
}
int main()
{
// capture image
HWND hwnd = GetDesktopWindow();
Mat src = captureScreenMat(hwnd);
// save img
cv::imwrite("Screenshot.png", src);
// clean-ups
buf.clear();
return 0;
}QDesktopWidget *desk = QApplication::desktop(); QScreen * screen = QGuiApplication::primaryScreen(); QPixmap p = screen->grabWindow(desk->winId()); QImage image = p.toImage();
感谢你能够认真阅读完这篇文章,希望小编分享的“C++如何实现截图截屏”这篇文章对大家有帮助,同时也希望大家多多支持亿速云,关注亿速云行业资讯频道,更多相关知识等着你来学习!
免责声明:本站发布的内容(图片、视频和文字)以原创、转载和分享为主,文章观点不代表本网站立场,如果涉及侵权请联系站长邮箱:is@yisu.com进行举报,并提供相关证据,一经查实,将立刻删除涉嫌侵权内容。


