上篇文章我们的那个登陆界面比较简陋,这篇文章稍微对这块进行了修改,如下

看到那个文本框中的图片和文本框中的文字了吗
<EditText android:id="@+id/txtUserName"
            android:hint="@string/hintInputUserNo"
            android:layout_width="fill_parent"
            android:drawableLeft="@drawable/user"
            android:layout_height="wrap_content"
            android:singleLine="true">
            </EditText>
图片就是上面代码中的drawableLeft这个属性来设置,而文字则是通过android:hint来设置
其文字是设置在string.xml中
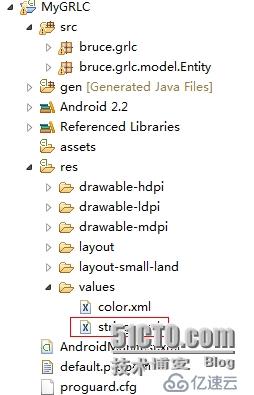
内容如下
<?xml version="1.0" encoding="utf-8"?>
<resources>
<string name="app_name">个人理财</string>
<string name="app_LoginName">用户登录</string>
<string name="labUserName">用户名:</string>
<string name="labPwd">密 码:</string>
<string name="labRePwd">重复密码:</string>
<string name="labRole">角色:</string>
<string name="labAdmin">管理员</string>
<string name="btnLoginText">登 录</string>
<string name="hintInputUserNo">请输入您的用户名</string>
<string name="hintInputUserPwd">请输入您的密码</string>
<string name="hintInputUserRePwd">请再次输入您的密码</string>
<string name="labColrLogin">#fff000</string>
<string name="btnCancelText">取消</string>
<string name="btnSure">确定</string>
<string name="btnUserReg">用户注册</string>
<string name="btnSysCode">系统参数</string>
<string name="btnDataBackup">数据备份</string>
<string name="labWelCome">欢迎您,</string>
<string name="chkDisplayPwd">显示密码</string>
<string name="WarningMsgTitle">提示</string>
<string name="UserNoIsEmpty">用户名不能为空!</string>
<string name="UserPWdIsEmpty">密码不能为空!</string>
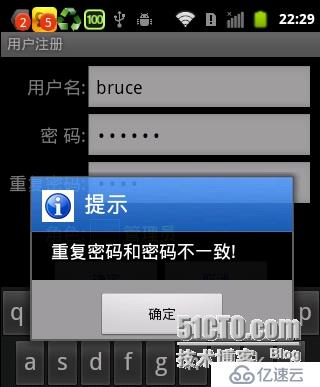
<string name="UserRepwdIsNotCorrect">重复密码和密码不一致!</string>
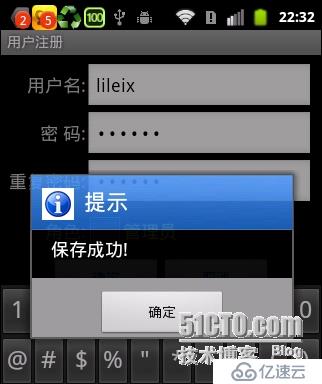
<string name="SaveSuccess">保存成功!</string>
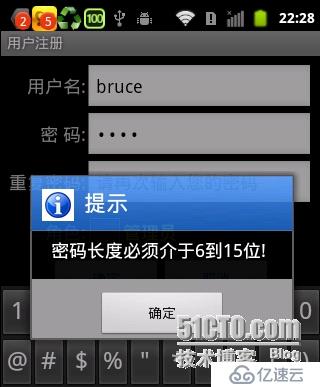
<string name="PwdLengthIsNotCorrect">密码长度必须介于6到15位!</string>
</resources>OK,通过设置android:hint="@string/hintInputUserNo"就可以实现水印效果。
OK,今天来看一下登录成功的界面以及功能
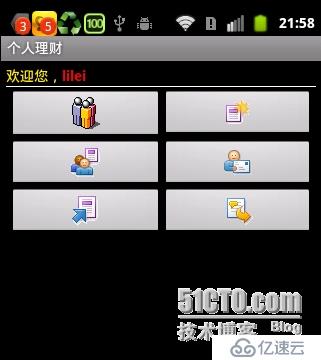
首先是登录成功后,会将登录用户的用户名传递给上面的界面。
public class index extends Activity {
    TextView labUser;
    ImageButton imgBtnUserRegister;
    /** Called when the activity is first created. */
    @Override
    public void onCreate(Bundle savedInstanceState) {
        super.onCreate(savedInstanceState);
        setContentView(R.layout.index);
        labUser = (TextView) this.findViewById(R.id.labUser);
        imgBtnUserRegister=(ImageButton)this.findViewById(R.id.imgBtnUserRegister);
        imgBtnUserRegister.setOnClickListener(new OnClickListener() {
            public void onClick(View v) {
                Intent intent = new Intent();
                intent.setClass(index.this,userregister.class);
                startActivityForResult(intent, 0);
            }
        });
        Init();
    }
    private void Init() {
        Bundle bundle = getIntent().getExtras();
        String userNo = bundle.getString("userNo");
        labUser.setText(userNo);
    }
}
在初始化Init方法中,接收到登陆界面传递过来的userNo,显示在TextView中。Index界面的代码如下
<?xml version="1.0" encoding="utf-8"?>
<LinearLayout xmlns:android="http://schemas.android.com/apk/res/android"
android:layout_width="fill_parent" android:layout_height="fill_parent"
android:padding="5dp" android:orientation="vertical">
<LinearLayout android:orientation="horizontal"
android:layout_width="fill_parent" android:layout_height="wrap_content">
<TextView android:id="@+id/labWelCome" android:layout_width="wrap_content"
android:text="@string/labWelCome" android:layout_height="fill_parent"
android:textColor="@color/yellow">
</TextView>
<TextView android:id="@+id/labUser" android:layout_width="wrap_content"
android:layout_height="fill_parent" android:textColor="@color/red"
android:textStyle="bold"></TextView>
</LinearLayout>
<View android:layout_height="1px" android:background="#FFFFFF"
android:layout_width="fill_parent" android:paddingBottom="10dp"></View>
<TableLayout android:id="@+id/tabMain"
android:layout_width="fill_parent" android:layout_height="wrap_content"
android:stretchColumns="*" android:padding="3dip">
<TableRow>
<ImageButton android:id="@+id/imgBtnUserRegister"
android:src="@drawable/userregister" />
<ImageButton android:id="@+id/p_w_picpathBtnSystemCode"
android:src="@drawable/main_system_code" />
</TableRow>
<TableRow>
<ImageButton android:id="@+id/imgBtnUserInfo"
android:src="@drawable/main_user_info" />
<ImageButton android:id="@+id/p_w_picpathBtnModifyPwd"
android:src="@drawable/main_modify_pwd" />
</TableRow>
<TableRow>
<ImageButton android:id="@+id/imgBtnEnter"
android:src="@drawable/main_enter_mng" />
<ImageButton android:id="@+id/imgBtnQuit" android:src="@drawable/main_quit_mng" />
</TableRow>
</TableLayout>
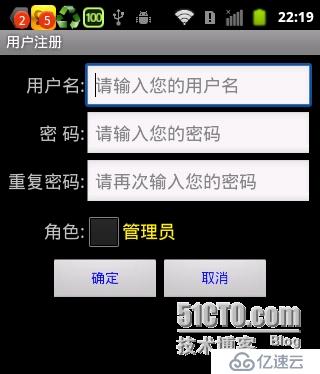
</LinearLayout>本界面采用TabelLayout布局。我们点击imgBtnUserRegister按钮,跳转到用户注册界面
Intent intent = new Intent();
                intent.setClass(index.this,userregister.class);
                startActivityForResult(intent, 0);
界面UI代码如下
<?xml version="1.0" encoding="utf-8"?>
<LinearLayout xmlns:android="http://schemas.android.com/apk/res/android"
    android:layout_width="fill_parent" android:layout_height="fill_parent"
    android:padding="5dp" android:orientation="vertical">
    <TableLayout android:id="@+id/tabMain"
        android:layout_width="fill_parent" android:layout_height="wrap_content"
        android:padding="3dip" android:stretchColumns="1">
        <TableRow>
            <TextView android:text="@string/labUserName"
                android:textSize="8pt" android:gravity="right" />
            <EditText android:id="@+id/txtUserName" android:maxLength="25"
                android:hint="@string/hintInputUserNo" android:singleLine="true"></EditText>
        </TableRow>
        <TableRow>
            <TextView android:text="@string/labPwd" android:textSize="8pt"
                android:gravity="right" />
            <EditText android:id="@+id/txtPwd" android:maxLength="50"
                android:singleLine="true" android:hint="@string/hintInputUserPwd"
                android:password="true"></EditText>
        </TableRow>
        <TableRow>
            <TextView android:text="@string/labRePwd" android:textSize="8pt"
                android:gravity="right" />
            <EditText android:id="@+id/txtRePwd" android:singleLine="true"
                android:hint="@string/hintInputUserRePwd" android:password="true"></EditText>
        </TableRow>
        <TableRow>
            <TextView android:text="@string/labRole" android:textSize="8pt"
                android:gravity="right" />
            <CheckBox android:id="@+id/chkRole" android:layout_width="wrap_content"
                android:layout_height="wrap_content" android:checked="false"
                android:text="@string/labAdmin" android:textColor="@color/yellow"
                android:textSize="8pt"></CheckBox>
        </TableRow>
    </TableLayout>
    <LinearLayout android:orientation="horizontal"
        android:gravity="center_horizontal" android:layout_width="fill_parent"
        android:layout_height="fill_parent">
        <Button android:id="@+id/btnSure" android:layout_width="110dp"
            android:layout_height="45dp" android:layout_gravity="center_horizontal"
            android:text="@string/btnSure" android:textStyle="bold"
            android:textColor="@color/blue"></Button>
        <Button android:id="@+id/btnCancel" android:layout_width="110dp"
            android:layout_gravity="center_horizontal" android:layout_height="45dp"
            android:text="@string/btnCancelText" android:textStyle="bold"
            android:textColor="@color/blue"></Button>
    </LinearLayout>
</LinearLayout>
点击确定按钮,注册用户。
btnSure.setOnClickListener(new OnClickListener() {
            public void onClick(View v) {
                String userName = txtUserName.getText().toString().trim();
                String pwd = txtPwd.getText().toString().trim();
                String rePwd = txtRePwd.getText().toString().trim();
                String isAdmin = chkRole.isChecked() ? "1" : "0";
                if (!CheckInput(userName, pwd, rePwd))
                    return;
                SoapObject response = GetServerResponse(userName, pwd, isAdmin);
                Boolean isSuccess = Boolean.valueOf(response.getProperty(
                        "IsSuccess").toString());
                if (isSuccess) {
                    ShowMessage(R.string.SaveSuccess);
                } else {
                    String errorMsg = response.getProperty("ErrorMessage")
                            .toString();
                    new AlertDialog.Builder(owner).setTitle(
                            R.string.WarningMsgTitle).setMessage(errorMsg)
                            .setIcon(R.drawable.info).setPositiveButton("确定",
                                    new DialogInterface.OnClickListener() {
                                        public void onClick(
                                                DialogInterface dialoginterface,
                                                int i) {
                                            txtUserName.setText("");
                                            txtPwd.setText("");
                                            txtRePwd.setText("");
                                            chkRole.setChecked(false);
                                        }
                                    }).show();
                }
            }
        });
首先先Check输入的用户名和密码等
private Boolean CheckInput(String userName, String pwd, String rePwd) {
        if (userName == null || userName.equals("")) {
            new AlertDialog.Builder(this).setTitle(R.string.WarningMsgTitle)
                    .setMessage(R.string.UserNoIsEmpty)
                    .setIcon(R.drawable.info).setPositiveButton("确定",
                            new DialogInterface.OnClickListener() {
                                public void onClick(
                                        DialogInterface dialoginterface, int i) {
                                    txtUserName.requestFocus();
                                }
                            }).show();
            return false;
        } 此处省略部分代码
如下都是一些Check。

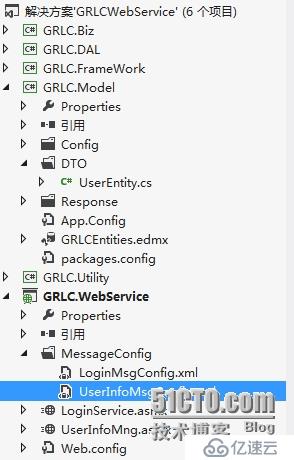
OK,到此一个用户就注册成功了。我们先看一下.net webservice端。
namespace GRLC.WebService
{
    /// <summary>
    /// UserInfoMng 的摘要说明
    /// </summary>
    [WebService(Namespace = "http://tempuri.org/")]
    [WebServiceBinding(ConformsTo = WsiProfiles.BasicProfile1_1)]
    [System.ComponentModel.ToolboxItem(false)]
    // 若要允许使用 ASP.NET AJAX 从脚本中调用此 Web 服务,请取消注释以下行。
    // [System.Web.Script.Services.ScriptService]
    public class UserInfoMng : System.Web.Services.WebService
    {
        [WebMethod]
        public CommonResponse UserInfoAdd(UserEntity userInfo)
        {
            return UserInfoBiz.GetInstance().AddUserInfo(userInfo);
        }
    }
}
下面是Biz层代码
namespace GRLC.Biz
{
public class UserInfoBiz
{
static UserInfoBiz userInfoBiz = new UserInfoBiz();
private UserInfoBiz()
{ }
public static UserInfoBiz GetInstance()
{
return userInfoBiz;
}
const string moduleName = "UserInfoModule";
private string GetMessageByName(string msgName)
{
return CommonFunction.GetMessageByModuleAndName(moduleName, msgName);
}
private string AddFaild
{
get
{
return this.GetMessageByName("AddFailed");
}
}
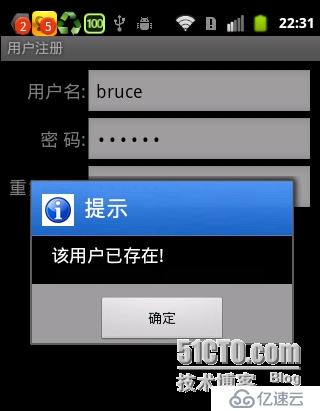
private string UserHasExists
{
get
{
return this.GetMessageByName("UserHasExists");
}
}
public CommonResponse AddUserInfo(UserEntity userEntity)
{
if (UserInfoMngDAL.GetInstance().IsUserInfoExists(userEntity.UseNo))
{
return new CommonResponse() { IsSuccess = false, ErrorMessage = UserHasExists };
}
User user = new User();
user.UseNo = userEntity.UseNo;
user.Pwd = Cryptor.Encrypt(userEntity.Pwd);
user.IsAdmin = userEntity.IsAdmin;
int suc = UserInfoMngDAL.GetInstance().AddUserInfo(user);
if (suc > 0)
{
return new CommonResponse() { IsSuccess = true };
}
return new CommonResponse() { IsSuccess = false, ErrorMessage = AddFaild };
}
}
}其中UserInfoMngDAL的定义如下
namespace GRLC.DAL
{
    public class UserInfoMngDAL
    {
        static UserInfoMngDAL userInfoMngDAL = new UserInfoMngDAL();
        private UserInfoMngDAL()
        { }
        public static UserInfoMngDAL GetInstance()
        {
            return userInfoMngDAL;
        }
        public int AddUserInfo(User user)
        {
            using(BonusEntities bonusEntities=new BonusEntities())
            {
                bonusEntities.User.Add(user);
                return bonusEntities.SaveChanges();
            }
        }
        public bool IsUserInfoExists(string userNo)
        {
            using (BonusEntities bonusEntities = new BonusEntities())
            {
                return bonusEntities.User.Any(u => u.UseNo == userNo);
            }
        }
    }
}
其中UserEntity的定义如下
namespace GRLC.Model.DTO
{
    public class UserEntity
    {
        public string UseNo { get; set; }
        public string Pwd { get; set; }
        public string IsAdmin { get; set; }
    }
}
到时候这个实体需要和Android那边传递的实体保持一致
Ok,我们接下来看看Android是如何调用的。
private SoapObject GetServerResponse(String userName, String pwd,
            String isAdmin) {
        SoapObject request = new SoapObject(NAMESPACE, METHOD_NAME);
        UserEntity userEntity = new UserEntity();
        userEntity.setProperty(0, userName);
        userEntity.setProperty(1, pwd);
        userEntity.setProperty(2, isAdmin);
        PropertyInfo pi = new PropertyInfo();
        pi.setName("userInfo");
        pi.setValue(userEntity);
        pi.setType(userEntity.getClass());
        request.addProperty(pi);// 将自定参数加入请求对象中
        SoapSerializationEnvelope soapEnvelope = new SoapSerializationEnvelope(
                SoapEnvelope.VER11);
        soapEnvelope.dotNet = true;
        soapEnvelope.setOutputSoapObject(request);
        HttpTransportSE httpTS = new HttpTransportSE(URL);
        soapEnvelope.bodyOut = httpTS;
        soapEnvelope.setOutputSoapObject(request);// 设置请求参数
        soapEnvelope.addMapping(NAMESPACE, "UserEntity", userEntity.getClass());
        try {
            httpTS.call(SOAP_ACTION, soapEnvelope);
        } catch (IOException e) {
            // TODO Auto-generated catch block
            e.printStackTrace();
        } catch (XmlPullParserException e) {
            // TODO Auto-generated catch block
            e.printStackTrace();
        }
        SoapObject result = null;
        try {
            result = (SoapObject) soapEnvelope.getResponse();
        } catch (SoapFault e) {
            // TODO Auto-generated catch block
            e.printStackTrace();
        }
        return result;
    }
OK,调用只要将数据对象传递正确,就不会调用失败。android中定义的UserEntity如下
package bruce.grlc.model.Entity;
import java.util.Hashtable;
import org.ksoap2.serialization.KvmSerializable;
import org.ksoap2.serialization.PropertyInfo;
public class UserEntity implements KvmSerializable {
    private String UseNo;
    private String Pwd;
    private String IsAdmin;
    @Override
    public Object getProperty(int arg0) {
        // TODO Auto-generated method stub
        Object property = null;
        switch (arg0) {
        case 0:
            property = this.UseNo;
            break;
        case 1:
            property = this.Pwd;
            break;
        case 2:
            property = this.IsAdmin;
        default:
            break;
        }
        return property;
    }
    @Override
    public int getPropertyCount() {
        // TODO Auto-generated method stub
        return 3;
    }
    @Override
    public void getPropertyInfo(int arg0, Hashtable arg1, PropertyInfo arg2) {
        // TODO Auto-generated method stub
        switch (arg0) {
        case 0:
            arg2.type = PropertyInfo.STRING_CLASS;
            arg2.name = "UseNo";
            break;
        case 1:
            arg2.type = PropertyInfo.STRING_CLASS;
            arg2.name = "Pwd";
            break;
        case 2:
            arg2.type = PropertyInfo.STRING_CLASS;
            arg2.name = "IsAdmin";
        default:
            break;
        }
    }
    @Override
    public void setProperty(int arg0, Object arg1) {
        // TODO Auto-generated method stub
        if (arg1 == null)
            return;
        switch (arg0) {
        case 0:
            this.UseNo = arg1.toString();
            break;
        case 1:
            this.Pwd = arg1.toString();
            break;
        case 2:
            this.IsAdmin = arg1.toString();
            break;
        default:
            break;
        }
    }
}
必须继承KvmSerializable这个抽象接口,并实现它的抽象方法。
public abstract interface org.ksoap2.serialization.KvmSerializable {

  // Method descriptor #4 (I)Ljava/lang/Object;
  public abstract java.lang.Object getProperty(int arg0);

  // Method descriptor #6 ()I
  public abstract int getPropertyCount();

  // Method descriptor #8 (ILjava/lang/Object;)V
  public abstract void setProperty(int arg0, java.lang.Object arg1);

  // Method descriptor #10 (ILjava/util/Hashtable;Lorg/ksoap2/serialization/PropertyInfo;)V
  public abstract void getPropertyInfo(int arg0, java.util.Hashtable arg1, org.ksoap2.serialization.PropertyInfo arg2);
}
OK,调用就是这么简单。最后,在界面操作的时候,当焦点在文本框中时,总是会弹出输入法,遮挡按钮,为了解决这一问题,需要采取两种方法
第一种,在AndroidManifest.xml中增加android:windowSoftInputMode="adjustResiz
<?xml version="1.0" encoding="utf-8"?>
<manifest xmlns:android="http://schemas.android.com/apk/res/android"
    package="bruce.grlc" android:versionCode="1" android:versionName="1.0">
    <uses-sdk android:minSdkVersion="8" />
    <application android:icon="@drawable/app" android:label="@string/app_name">
        <activity android:name=".main"
        android:label="@string/app_LoginName"
        android:windowSoftInputMode="adjustResize">
            <intent-filter>
                <action android:name="android.intent.action.MAIN" />
                <category android:name="android.intent.category.LAUNCHER" />
            </intent-filter>
        </activity>
        <activity android:name=".index" android:label="@string/app_name">
        </activity>
        <activity android:name=".userregister" android:label="@string/btnUserReg">
        </activity>
    </application>
    <uses-permission android:name="android.permission.INTERNET"></uses-permission>
</manifest>
这句的意思是当输入法出现时,界面自适应,但是有时候界面上的控件比较多时,依然会遮住某些控件。所以如下
第二种解决方案,在触摸屏幕其他地方时,自动关闭输入法
public boolean onTouchEvent(MotionEvent event) {
        InputMethodManager im = (InputMethodManager) getSystemService(Context.INPUT_METHOD_SERVICE);
        im.hideSoftInputFromWindow(getCurrentFocus()
                .getApplicationWindowToken(),
                InputMethodManager.HIDE_NOT_ALWAYS);
        return super.onTouchEvent(event);
    }
OK,本篇到此结束。
免责声明:本站发布的内容(图片、视频和文字)以原创、转载和分享为主,文章观点不代表本网站立场,如果涉及侵权请联系站长邮箱:is@yisu.com进行举报,并提供相关证据,一经查实,将立刻删除涉嫌侵权内容。


