注意:后台服务更改之后需要重启服务;前端配置文件更改之后也需要重新跑命令npm run dev
一、使用express提供后台服务,输出接口
后台目录结构: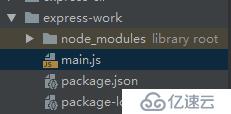
main.js
var express = require('express');
var app = express();
app.get('/', function (req, res) {
    res.send('Hello World');
})
app.get('/getUserInfo', function(req, res, next){  //用于前台调用的接口,地址:http://127.0.0.1:8888/getUserInfo
    console.log('get用户请求数据为:');
    console.log(req.query);
    res.json({
        code:200,
        data:{
            message:'你好'
        },
        message:'success'
    });
});
var server = app.listen(8888, function () {
    var host = server.address().address
    var port = server.address().port
    console.log(host,port)
    console.log("your application is running on http://localhost:8888")
})
---解释---:
(1)、app.get()表示接收所有前端来的get请求方式,同理,app.post(),app.delete()分别表示接受前端发来的post请求与delete请求方式。
(2)、app.get(path, callback [, callback ...]):传参,第一个参数是路径,后面的参数都是是回调函数,可以放1个或者多个回调函数,一般只用到1个回调,本例也只用了1个回调。官方对这个方法的解释是:Routes HTTP GET requests to the specified path with the specified callback functions,意即‘用指定回调方法向指定路径发送http get请求’,通俗讲就是对path参数表示的接口执行一些操作,这些操作写在第二个参数即回调函数内。
(3) app.get()中的第二个参数---回调函数:该回调函数接受3个参数,按照大多数人的不成文的书写惯例,这三个传参写作req, res, next。第一个参数表示http请求对象(request),第二个参数表示response对象,第三个参数是next函数,表示将控制权交给下一个中间件。next有点复杂不详说,只要记住一个请求结束后,不要后面写next(),常见的res.send(),res.json()都属于请求结束,后面不要再写next()了.
(4)res.json(obj) 表示返回一个json对象,该对象的详细数据就是括号里的东西啦。
二、前端使用vue-cli脚手架
前端目录结构: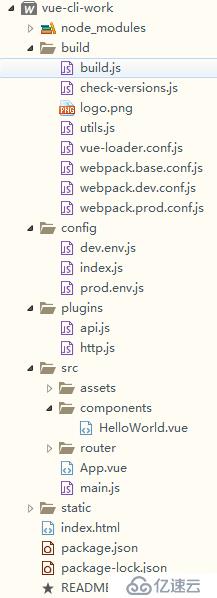
1、先解决跨域问题
在config/index.js文件里面的module.exports对象里面的proxyTable里面加上以下代理:
proxyTable: {
    '/gsafetyapi': {
        target: 'http://127.0.0.1:8888/', //要代理的服务地址,要加http
        changeOrigin: true,  //是否跨域
        secure: false, //如果是https接口,需要配置这个参数
        timeout: 480000,
        pathRewrite: {
            '^/gsafetyapi': ''  //这里理解成用gsafetyapi代替target里面的地址
        }
    },
},
2、封装axios和接口地址集合
新建文件夹plugins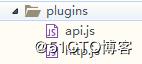
http.js
import axios from 'axios';
import apiConfig from "./api.js"
import qs from 'qs'

axios.defaults.baseURL = process.env.NODE_ENV === 'development' ? 'gsafetyapi' : '';  //开发的时候加代理,生产环境不用加代理
// 请求拦截
axios.interceptors.request.use(config => {
  // 1. 这个位置就请求前最后的配置
  // 2. 当然你也可以在这个位置 加入你的后端需要的用户授权信息
  return config
}, error => {
  return Promise.reject(error)
})
// 响应拦截
axios.interceptors.response.use(response => {
  // 请求成功
  // 1. 根据自己项目需求定制自己的拦截
  // 2. 然后返回数据
  return response;
}, error => {
  // 请求失败
  if (error && error.response) {
    switch (error.response.status) {
      case 400:
        // 对400错误您的处理\
        break
      case 401:
        // 对 401 错误进行处理
        break
      default:
        // 如果以上都不是的处理
        return Promise.reject(error);
    }
  }
})
export default {
  /**
   * get 请求
   * @param api_name 接口路由
   * @param params 接口参数
   * @param time 如果请求话费了超过 `time` 的时间,请求将被中断
   * @returns {AxiosPromise<any>}
   */
  // get(apiKey, data) {
  //   return axios.get(apiConfig[apiKey], data);
  // },
  get(api_name, params, time) {
    let url = apiConfig[api_name];
    return axios({
      method: 'get',
      url: url,
      params: params,
      timeout: time || 60000,
    })
  },
  /**
   * post 请求
   *
   * @param api_name 接口路由
   * @param params 接口参数
   * @param time 如果请求话费了超过 `time` 的时间,请求将被中断
   * @returns {AxiosPromise<any>}
   */
  post(api_name, params, time) {

    let url = apiConfig[api_name];
    return axios({
      method: 'post',
      url: url,
      params: qs.stringify(params),
      timeout: time || 60000,
    })
  },
}
封装api的文件
api.js
export default {
  getCompanyDepartmentTree: "/api/v1/user-center-service/companyDepartment/getCompanyDepartmentTree", //获取组织架构数据
  getUserInfo:"/getUserInfo"
}
3、全局注册封装好的axios
// The Vue build version to load with the `import` command
// (runtime-only or standalone) has been set in webpack.base.conf with an alias.
// 已在webpack.base.conf中使用别名设置了要使用import命令加载的Vue构建版本(仅运行时或独立运行)
import Vue from 'vue'
import App from './App'
import router from './router'
import http from '../plugins/http'
Vue.config.productionTip = false
Vue.prototype.$http = http;

/* eslint-disable no-new */
new Vue({
  el: '#app',
  router,
  components: { App },
  template: '<App/>'
})
4、调接口:http://127.0.0.1:8888/getUserInfo
created () {
    this.$http
        .get("getUserInfo",{name:'kate'}).then(res => {
            console.log(res)
        });
}三、数据库使用mongodb
1、安装,直接安装在c盘下
2、配置环境变量
3、创建数据库文件的存放位置
在D盘下新建mongodb文件夹,
mongodb文件夹里面新建data文件夹,data文件夹里面新建db和log文件夹
mongodb文件夹里面新建mongo.config配置文件,文件内容:
##数据文件  此处=后对应到数据所存放的目录
dbpath=d:\mongodb\data\db
##日志文件  此处=后对应到日志文件所在路径
logpath=d:\mongodb\data\log\mongodb.log
##错误日志采用追加模式,配置这个选项后mongodb的日志会追加到现有的日志文件,而不是从新创建一个新文件
logappend=true
#启用日志文件,默认启用
journal=true
#这个选项可以过滤掉一些无用的日志信息,若需要调试使用请设置为false
quiet=true
#端口号 默认为27017
port=27017
4、
net start MongoDB 开启服务
net stop MongoDB 关闭服务
5、现在搭建的是本地数据库,数据库地址:http://localhost:27017/
6、mongoose 数据模型
直接用 node.js 也可以连接数据库进行读写,但mongoose 这个插件除了封装这个基本功能之外,还提供了很多其他的服务。
安装:npm install mongoose --save
var mongoose = require('mongoose');
//链接数据库
mongoose.connect('mongodb://localhost:27017/db',function(err){
    if(err){
        console.log('数据库连接失败')
    }else{
        console.log('数据库连接成功')
        var server = app.listen(8888, function(){
            console.log("Server is running on http://localhost:8888");
        });
    }
});7、建立schema,类似于一个collection集合的概念,类似于mysql的一张表,定义schema,就是定义这张表的表结构,要存什么格式的数据,每一条数据都是这张表的一行,
注意:这种schema不具备操作数据库的能力
let mongoose = require('mongoose');
let userScheam = new mongoose.Schema({
    //账户名
    account:String,
    pass:String,
    checkPass:String,
    age:Number
})
module.exports = userScheam;
8、定义好了Schema,接下就是生成Model。
model是由schema生成的模型,可以对数据库进行操作
//表有了,下面需要借助model,来对数据库的表进行操作
let mongoose = require('mongoose');
let userSchema = require('../schemas/userSchema');
module.exports = new mongoose.model('User',userSchema); //User是给这个模型起的名字,后面是要操作的那个表的表名
//User才具有了对表进行增删改查的api
9、在路由文件前面,引入该model,然后就可以使用
var User = require('./models/userModel');
User.save(); User.find();等等增删改查方法
免责声明:本站发布的内容(图片、视频和文字)以原创、转载和分享为主,文章观点不代表本网站立场,如果涉及侵权请联系站长邮箱:is@yisu.com进行举报,并提供相关证据,一经查实,将立刻删除涉嫌侵权内容。


