下文主要给大家带来MySQL8.0二进制免编译包安装部署过程,希望这些内容能够带给大家实际用处,这也是我编辑MySQL8.0二进制免编译包安装部署过程这篇文章的主要目的。好了,废话不多说,大家直接看下文吧。
目前官网MySQL有四个版本,分别为GA版本、DMR版本、RC版本、Beta版本。一般情况下生产环境或者测试环境我们推荐使用GA版本,因为这个版本基本上所有功能都经过bug测试通过。
实验环境的操作系统
`[root@localhost ~]# cat /etc/redhat-release
CentOS Linux release 7.5.1804 (Core)`
2.关闭SELinux
`vi /etc/sysconfig/selinux
SELINUX=disabled`3.关闭系统防火墙iptables
service iptables stop
iptables -F
iptables -X
iptables -Z
4.重启机器reboot
5.查看Centos7.x下IO支持的调度算法
dmesg |grep -i scheduler
可以看到Centos7.x默认支持的是deadline算法,而一般会在SSD固态硬盘环境中使用noop算法,在centos7.x上建议使用deadline模式
注:Centos7.x调整I/O Scheduler系统优化:https://www.zhangfangzhou.cn/centos-io-scheduler.html
6.swap分区的设置,swappiness值的大小建议都不要设置0和100,对wappiness数值大小解释如下:
如果系统内存够大,那么不应该让 linux 太多使用swap分区, 可以通过修改swappiness的数值。
当swappiness为0的时候表示最大限度使用物理内存,然后才是 swap空间;
当swappines为100的时候,则表示积极的使用swap分区,并且把内存上的数据及时的搬运到swap空间里面。
在CentOS、Red Hat、ubuntu等系统中,swappiness的默认值都为60
如果Linux云服务器的内存很小,比如说低于4G,那么可以不用更改这个值,因为毕竟考虑到内存不够用而去借用swap的情况。
而相对于很多云服务器来说,目前还是建议设置在值为25以下,如果超过了8G内存,而且目前内存使用量还有剩余的话,建议直接将swappiness改成0,这样可以最大限度的使用物理内存,减少硬盘的负载,同时加快速度。也避免在使用Memcached的时候出现"memcached timeout error because of slow response"这样的错误。
查看swappiness当前设置的值:
[root@liulei ~]# cat /proc/sys/vm/swappiness
30
修改swappiness的值:比如设置swappiness值为10
临时修改方案:
#sysctl vm.swappiness=10
vm.swappiness = 10
#cat /proc/sys/vm/swappiness
10
说明:采用临时修改方案,如果我们重启了系统,配置会失效.
永久修改方案:
在/etc/sysctl.conf 文件里添加如下参数:
vm.swappiness=10
或者:
#echo 'vm.swappiness=10'>> /etc/sysctl.conf
7.文件系统的选择,建议使用xfs文件系统,与ext4文件相比,它更方便管理、且支持动态扩容和方便删除文件
8.操作系统的限制,可以修改系统的软硬件限制来防止系统错误的发生。
编辑/etc/security/limits.conf,加入限制内容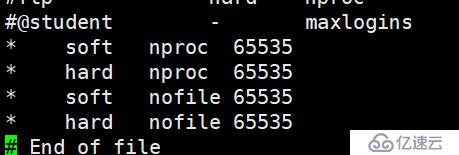
9.关闭numa,让CPU可以更好利用内存
说明:mysql二进制安装包下载地址
https://dev.mysql.com/downloads/mysql/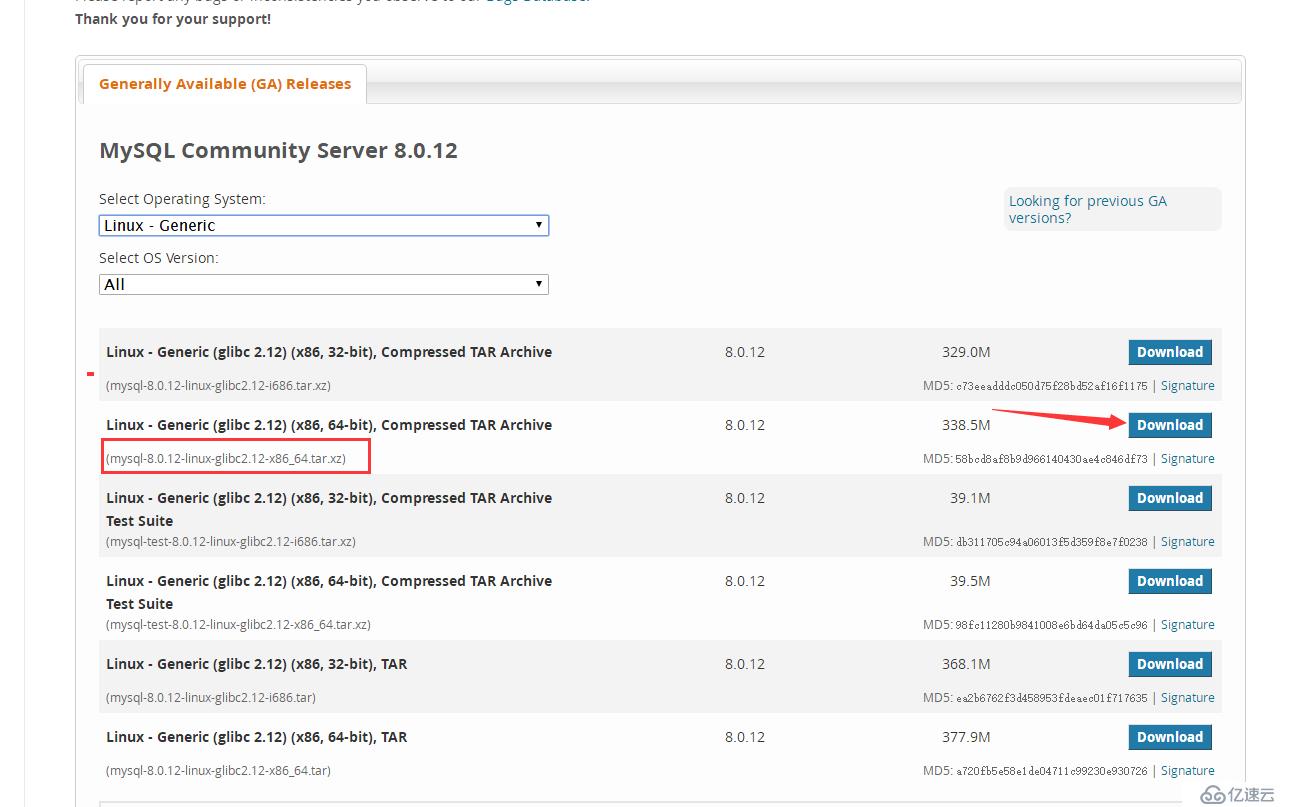

[mysql]
prompt="\u@db \R:\m:\s [\d]> "
no-auto-rehash
[mysqld]
user=mysql
port=3306
basedir=/usr/local/mysql
datadir=/data/mysql/
socket=/tmp/mysql.sock
pid-file=db.pid
character-set-server=utf8mb4
skip_name_resolve=1
open_files_limit=65535
back_log=1024
max_connections=512
max_connect_errors=1000000
table_open_cache=1024
table_definition_cache=1024
table_open_cache_instances=64
thread_stack=512K
external-locking=FALSE
max_allowed_packet=32M
sort_buffer_size=4M
join_buffer_size=4M
thread_cache_size=768
#query_cache_size=0
#query_cache_type=0
interactive_timeout=600
wait_timeout=600
tmp_table_size=32M
max_heap_table_size=32M
slow_query_log=1
slow_query_log_file=/data/mysql/slow.log
log-error=/data/mysql/error.log
long_query_time=0.1
server-id=3306101
log-bin=/data/mysql/mysql-bin
sync_binlog=1
binlog_cache_size=4M
max_binlog_cache_size=1G
max_binlog_size=1G
expire_logs_days=7
master_info_repository=TABLE
relay_log_info_repository=TABLE
gtid_mode=on
enforce_gtid_consistency=1
log_slave_updates
binlog_format=row
relay_log_recovery=1
relay-log-purge=1
key_buffer_size=32M
read_buffer_size=8M
read_rnd_buffer_size=4M
bulk_insert_buffer_size=64M
lock_wait_timeout=3600
explicit_defaults_for_timestamp=1
innodb_thread_concurrency=0
innodb_sync_spin_loops=100
innodb_spin_wait_delay=30
transaction_isolation=REPEATABLE-READ
#innodb_additional_mem_pool_size=16M
innodb_buffer_pool_size=512M
innodb_buffer_pool_instances=8
innodb_buffer_pool_load_at_startup=1
innodb_buffer_pool_dump_at_shutdown=1
innodb_data_file_path=ibdata1:1G:autoextend
innodb_flush_log_at_trx_commit=1
innodb_log_buffer_size=32M
innodb_log_file_size=2G
innodb_log_files_in_group=2
innodb_max_undo_log_size=4G
innodb_io_capacity=4000
innodb_io_capacity_max=8000
innodb_flush_neighbors=0
innodb_write_io_threads=8
innodb_read_io_threads=8
innodb_purge_threads=4
innodb_page_cleaners=4
innodb_open_files=65535
innodb_max_dirty_pages_pct=50
innodb_flush_method=O_DIRECT
innodb_lru_scan_depth=4000
innodb_checksum_algorithm=crc32
##innodb_file_format=Barracuda
##innodb_file_format_max = Barracuda
innodb_lock_wait_timeout=10
innodb_rollback_on_timeout=1
innodb_print_all_deadlocks=1
innodb_file_per_table=1
innodb_online_alter_log_max_size=4G
internal_tmp_disk_storage_engine=InnoDB
innodb_stats_on_metadata=0
[mysqldump]
quick
max_allowed_packet=32M
6.初始化数据库
有密码初始化命令如下
[root@localhost ~]# /usr/local/mysql/bin/mysqld --defaults-file=/etc/my.cnf --basedir=/usr/local/mysql --datadir=/data/mysql/ --user=mysql --initialize
/usr/local/mysql/bin/mysqld: error while loading shared libraries: libaio.so.1: cannot open shared object file: No such file or directory
解决办法:
yum search libaio
yum install -y libaio.x86_64 libaio-devel.x86_64
重新执行初始化命令成功
[root@localhost ~]# /usr/local/mysql/bin/mysqld --defaults-file=/etc/my.cnf --basedir=/usr/local/mysql --datadir=/data/mysql/ --user=mysql --initialize
注:无密码初始化命令如下:
/usr/local/mysql/bin/mysqld --defaults-file=/etc/my.cnf --basedir=/usr/local/mysql --datadir=/data/mysql/ --user=mysql --initialize-insecure
注:临时初始化密码,像MySQL5.7一样,记录在log-error(错误日志)里面
7.启动数据库。命令如下:
/usr/local/mysql/bin/mysqld_safe --defaults-file=/etc/my.cnf &
查看数据库启动日志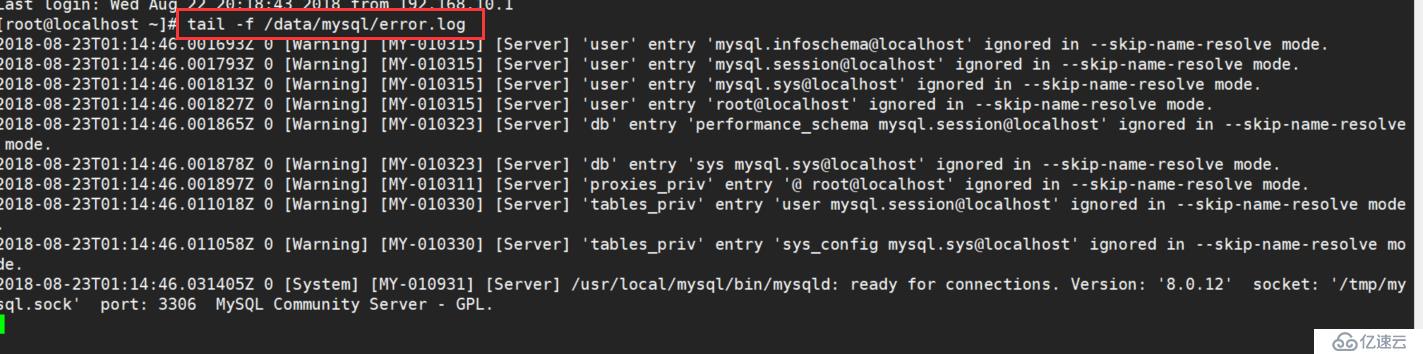
从日志可知数据启动成功,当然也可以查看mysql进程是否存在
查看mysql启动进程
可以看到mysql数据已经启动,但是直接使用mysql无法登陆数据库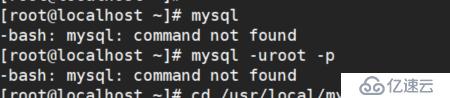
原因:这是由于系统默认会查找/usr/bin下的命令,但是我们mysql是安装在/usr/local/mysql/bin/目录下的,所以这个mysql命令不在/usr/bin这个目录下,当然会找不到命令,可以通过做软连接,把/usr/local/mysql/bin/mysql映射一个链接到/usr/bin目录下:
ln -s /usr/local/mysql/bin/mysql /usr/bin
就可以直接使用下面命令登陆数据库:
mysql -uroot -p
登陆msyql数据库需要密码,原因是我们之前初始化时设置了密码,这个密码可以在error.log里面找到
[root@localhost ~]# cat /data/mysql/error.log |grep password
2018-08-23T01:10:18.173290Z 5 [Note] [MY-010454] [Server] A temporary password is generated for root@localhost: oJ+eg/cE!6)a
数据库密码就是:oJ+eg/cE!6)a
使用该密码登陆数据库
[root@localhost ~]# mysql -uroot -p
Enter password:
Welcome to the MySQL monitor. Commands end with ; or \g.
Your MySQL connection id is 22
Server version: 8.0.12
Copyright (c) 2000, 2018, Oracle and/or its affiliates. All rights reserved.
Oracle is a registered trademark of Oracle Corporation and/or its
affiliates. Other names may be trademarks of their respective
owners.
Type 'help;' or '\h' for help. Type '\c' to clear the current input statement.
root@db 22:06: [(none)]>
首次登陆数据库需要修改数据库root密码
root@db 22:27: [(none)]> alter user 'root'@'localhost' identified by '123456';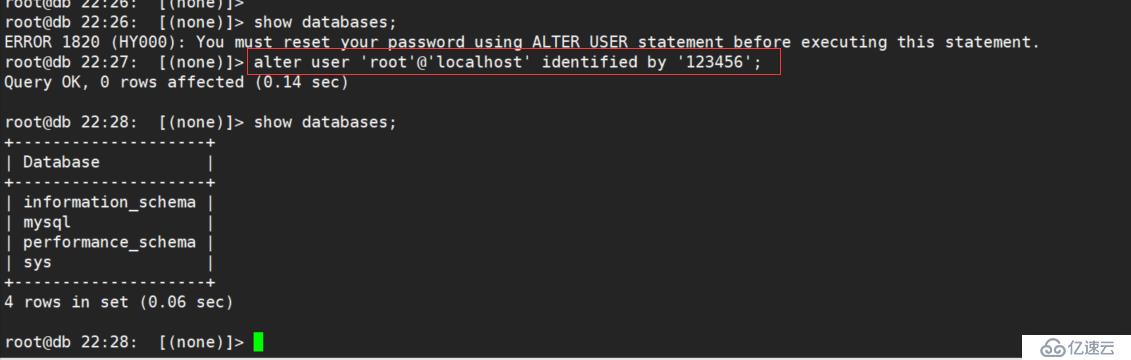
安装完成之后;可以观察到MySQL8.0数据目录下的文件相比之前版本发生了一些变化。
[root@localhost ~]# ll /data/mysql/
total 5300312
-rw-r----- 1 mysql mysql 56 Aug 22 21:10 auto.cnf
-rw------- 1 mysql mysql 1676 Aug 22 21:10 ca-key.pem
-rw-r--r-- 1 mysql mysql 1112 Aug 22 21:10 ca.pem
-rw-r--r-- 1 mysql mysql 1112 Aug 22 21:10 client-cert.pem
-rw------- 1 mysql mysql 1680 Aug 22 21:10 client-key.pem
-rw-r----- 1 mysql mysql 6 Aug 22 21:28 db.pid
-rw-r----- 1 mysql mysql 8093 Aug 22 21:28 error.log
-rw-r----- 1 mysql mysql 4447 Aug 22 21:28 ib_buffer_pool
-rw-r----- 1 mysql mysql 1073741824 Aug 22 22:28 ibdata1
-rw-r----- 1 mysql mysql 2147483648 Aug 22 22:28 ib_logfile0
-rw-r----- 1 mysql mysql 2147483648 Aug 22 21:10 ib_logfile1
-rw-r----- 1 mysql mysql 12582912 Aug 22 21:28 ibtmp1
drwxr-x--- 2 mysql mysql 143 Aug 22 21:10 mysql
-rw-r----- 1 mysql mysql 178 Aug 22 21:10 mysql-bin.000001
-rw-r----- 1 mysql mysql 155 Aug 22 21:20 mysql-bin.000002
-rw-r----- 1 mysql mysql 178 Aug 22 21:28 mysql-bin.000003
-rw-r----- 1 mysql mysql 471 Aug 22 22:28 mysql-bin.000004
-rw-r----- 1 mysql mysql 116 Aug 22 21:28 mysql-bin.index
-rw-r----- 1 mysql mysql 25165824 Aug 22 22:28 mysql.ibd
drwxr-x--- 2 mysql mysql 4096 Aug 22 21:10 performance_schema
-rw------- 1 mysql mysql 1680 Aug 22 21:10 private_key.pem
-rw-r--r-- 1 mysql mysql 452 Aug 22 21:10 public_key.pem
-rw-r--r-- 1 mysql mysql 1112 Aug 22 21:10 server-cert.pem
-rw------- 1 mysql mysql 1680 Aug 22 21:10 server-key.pem
-rw-r----- 1 mysql mysql 1052 Aug 22 22:28 slow.log
drwxr-x--- 2 mysql mysql 28 Aug 22 21:10 sys
-rw-r----- 1 mysql mysql 10485760 Aug 22 21:28 undo_001
-rw-r----- 1 mysql mysql 10485760 Aug 22 22:28 undo_002
注:多了很多.pem文件,没有了.frm文件。而且undo日志文件从系统表空间拆分出来了。系统表和数据字典信息都存储在mysql.ibd文件中。
MySQL数据库正常关闭方式,命令如下:
/usr/local/mysql/bin/mysqladmin -uroot -proot123 shutdown'
对于以上关于MySQL8.0二进制免编译包安装部署过程,大家是不是觉得非常有帮助。如果需要了解更多内容,请继续关注我们的行业资讯,相信你会喜欢上这些内容的。
免责声明:本站发布的内容(图片、视频和文字)以原创、转载和分享为主,文章观点不代表本网站立场,如果涉及侵权请联系站长邮箱:is@yisu.com进行举报,并提供相关证据,一经查实,将立刻删除涉嫌侵权内容。


