实验目的
1.掌握简单的组件(TextView,EditText,Button)使用
2.掌握点击事件的使用
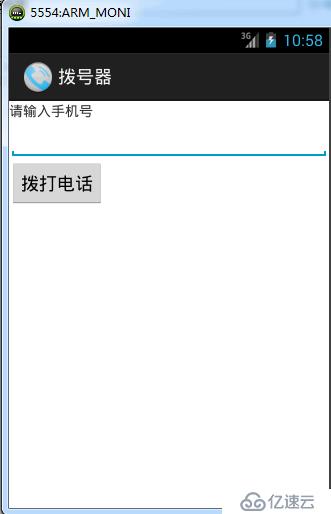
电话拔号器效果图
界面布局代码:
<RelativeLayout xmlns:android="http://schemas.android.com/apk/res/android"
    xmlns:tools="http://schemas.android.com/tools"
    android:layout_width="match_parent"
    android:layout_height="match_parent" >
  <TextView
      android:id="@+id/title"
      android:layout_width="wrap_content"
      android:layout_height="wrap_content"
      android:text="@string/title"/>

  <EditText
      android:id="@+id/phoneNumber"
      android:layout_width="match_parent"
      android:layout_height="wrap_content"
      android:inputType="phone"
      android:layout_below="@id/title"/>

  <Button
      android:id="@+id/button"
      android:layout_width="wrap_content"
      android:layout_height="wrap_content"
      android:text="@string/callPhone"
      android:layout_below="@id/phoneNumber"/>
</RelativeLayout>
Java代码实现拨打电话:
 @Override
    protected void onCreate(Bundle savedInstanceState) {
        super.onCreate(savedInstanceState);
        setContentView(R.layout.main);

        Button  button=(Button) findViewById(R.id.button);
        button.setOnClickListener(this);
    }
    @Override
    public void onClick(View v) {
       //1.获取输入的电话号码
        EditText et=(EditText) findViewById(R.id.phoneNumber);
        String number=et.getText().toString();
       //2.创建打电话意图
        Intent intent=new Intent();
        intent.setAction(intent.ACTION_CALL);
        intent.setData(Uri.parse("tel:"+number));
        startActivity(intent);
    }
注意 在AndroidManifest.xml添加拨打电话的权限
<uses-permission android:name="android.permission.CALL_PHONE"/>
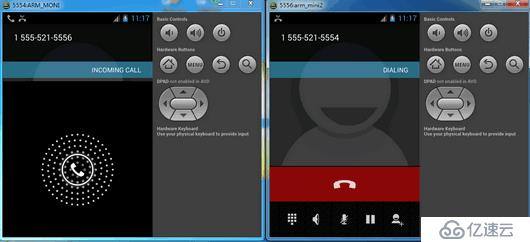
测试:
免责声明:本站发布的内容(图片、视频和文字)以原创、转载和分享为主,文章观点不代表本网站立场,如果涉及侵权请联系站长邮箱:is@yisu.com进行举报,并提供相关证据,一经查实,将立刻删除涉嫌侵权内容。


