[TOC]
这种情况非集群配置方式,比较简单,可以直接参考我整理的《Flume笔记整理》,其基本结构图如下:

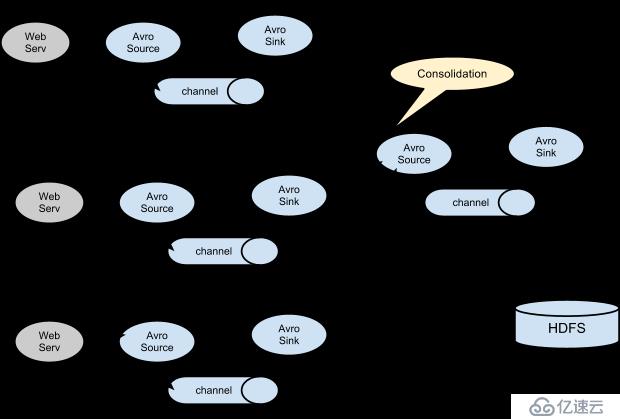
结构图如下:

说明如下:
即可以把我们的Agent部署在不同的节点上,上面是两个Agent的情况。其中Agent foo可以部署在日志产生的节点上,
比如,可以是我们web服务器例如tomcat或者nginx的节点上,foo的source可以配置为监控日志文件数据的变化,
channel则可以基于内存或基于文件进行存储,而sink即日志落地可以配置为avro,即输出到下一个Agent中。

Agent bar可以部署在另一个节点上,当然跟foo在同一个节点也是没有问题,因为本身Flume是可以多个实例在同一个
节点上运行的。bar主要作用是收集来自不同avro source的节点的日志数据,实际上,如果我们的web环境是集群的,
那么web服务器就会有多个节点,这时就有多个web服务器节点产生日志,我们需要在这多个web服务器上都部署agent,
此时,bar的source就会有多个,后面的案例正是如此,不过在这个小节中,只讨论多个agent一个source的情况。
而对于agent bar的数据下沉方式,也是可以选择多种方式,详细可以参考官网文档,这里选择sink为HDFS。

不过需要注意的是,在agent foo中,source只有一个,在后面的案例中,会配置多个source,即在这一个agent中,
可以采集不同的日志文件,后面要讨论的多个source,指的是多个不同日志文件的来源,即foo中的多个source,例如
data-access.log、data-ugctail.log、data-ugchead.log等等。如下:

即这里有两个节点:
uplooking01:
其中的日志文件 /home/uplooking/data/data-clean/data-access.log
为web服务器生成的用户访问日志,并且每天会产生一个新的日志文件。
在这个节点上,我们需要部署一个Flume的Agent,其source为该日志文件,sink为avro。

uplooking03:
这个节点的作用主要是收集来自不同Flume Agent的日志输出数据,例如上面的agent,然后输出到HDFS中。

说明:在我的环境中,有uplooking01 uplooking02 uplooking03三个节点,并且三个节点配置了Hadoop集群。#########################################################
##
##主要作用是监听文件中的新增数据,采集到数据之后,输出到avro
## 注意:Flume agent的运行,主要就是配置source channel sink
## 下面的a1就是agent的代号,source叫r1 channel叫c1 sink叫k1
#########################################################
a1.sources = r1
a1.sinks = k1
a1.channels = c1
#对于source的配置描述 监听文件中的新增数据 exec
a1.sources.r1.type = exec
a1.sources.r1.command = tail -F /home/uplooking/data/data-clean/data-access.log
#对于sink的配置描述 使用avro日志做数据的消费
a1.sinks.k1.type = avro
a1.sinks.k1.hostname = uplooking03
a1.sinks.k1.port = 44444
#对于channel的配置描述 使用文件做数据的临时缓存 这种的安全性要高
a1.channels.c1.type = file
a1.channels.c1.checkpointDir = /home/uplooking/data/flume/checkpoint
a1.channels.c1.dataDirs = /home/uplooking/data/flume/data
#通过channel c1将source r1和sink k1关联起来
a1.sources.r1.channels = c1
a1.sinks.k1.channel = c1#########################################################
##
##主要作用是监听avro,采集到数据之后,输出到hdfs
## 注意:Flume agent的运行,主要就是配置source channel sink
## 下面的a1就是agent的代号,source叫r1 channel叫c1 sink叫k1
#########################################################
a1.sources = r1
a1.sinks = k1
a1.channels = c1
#对于source的配置描述 监听avro
a1.sources.r1.type = avro
a1.sources.r1.bind = 0.0.0.0
a1.sources.r1.port = 44444
#对于sink的配置描述 使用log日志做数据的消费
a1.sinks.k1.type = hdfs
a1.sinks.k1.hdfs.path = /input/data-clean/access/%y/%m/%d
a1.sinks.k1.hdfs.filePrefix = flume
a1.sinks.k1.hdfs.fileSuffix = .log
a1.sinks.k1.hdfs.inUsePrefix = tmpFlume
a1.sinks.k1.hdfs.inUseSuffix = .tmp
a1.sinks.k1.hdfs.useLocalTimeStamp = true
a1.sinks.k1.hdfs.round = true
a1.sinks.k1.hdfs.roundValue = 10
a1.sinks.k1.hdfs.roundUnit = second
#配置下面两项后,保存到HDFS中的数据才是文本
#否则通过hdfs dfs -text查看时,显示的是经过压缩的16进制
a1.sinks.k1.hdfs.serializer = TEXT
a1.sinks.k1.hdfs.fileType = DataStream
#对于channel的配置描述 使用内存缓冲区域做数据的临时缓存
a1.channels.c1.type = memory
a1.channels.c1.capacity = 1000
a1.channels.c1.transactionCapacity = 100
#通过channel c1将source r1和sink k1关联起来
a1.sources.r1.channels = c1
a1.sinks.k1.channel = c1首先要确保会有日志生成,其输出为/home/uplooking/data/data-clean/data-access.log。
在uplooking03上启动Flume Agent:
[uplooking@uplooking03 flume]$ flume-ng agent -n a1 -c conf --conf-file conf/flume-source-avro.conf -Dflume.root.logger=INFO,console在uplooking01上启动Flume Agent:
flume-ng agent -n a1 -c conf --conf-file conf/flume-sink-avro.conf -Dflume.root.logger=INFO,console一段时间后,便可以在hdfs中看到写入的日志文件:
[uplooking@uplooking02 ~]$ hdfs dfs -ls /input/data-clean/access/18/04/07
18/04/07 08:52:02 WARN util.NativeCodeLoader: Unable to load native-hadoop library for your platform... using builtin-java classes where applicable
Found 26 items
-rw-r--r--   3 uplooking supergroup       1131 2018-04-07 08:50 /input/data-clean/access/18/04/07/flume.1523062248369.log
-rw-r--r--   3 uplooking supergroup       1183 2018-04-07 08:50 /input/data-clean/access/18/04/07/flume.1523062248370.log
-rw-r--r--   3 uplooking supergroup       1176 2018-04-07 08:50 /input/data-clean/access/18/04/07/flume.1523062248371.log
......
查看文件中的数据:
[uplooking@uplooking02 ~]$ hdfs dfs -text /input/data-clean/access/18/04/07/flume.1523062248369.log
18/04/07 08:55:07 WARN util.NativeCodeLoader: Unable to load native-hadoop library for your platform... using builtin-java classes where applicable
1000    220.194.55.244  null    40604   0       POST /check/init HTTP/1.1       500     null    Mozilla/5.0 (Windows NT 6.1; WOW64) AppleWebKit/537.36 (KHTML, like Gecko) Chrome/59.0.3071.115 Safari/537.3      1523062236368
1002    221.8.9.6 80    886a1533-38ca-466c-86e1-0b84022f781b    20201   1       GET /top HTTP/1.0       500     null      Mozilla/5.0 (Windows NT 6.1; WOW64) AppleWebKit/537.36 (KHTML, like Gecko) Chrome/59.0.3071.115 Safari/537.3      1523062236869
1002    61.172.249.96   99fb19c4-ec59-4abd-899c-4059dea39ead    0       0       POST /updateById?id=21 HTTP/1.1 408       null    Mozilla/5.0 (Windows NT 6.1; WOW64; Trident/7.0; rv:11.0) like Gecko    1523062237370
1003    61.172.249.96   886a1533-38ca-466c-86e1-0b84022f781b    10022   1       GET /tologin HTTP/1.1   null    /update/pass      Mozilla/5.0 (Windows; U; Windows NT 5.1)Gecko/20070309 Firefox/2.0.0.3  1523062237871
1003    125.39.129.67   6839fff8-7b3a-48f5-90cd-0f45c7be1aeb    10022   1       GET /tologin HTTP/1.0   408     null      Mozilla/5.0 (Windows; U; Windows NT 5.1)Gecko/20070309 Firefox/2.0.0.3  1523062238372
1000    61.172.249.96   89019ae0-6140-4e5a-9061-e3af74f3e4a8    10022   1       POST /stat HTTP/1.1     null    /passpword/getById?id=11  Mozilla/4.0 (compatible; MSIE 5.0; WindowsNT)   1523062238873
如果在uplooking03的Flume agent不配置hdfs.serializer=TEXT和hdfs.fileType=DataStream,那么上面查看到的数据会是16进制数据。
如下:
在我们的环境中,如下: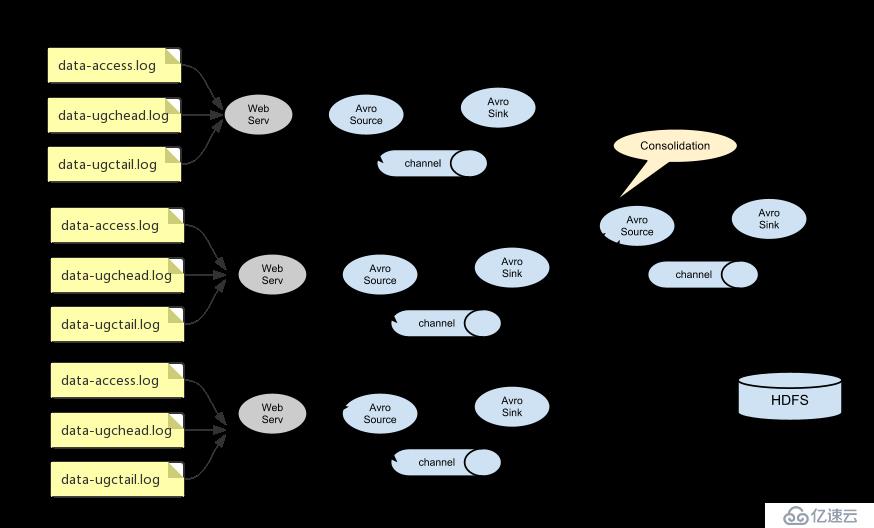
即在我们的环境中,日志源有三份,分别是data-access.log、data-ugchead.log、data-ugctail.log
不过在下面的实际配置中,日志源的agent我们只使用两个,uplooking01和uplooking02,它们的sink都
输出到uplooking03的source中。uplooking01和uplooking02的配置都是一样的,如下:
#########################################################
##
##主要作用是监听文件中的新增数据,采集到数据之后,打印在控制台
##    注意:Flume agent的运行,主要就是配置source channel sink
##  下面的a1就是agent的代号,source叫r1 channel叫c1 sink叫k1
#########################################################
a1.sources = r1 r2 r3
a1.sinks = k1
a1.channels = c1

#对于source r1的配置描述 监听文件中的新增数据 exec
a1.sources.r1.type = exec
a1.sources.r1.command  = tail -F /home/uplooking/data/data-clean/data-access.log
a1.sources.r1.interceptors = i1 i2
a1.sources.r1.interceptors.i1.type = static
##静态的在header中添加一个key value,下面就配置了两个拦截器,i1和i2
a1.sources.r1.interceptors.i1.key = type
a1.sources.r1.interceptors.i1.value = access
a1.sources.r1.interceptors.i2.type = timestamp
## timestamp的作用:这里配置了的话,在负责集中收集日志的flume agent就不需要配置
## a1.sinks.k1.hdfs.useLocalTimeStamp = true也能通过这些%y/%m/%d获取时间信息
## 这样一来的话,就可以减轻集中收集日志的flume agent的负担,因为此时的时间信息可以直接从source中获取

#对于source r2的配置描述 监听文件中的新增数据 exec
a1.sources.r2.type = exec
a1.sources.r2.command  = tail -F /home/uplooking/data/data-clean/data-ugchead.log
a1.sources.r2.interceptors = i1 i2
a1.sources.r2.interceptors.i1.type = static
##静态的在header中添加一个key value,下面就配置了两个拦截器,i1和i2
a1.sources.r2.interceptors.i1.key = type
a1.sources.r2.interceptors.i1.value = ugchead
a1.sources.r2.interceptors.i2.type = timestamp

#对于source r3的配置描述 监听文件中的新增数据 exec
a1.sources.r3.type = exec
a1.sources.r3.command  = tail -F /home/uplooking/data/data-clean/data-ugctail.log
a1.sources.r3.interceptors = i1 i2
a1.sources.r3.interceptors.i1.type = static
##静态的在header中添加一个key value,下面就配置了两个拦截器,i1和i2
a1.sources.r3.interceptors.i1.key = type
a1.sources.r3.interceptors.i1.value = ugctail
a1.sources.r3.interceptors.i2.type = timestamp

#对于sink的配置描述 使用avro日志做数据的消费
a1.sinks.k1.type = avro
a1.sinks.k1.hostname = uplooking03
a1.sinks.k1.port = 44444

#对于channel的配置描述 使用文件做数据的临时缓存 这种的安全性要高
a1.channels.c1.type = file
a1.channels.c1.checkpointDir = /home/uplooking/data/flume/checkpoint
a1.channels.c1.dataDirs = /home/uplooking/data/flume/data

#通过channel c1将source r1 r2 r3和sink k1关联起来
a1.sources.r1.channels = c1
a1.sources.r2.channels = c1
a1.sources.r3.channels = c1
a1.sinks.k1.channel = c1uplooking03的配置如下:
#########################################################
##
##主要作用是监听avro,采集到数据之后,输出到hdfs
##    注意:Flume agent的运行,主要就是配置source channel sink
##  下面的a1就是agent的代号,source叫r1 channel叫c1 sink叫k1
#########################################################
a1.sources = r1
a1.sinks = k1
a1.channels = c1

#对于source的配置描述 监听avro
a1.sources.r1.type = avro
a1.sources.r1.bind = 0.0.0.0
a1.sources.r1.port = 44444

#对于sink的配置描述 使用log日志做数据的消费
a1.sinks.k1.type = hdfs
a1.sinks.k1.hdfs.path = /input/data-clean/%{type}/%Y/%m/%d
a1.sinks.k1.hdfs.filePrefix = %{type}
a1.sinks.k1.hdfs.fileSuffix = .log
a1.sinks.k1.hdfs.inUseSuffix = .tmp
a1.sinks.k1.hdfs.round = true
a1.sinks.k1.hdfs.rollInterval = 0
a1.sinks.k1.hdfs.rollCount = 0
a1.sinks.k1.hdfs.rollSize = 10485760
# 如果希望上面配置的日志文件滚动策略生效,则必须要配置下面这一项
a1.sinks.k1.hdfs.minBlockReplicas = 1
#配置下面两项后,保存到HDFS中的数据才是文本
#否则通过hdfs dfs -text查看时,显示的是经过压缩的16进制
a1.sinks.k1.hdfs.serializer = TEXT
a1.sinks.k1.hdfs.fileType = DataStream

#对于channel的配置描述 使用内存缓冲区域做数据的临时缓存
a1.channels.c1.type = memory
a1.channels.c1.capacity = 1000
a1.channels.c1.transactionCapacity = 100

#通过channel c1将source r1和sink k1关联起来
a1.sources.r1.channels = c1
a1.sinks.k1.channel = c1首先需要保证uplooking01和uplooking02上都能正常地产生日志。
在uplooking03上启动Agent:
[uplooking@uplooking03 flume]$ flume-ng agent -n a1 -c conf --conf-file conf/flume-source-avro.conf -Dflume.root.logger=INFO,console分别在uplooking01和uplooking02上启动Agent:
flume-ng agent -n a1 -c conf --conf-file conf/flume-sink-avro.conf -Dflume.root.logger=INFO,console一段时间后,可以在HDFS中查看相应的日志文件:
$ hdfs dfs -ls /input/data-clean
18/04/08 01:34:36 WARN util.NativeCodeLoader: Unable to load native-hadoop library for your platform... using builtin-java classes where applicable
Found 3 items
drwxr-xr-x   - uplooking supergroup          0 2018-04-07 22:00 /input/data-clean/access
drwxr-xr-x   - uplooking supergroup          0 2018-04-07 22:00 /input/data-clean/ugchead
drwxr-xr-x   - uplooking supergroup          0 2018-04-07 22:00 /input/data-clean/ugctail
查看某个日志目录下的日志文件:
[uplooking@uplooking02 data-clean]$ hdfs dfs -ls /input/data-clean/access/2018/04/07
18/04/08 01:35:27 WARN util.NativeCodeLoader: Unable to load native-hadoop library for your platform... using builtin-java classes where applicable
Found 2 items
-rw-r--r--   3 uplooking supergroup    2447752 2018-04-08 01:02 /input/data-clean/access/2018/04/08/access.1523116801502.log
-rw-r--r-- 3 uplooking supergroup 5804 2018-04-08 01:02 /input/data-clean/access/2018/04/08/access.1523120538070.log.tmp可以看到日志文件数量非常少,那是因为前面在配置uplooking03的agent时,日志文件滚动的方式为,单个文件满10M再进行切分日志文件。
免责声明:本站发布的内容(图片、视频和文字)以原创、转载和分享为主,文章观点不代表本网站立场,如果涉及侵权请联系站长邮箱:is@yisu.com进行举报,并提供相关证据,一经查实,将立刻删除涉嫌侵权内容。


